
63
VENUS - GIOIA
EN
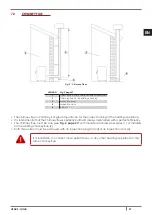
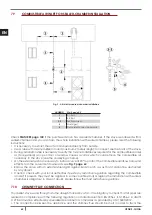
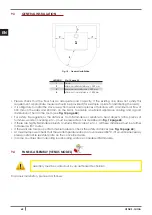
draught and to avoid condensation in the pipes.
•
The fume conduit should be equivalent or longer than the outlet joint ones (Ø 80 mm).
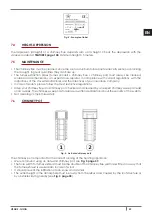
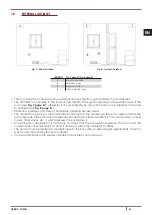
• Some stove models are endowed with a lateral and/or back exhaust. Check that the unused exhaust is
sealed with the plug given with standard equipment.
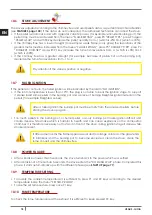
SYSTEM TYPE
Ø80 mm PIPE
Ø100 mm PIPE
Minimum vertical length
1,5 mt
2 mt
Maximum length (with 1 union)
6,5 mt
10 mt
Maximum length (with 3 unions)
4,5 mt
8 mt
Maximum number of unions
3
3
Level section (minimum inclination 3%)
2 mt
2 mt
Installation at a height above 1200 m a.s.l.
NO
Obligatory
• Use a plate pipe for stoves of Ø80 mm or Ø100 mm depending on the type of system and with silicone
gaskets.
•
It is forbidden to use metal, fibre cement or aluminium flexible pipes.
• For change of direction it is obligatory always to use a union (with angle > 90°) with inspection plug
which enables an easy periodic cleaning of the pipes.
•
Please assure you that after the cleaning the inspection plugs are sealed with its efficient gasket.
• It is forbidden to connect more appliances to the same fume conduit.
• It is forbidden to convey in the same fume conduit exhausts from overhanging cooker hoods.
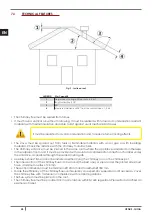
•
It is forbidden to exhaust flue gases directly from the wall towards the outside and closed spaces also
at open top.
• It is forbidden to connect any other appliance (wood stoves, cooker hoods, boilers, etc...).
•
The fume conduit must be placed at a distance of minimum 500 mm from flammable or heat-susceptible
components.
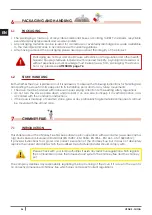
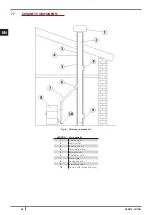
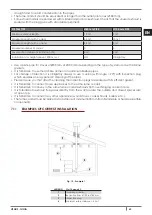
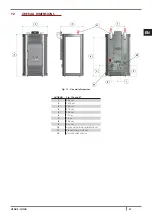
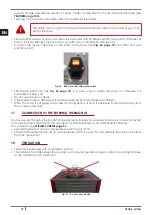
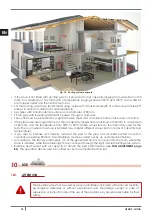
7.11
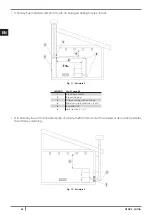
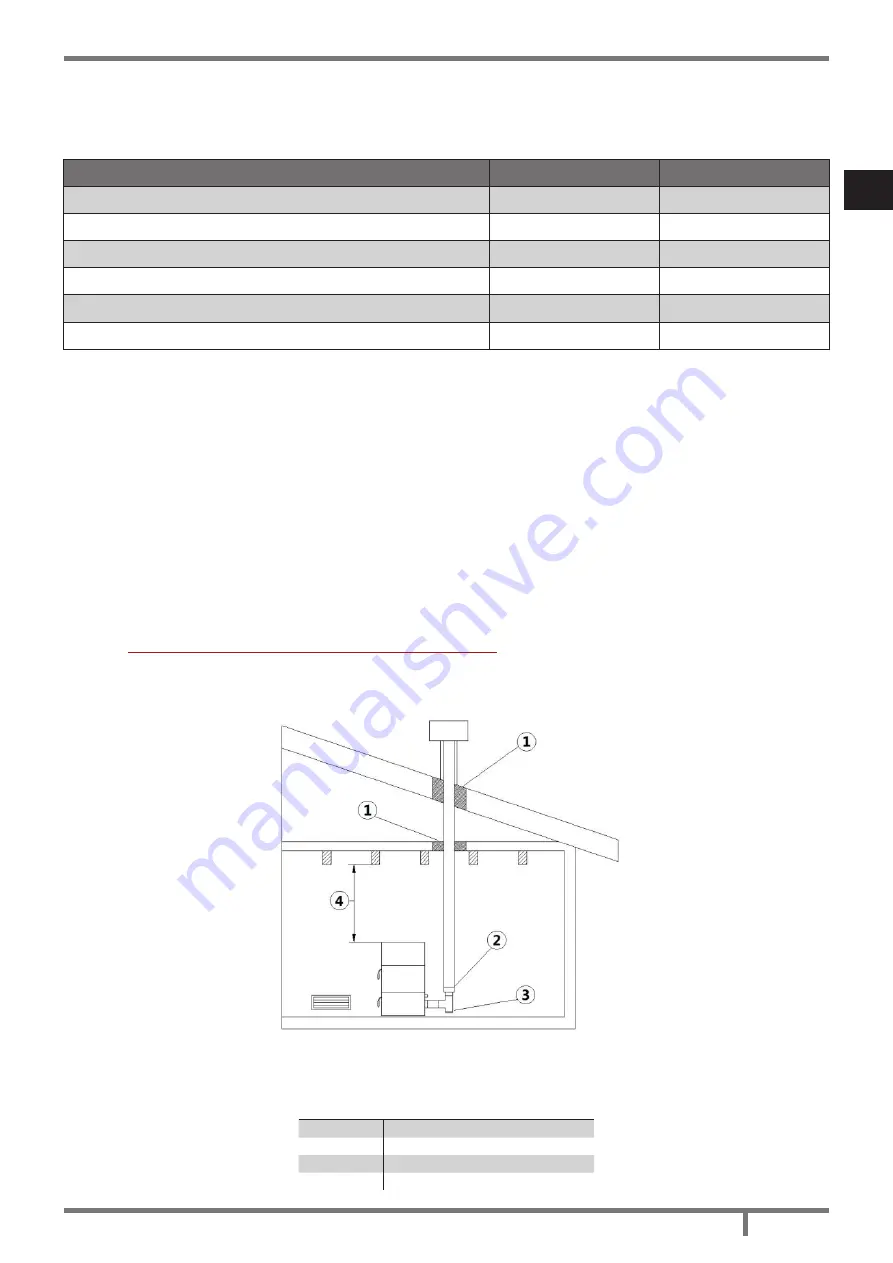
EXAMPLES OF CORRECT INSTALLATION
Fig. 10 - Example 1
LEGEND
Fig. 10 page 63
1
Insulating material
2
Reduction from Ø100 to Ø80 mm
3
Inspection plug
4
Minimum safety distance = 0,5 mt
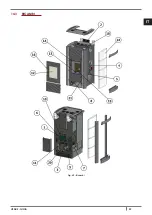
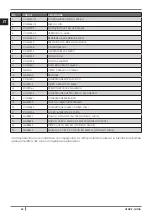
Summary of Contents for VENUS
Page 2: ......
Page 49: ...49 VENUS GIOIA IT 14 3 RICAMBI Fig 60 Ricambi...
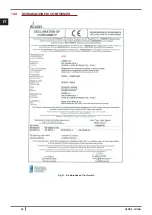
Page 52: ...52 VENUS GIOIA IT 14 4 DICHIARAZIONE DI CONFORMIT Fig 61 Dichiarazione di Conformit...
Page 98: ...98 VENUS GIOIA EN 14 3 SPARE PARTS Fig 60 Spare parts...
Page 101: ...101 VENUS GIOIA EN 14 5 DECLARATION OF CONFORMITY Fig 61 Declaration of Conformity...
Page 148: ...148 VENUS GIOIA FR 14 3 PI CES D TACH ES Fig 60 Pi ces d tach es...
Page 151: ...151 VENUS GIOIA FR 14 5 D CLARATION DE CONFORMIT Fig 61 D claration de Conformit...
Page 197: ...197 VENUS GIOIA ES 14 3 REPUESTOS Fig 60 Repuestos...
Page 200: ...200 VENUS GIOIA ES 14 5 DECLARACI N DE CONFORMEDAD Fig 61 Declaraci n de conformedad...
Page 247: ...247 VENUS GIOIA NL 14 3 RESERVEONDERDELEN Fig 60 Reserveinderdelen...
Page 250: ...250 VENUS GIOIA NL 14 5 CONFORMITEITSVERKLARING Fig 61 Conformiteitsverklaring...
Page 297: ...297 VENUS GIOIA PT 14 3 PE AS SOBRESSALENTES Fig 60 Pe as sobressalentes...
Page 300: ...300 VENUS GIOIA PT 14 5 DECLARA O DE CONFORMIDADE Fig 61 Declara o de conformidade...
Page 302: ...302 VENUS GIOIA EL 1 MANUAL...
Page 305: ...305 VENUS GIOIA EL 7 2 Fig 2 LEGEND Fig 2 305 1 2 3 4 5 3 5 mt Fig 2 305 1 2 3 u 4...
Page 307: ...307 VENUS GIOIA EL Fig 4 7 4 350 3 5 meters 7 5 7 6 Fig 5 Fig 5 307 Fig 3 306...
Page 308: ...308 VENUS GIOIA EL 7 7 Fig 6 LEGEND Fig 6 308 1 2 3 4 5 6 7 8 9 10...
Page 312: ...312 VENUS GIOIA EL 7 11 Fig 10 1 LEGEND Fig 10 312 1 2 100 80 mm 3 4 0 5 mt 120 mm Fig 11 2...
Page 319: ...319 VENUS GIOIA EL Fig 23 Fig 24 2 Fig 23 319 Fig 24 319 Fig 25 Fig 25 319 9 6 350...
Page 323: ...323 VENUS GIOIA EL 10 10 1 10 2 1 2 pellet 1 5...
Page 333: ...333 VENUS GIOIA EL 12 12 1 12 2 2 Fig 37 Fig 38 Fig 39 Fig 37 333 Fig 38 333 Fig 39 333...
Page 335: ...335 VENUS GIOIA EL 12 4 4 8 Fig 44 Fig 45 2 Fig 44 335 Fig 45 335 12 5 Fig 46...
Page 339: ...339 VENUS GIOIA EL 12 13 12 14 700 C...
Page 341: ...341 VENUS GIOIA EL AL 5 NO IGNITION Pellet pellets AL 6 NO PELLET AL 7 THERMAL SAFETY...
Page 342: ...342 VENUS GIOIA EL AL 8 FAILURE DEPRESS pellets 304 AL 9 OPEN DOOR...
Page 343: ...343 VENUS GIOIA EL 13 2 4A 250V pellet ACTIVE ALARM...
Page 345: ...345 VENUS GIOIA EL WORK MODULATI...
Page 346: ...346 VENUS GIOIA EL 14 14 1 WIRING SCHEME Fig 58 Wiring scheme 14 2 Fig 59 347...
Page 347: ...347 VENUS GIOIA EL Fig 59 Fig 60 348 3 5 8 7 10 9 6 1 4 3 3 2...
Page 348: ...348 VENUS GIOIA EL 14 3 Fig 60...
Page 351: ...351 VENUS GIOIA EL 14 5 Fig 61...


