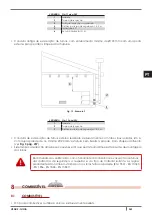


277
VENUS - GIOIA
PT
10.9
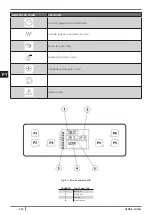
SET TEMPERATURA
•
Para modificar a temperatura ambiente, basta pressionar as teclas P1 e P2 conforme a temperatura
desejada mostrando “SET TEMP AMBIENTE”.
•
Para ver a temperatura configurada, pressionar apenas uma vez a tecla P1.
10.10
TEMPERATURA DE FUMOS
Para verificar a temperatura dos fumos em saída pela descarga, basta manter pressionar a tecla P2.
10.11
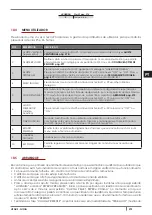
DESLIGAMENTO
Para desligar a estufa, manter pressionando a tecla P4: aparece a mensagem “LIMPEZA FINAL” no
ecrã. Após cerca de 10 minutos, desliga-se também o aspirador de fumos (isto acontece sempre
independentemente que a esteja quente ou fria). Depois será exibido “APAGADO”.
Se os pellets são de péssima qualidade (contendo colas, óleos, tintas, resíduos
plásticos ou se é farinhento), durante o funcionamento formarão resíduos ao longo
do tubo de descarga de pellets. Uma vez desligada a estufa, estes resíduos poderão
formar pequenos veios que subindo ao longo do tubo poderão chegar até aos pellets
no reservatório carbonizando-os e criando desta forma um fumo denso e nocivo no
interior do local. Manter sempre fechado o reservatório com a sua cobertura. Se o
tubo estiver sujo, limpá-lo (ver
INTRODUÇÃO pág. 282
).
10.12
CONFIGURAÇÕES DE RELÓGIO
• Pressionar a tecla P3 e depois a tecla P5 até destacar o menu (02) “AJUSTE RELOGIO”.
• Pressionar uma vez P3 (DIA) e através das teclas P1 e P2 selecionar o dia da semana (segunda, terça,
quarta, quinta, sexta, sábado ou domingo).
•
Pressionar uma segunda vez a tecla P3 (HORAS) e através das teclas P1 e P2 configurar as horas.
•
Pressionar uma terceira vez a tecla P3 (MINUTOS) e através das teclas P1 e P2 configurar os minutos.
•
Pressionar uma quarta vez a tecla P3 (DIA) e através das teclas P1 e P2 configurar o dia do mês (1, 2, 3
…29, 30, 31).
•
Pressionar uma quinta vez a tecla P3 (MÊS) e através das teclas P1 e P2 configurar o mês.
•
Pressionar uma sexta vez a tecla P3 (ANO) e através das teclas P1 e P2 configurar o ano.
• Para sair do programa pressionar duas vezes P4.
10.13
PROGRAMAÇÃO DIÁRIA
Permite ativar, desativar e configurar as funções do cronotermostato diário. Pressionar a tecla P3 e depois
a tecla P5 até destacar o menu (03) “AJUSTE PROGRAM”. Pressionar uma vez a tecla P3 e através das
teclas P5 e P6 selecionar “PROGRAM DIARIO”. Pressionar uma vez P3, aparece “PROGRAM DIARIO”.
Através das teclas P1 e P2 colocar em ‘’OFF’’ ou ‘’ON’’.
É possível configurar duas faixas de funcionamento delimitadas dos horários configurados.
Depois do “PROGRAM DIARIO”:
• Pressionar P5: aparece a mensagem “START 1”, através das teclas P1 e P2 inserir o valor da hora de
acendimento ou então em “OFF”.
• Pressionar P5: aparece a mensagem “STOP 1”, através das teclas P1 e P2 inserir o valor da hora de
desligamento ou então em “OFF”.
• Pressionar P5: aparece a mensagem “START 2”, através das teclas P1 e P2 inserir o valor da hora de
acendimento ou então em “OFF”.
• Pressionar P5: aparece a mensagem “STOP 2”, através das teclas P1 e P2 inserir o valor da hora de
desligamento ou então em “OFF”.
• Pressionar três vezes a tecla P4 para sair do menu.
Summary of Contents for VENUS
Page 2: ......
Page 49: ...49 VENUS GIOIA IT 14 3 RICAMBI Fig 60 Ricambi...
Page 52: ...52 VENUS GIOIA IT 14 4 DICHIARAZIONE DI CONFORMIT Fig 61 Dichiarazione di Conformit...
Page 98: ...98 VENUS GIOIA EN 14 3 SPARE PARTS Fig 60 Spare parts...
Page 101: ...101 VENUS GIOIA EN 14 5 DECLARATION OF CONFORMITY Fig 61 Declaration of Conformity...
Page 148: ...148 VENUS GIOIA FR 14 3 PI CES D TACH ES Fig 60 Pi ces d tach es...
Page 151: ...151 VENUS GIOIA FR 14 5 D CLARATION DE CONFORMIT Fig 61 D claration de Conformit...
Page 197: ...197 VENUS GIOIA ES 14 3 REPUESTOS Fig 60 Repuestos...
Page 200: ...200 VENUS GIOIA ES 14 5 DECLARACI N DE CONFORMEDAD Fig 61 Declaraci n de conformedad...
Page 247: ...247 VENUS GIOIA NL 14 3 RESERVEONDERDELEN Fig 60 Reserveinderdelen...
Page 250: ...250 VENUS GIOIA NL 14 5 CONFORMITEITSVERKLARING Fig 61 Conformiteitsverklaring...
Page 297: ...297 VENUS GIOIA PT 14 3 PE AS SOBRESSALENTES Fig 60 Pe as sobressalentes...
Page 300: ...300 VENUS GIOIA PT 14 5 DECLARA O DE CONFORMIDADE Fig 61 Declara o de conformidade...
Page 302: ...302 VENUS GIOIA EL 1 MANUAL...
Page 305: ...305 VENUS GIOIA EL 7 2 Fig 2 LEGEND Fig 2 305 1 2 3 4 5 3 5 mt Fig 2 305 1 2 3 u 4...
Page 307: ...307 VENUS GIOIA EL Fig 4 7 4 350 3 5 meters 7 5 7 6 Fig 5 Fig 5 307 Fig 3 306...
Page 308: ...308 VENUS GIOIA EL 7 7 Fig 6 LEGEND Fig 6 308 1 2 3 4 5 6 7 8 9 10...
Page 312: ...312 VENUS GIOIA EL 7 11 Fig 10 1 LEGEND Fig 10 312 1 2 100 80 mm 3 4 0 5 mt 120 mm Fig 11 2...
Page 319: ...319 VENUS GIOIA EL Fig 23 Fig 24 2 Fig 23 319 Fig 24 319 Fig 25 Fig 25 319 9 6 350...
Page 323: ...323 VENUS GIOIA EL 10 10 1 10 2 1 2 pellet 1 5...
Page 333: ...333 VENUS GIOIA EL 12 12 1 12 2 2 Fig 37 Fig 38 Fig 39 Fig 37 333 Fig 38 333 Fig 39 333...
Page 335: ...335 VENUS GIOIA EL 12 4 4 8 Fig 44 Fig 45 2 Fig 44 335 Fig 45 335 12 5 Fig 46...
Page 339: ...339 VENUS GIOIA EL 12 13 12 14 700 C...
Page 341: ...341 VENUS GIOIA EL AL 5 NO IGNITION Pellet pellets AL 6 NO PELLET AL 7 THERMAL SAFETY...
Page 342: ...342 VENUS GIOIA EL AL 8 FAILURE DEPRESS pellets 304 AL 9 OPEN DOOR...
Page 343: ...343 VENUS GIOIA EL 13 2 4A 250V pellet ACTIVE ALARM...
Page 345: ...345 VENUS GIOIA EL WORK MODULATI...
Page 346: ...346 VENUS GIOIA EL 14 14 1 WIRING SCHEME Fig 58 Wiring scheme 14 2 Fig 59 347...
Page 347: ...347 VENUS GIOIA EL Fig 59 Fig 60 348 3 5 8 7 10 9 6 1 4 3 3 2...
Page 348: ...348 VENUS GIOIA EL 14 3 Fig 60...
Page 351: ...351 VENUS GIOIA EL 14 5 Fig 61...