INSTALLING THE TRMIM-10R
Page 3-2
•
If the TRMIM-10R is being installed into an MMAC-8, or MMAC-
8FNB, be sure that a Power Supply Module (PSM or PSM-R) is
installed in the associated rear power supply slot. The PSM or
PSM-R is the source of power for MMAC modules. One PSM or
PSM-R is required for every two MIMs.
NOTE: The PSM-R is a Redundant Power Supply Module, that is
recommended for use with the MMAC-8FNB (equipped with a
Flexible Network Bus).
•
To link several Cabletron Systems' Token Ring products that are
installed in the same MMAC, the MMAC must be configured with
a backplane and the boards must be set to the same ring speed
and in consecutive slots.
Install the TRMIM-10R as follows:
1.
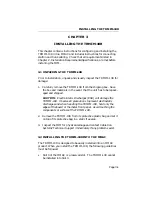
Position the hardware jumper on the proper pins on the TRMIM-
10R to select either 4 or 16 Mbit/sec as the default ring speed (see
Figure 3-1). The speed setting affects the number of stations and
the maximum lobe length. Refer to Chapter 2, Installation
Requirements/Specifications for additional information.
NOTE: The network speed is also selectable by software. The
software selection overrides the hardware jumper selection.
2.
Power the MMAC chassis off, if it is not already powered off, by
unplugging the AC power cord from the wall outlet.
3.
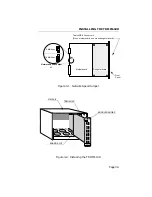
Remove the selected blank panel from the MMAC and slide the
TRMIM-10R (see Figure 3-2) into the MMAC card cage. Be sure
that the board is in the guides at the top and bottom of the card
cage.
4.
Secure the module to the MMAC by tightening the knurled knobs.
Failure to firmly secure the MIM may result in improper opera-
tion.
5.
Power the MMAC chassis on.

