16/36
2021/03 - Version: B Code : 37371
HOTLINE
WOODEN POOLS
BWT myPOOL
POOL’N BOX
filled with water. It could also make it impossible to assemble the pool walls. If necessary, correct defects
by sanding or resurfacing the slab.
Your pool is comprised of several slat references, the positions of the slats are illustrated in
Figure 5
. There
are specific slats to house the pool fittings (skimmer, return fitting). Assembly of this structure is described
step by step in this section.
5.1
Application of the bituminous strips
Start by unrolling the bituminous strip that will insulate the wooden structure from the concrete slab
(
Figure 6
).
Figure 6 – Laying the bituminous strips
5.2
Assembling the slats
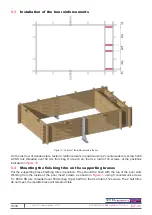
After laying out the first row of slats, make sure that the diagonals are equal.
Lay out the ½ slats that constitute the pool widths, then, in the corners, slot in the slats that constitute the
pool lengths.
Fit the slats together, according to the assembly diagram shown in
Figure 7
and taking care to position the
machined slats correctly (see
Figure 5
). The tongues should always be oriented upwards, and the grooves
downwards.
The female slats and half-slats located on the top of the walls are machined to subsequently
accommodate the liner locking track. The machined section should be oriented towards the inside of
the pool.
While assembling the pool walls, make sure as of the first rows that the slats are fully engaged in the
grooves.
For correct assembly, it may be necessary to use a mallet and clamp to remedy light slat deformations
caused by storage. Do not strike the wooden slats directly, use the protective martyr blocks (sections of
slat approximately 30 cm long, supplied.
After assembling the first row, check that the slats are perfectly level, make any corrections necessary,
then screw the slats constituting the pool lengths together:
•
fix them to the 2 supporting braces (these are pre-drilled, as shown in
Figure 8
) using the 14 A2 SS
torx hinge screws 6 × 30 (bag C).
•
screw them together as shown in
Figure 9
using 2 screws per slat pair, and on the two sides
comprising 5 full slats and one half-slat, that is a total of 24 countersunk 5 x 40 A4 SS torx screws
threaded over 25 mm (bag B) .


