16
SERVICE (CONT.)
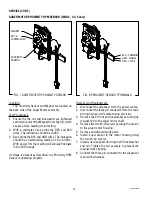
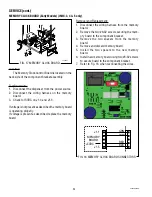
AUGER MOTOR PROXIMITY RPM SENSOR (IMIX-3, 4 & 5 only)
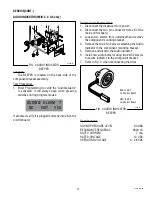
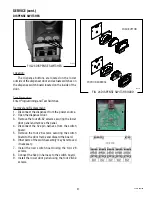
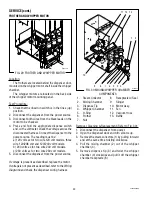
FIG. 7 AUGER MOTOR PROXIMITY SENSOR
MAGNET
PROXIMITY
SENSOR
NUT &
LOCKWASHER
FIG. 8 PROXIMITY SENSOR TERMINALS
BLK - COMMON
GRN - SIGNAL
RED - +5VDC
Location:
The Proximity Sensor and Magnet are located on
the back side of the Auger Motor assembly.
Test Procedures:
1. Ensure the the nut and lockwasher are tightened
securely to prevent the Magnet from slipping, which
causes a false reading when testing.
2. With a voltmeter, back probe the RED and BLK
wires. The indication should be +5VDC.
3. Back probe the BLK and GRN wires. The indication
should be an alternating reading of 5-0-5-0VDC.
With power ON, the reading will actually fluctuate
in the 3VDC range.
If voltage is present as described, the Proximity RPM
Sensor is operating properly.
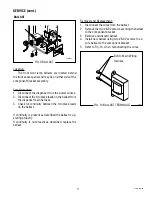
Removal and Replacement:
1. Disconnect the dispenser from the power source.
2. Disconnect the three pin connector from the main
wirring harnes of the motor being serviced.
3. Remove the #10 nut and lockwasher securing the
magnet hub to the auger motor shaft.
4. Remove the two #4-40 screws securing the sensor
to the auger motor housing.
5. Remove and discard faulty parts.
6. Install a new sensor to the motor housing using
the two #4-40 screws.
7. Install a new magnet hub using the #10 lockwasher
and nut. Tighten the nut securely to prevent the
magnet from slipping.
8. Connect the three pin connector to the dispenser
main wiring harness.
42032 060109
Summary of Contents for IMIX
Page 10: ...10 42032 060109 NOTES ...
Page 46: ...46 42032 060109 ...
Page 48: ...48 42032 060109 ...

