background image

20


Course

Back to Top

Climb Challenge

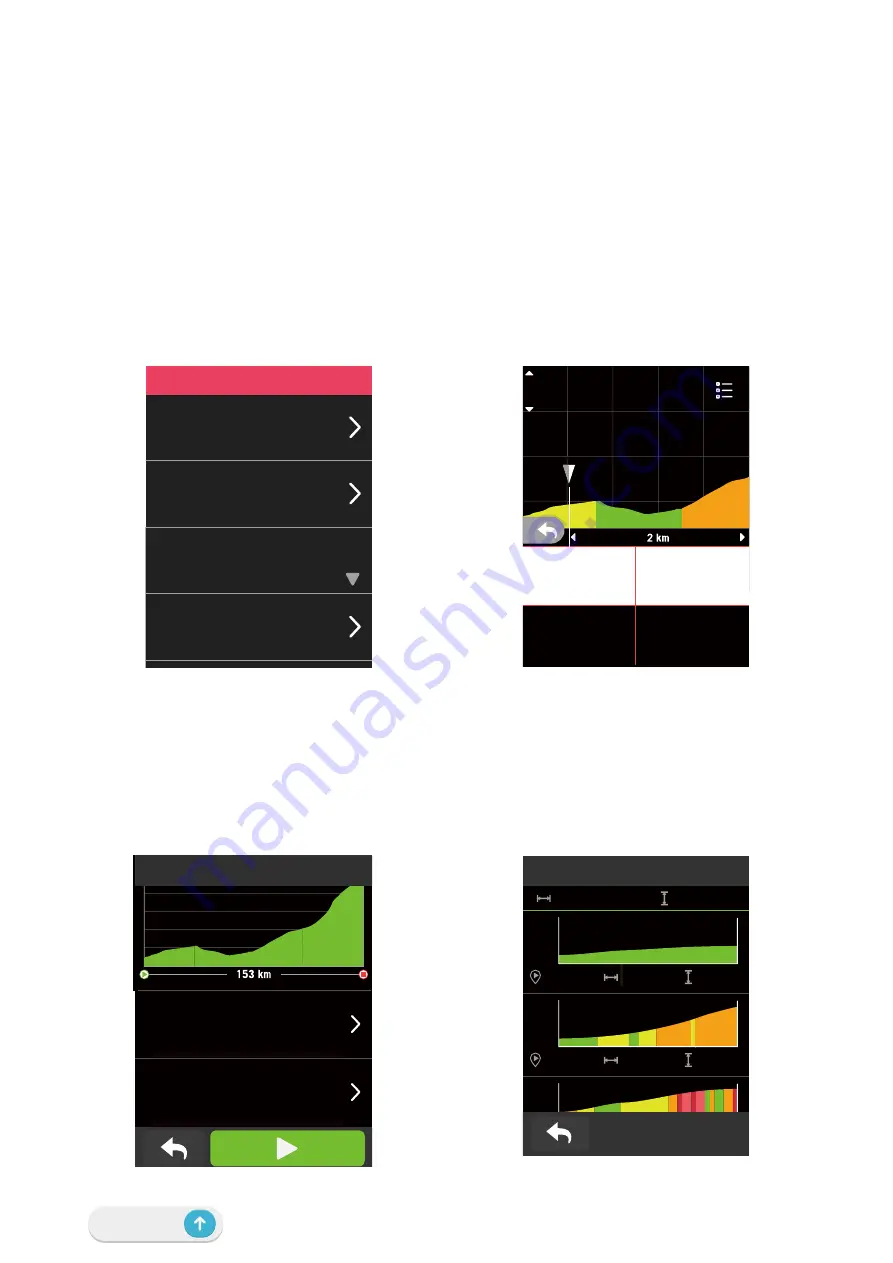
Climb to new heights with the Climb Challenge feature. When approaching a climb, the 
Rider S500 will change to the Climb Section page, providing an overview of a route’s climb 
segments. The Climb Challenge screen also features a graphical summary with multiple 
climbs, vivid color climb segments, distance, altitude & ascent, and start & end points, 
providing easy access and ride information at-a-glance.

You can setup the climb challengae page in the 

Settings > Bike Settings > select a bike profile 

> Ride Config

. Choose to automatically or maunually display the page while riding.  

You can also check the climbs information in the saved route. Go to 

Course

 > 

Route

 > select 

a disred route > 

Climbs

99%

03

CLIMBS

10.3 km

349.0 m

3 km

147 m

01

52.3 km

3.7 km

268 m

4%

2%

02

67.1 km

6%

Data Page

RIDE CONFIG

Quick Status

Alert

Smart Pause

Climb Chall. Page

Auto

99.99

99.99

m

%

Alt. Gain

Gradient

99.99

99.99

m

%

Alt. Gain

Gradient

100 m

16.5

317

1

2.6

%

k

m

Grade

Remaining

Speed

Asc. Remain.

m

3/6

100 m

h

k

m

Climbs

Reverse Route

Mount Hotham Trip

Summary of Contents for Rider 800

Page 1: ...User Manual ...

Page 2: ...nce 18 Reverse 18 Climb Challenge 20 Workout 21 Bryton Test 23 Smart Trainer 24 Navigation 27 Voice Search 27 Pin a Location 28 Navigate on Bryton Active App 25 Retrace 29 Download Maps 30 Results 33 Settings 34 Bike Setup 34 Display 37 Pair Sensors 38 System 42 Altitude 45 About 46 Profile 47 Bryton Advanced Settings 48 Notifications 44 Appendix 45 Specifications 45 Battery Information 46 Install...

Page 3: ...s You are entitled to a replacement or refund for a majory failure and for compensation for any other reasonably forseeable loss or damage You are also entitled to have the goods repaired or replaced if the goods fail to be of acceptable quality and the failure does not amount to a majoy failure Video Tutorial For a step by step demonstration of device and Bryton Active app please scan the QR code...

Page 4: ...k the screen B LAP x When recording press to mark the lap C RECORD x In Cycling mode press to start recording x When recording press to pause recording and enter the Menu D PAGE x In Cycling mode press to switch meter screen pages Reboot Rider Press at the same time to reboot the device Accessories The Rider S500 T SKU comes with the following accessories USB Cable Bike Mount Sport Mount Optional ...

Page 5: ...wer 85 w alories 134 nt t Gain 645 m t t tit i it t itud d d d de 876 Heart R 141 Trip Tim 07 4 Rid 06 k m h m K C A L 3S Power ate 85 1 b p m w d 4 me 45 Calories 1134 me 15 Gradient 2 Alt Gain 645 m Altitude 876 ce 5 r p m m K es 5 m orie 45 ries en 45 nt Cal 64 alor 2 ad 64 adie 2 en Ca G 6 Gra a 2 e m m G p Tim de T 6 1 me 5 Ti 1 me me 15 me 5 Trip T R 0 p Ti i 6 de Rid 06 me Ti 1 Tim e Ti 6 1...

Page 6: ...alue when using a Heart Rate Monitor or a Power sensor The colors will change by different zones which are based on the settings HDU 8 12 2 2 6SHHG HDU 5DWLR 28 2 6 Di2 Battery 80 HDU RPER 36 14 k m h NOTE x Please go to page 55 to see more details for setting Heart Rate Zone and Power Zone x Please go to page 5 to see how to edit data grids in meter page Select Graph in the grid category if you w...

Page 7: ...olor of the top grid will change by different zones which are based on the settings Recording Status Recording Pause Stop Not Recording Recording Sensors Battery Status Critical Good New Active App connecting Status Connected Disconnected 60 Katherine s SPD Katherine s CAD Katherine s HR Katherine s PW Katherine s Di2 Katherine s Radar 08 30AM 01 30 23 215 138 03 02 01 00 40 00 241 142 00 04 49 30...

Page 8: ...HU 2XW RI EDWWHU DWWHU KDUJLQJ 5HFRUGLQJ 5HFRUGLQJ 3DXVHG 1RW 5HFRUGLQJ 5HFRUGLQJ 6WRSSHG 3URILOH 6HWWLQJV 5HVXOW 6WRS 1DYLJDWLQJ FRQ HVFULSWLRQ 1DYLJDWLRQ 5RXWH LVWRU DYRULWH RRP LQ RRP RXW RFDWH XUUHQW 3RVLWLRQ 9RLFH 6HDUFK GG D 3 1 6HDUFK 32 0RYH WKH 0DS RPSDVV 0RGH HDGLQJ 0RGH 5RXWH 6WDUWLQJ 3RLQW 5RXWH QGLQJ 3RLQW 5RXWH LVWDQFH OLPEV QIR FRQ HVFULSWLRQ 6HQVRU 3DLULQJ HDUW 5DWH 6HQVRU 6SHHG 6H...

Page 9: ...st 4 Hours Step 2 Turn On Rider S500 Press to turn on the device Step 3 Initial Setup When powering on the Rider S500 for the first time follow the instruction to complete setup 1 Select the display language 2 Choose the units of measurement 3 Download Bryton Active app and pair the Rider S500 with your cellphone 4 Go through the starting tutorial before riding Road Course Navigation 100 KM KG MI ...

Page 10: ... page and enjoy your ride in free cycling mode x Free ride without recording In cycling mode measurement starts and stops automatically in sync with the movement of the bicycle x Start an exercise and record your data 1 In cycling mode press to start recording press again to pause recording 2 Choose to Discard or Save the result to end riding 3 Choose to go to the meter page to see your cycling da...

Page 11: ... 3 Share Your Records a Click in the right upper corner b Drop FIT BDX GPX file s here or Click Select files to upload tracks c Click Activities to check uploaded tracks Share Your Tracks to Strava com 1 Sign up log in on Strava com a Go to https www strava com b Register for a new account or use your current Strava account to log in 2 Connect to PC Turn on your Rider S500 and connect it to your c...

Page 12: ...the UUID shown on app is as same as your device Select Yes to confirm adding this device If the UUID does not match press NO and try again d Successfully added Turn on Auto Sync Tracks Now new tracks will be automatically uploaded to Bryton Active App NOTE Bryton Active App syncs with Brytonactive com If you already have a brytonactive com account please use the same account to log in to Bryton Ac...

Page 13: ...ons to install Bryton Update Tool Update GPS Data The newer GPS data can speed up the GPS acquisition We higly recommend you to update GPS data for every 1 2 weeks Update Firmware Bryton releases a new firmware version with new functions or on irregular basis to add new functions or fix bugs We highly recommend that you update firmware once the latest version is available It usually takes a while ...

Page 14: ...message will pop up automatically select OK to start the update Or select Firmware Update to start updating c Choose to upadte the firmware with the Bryton cable or Bluetooth You will need a USB C to USB Adapter with Bryton original cable Make sure the smartphone is connected to the device Select the BRYTON root folder to allow Bryton Active app gets permission to access the device for downloading...

Page 15: ...ne via Bluetooth b The update message will pop up automatically select OK to start the update Or select Firmware Update to start updating c Choose to upadte the firmware with Bryton cable or with Bluetooth If you are using the cable please give the app permission to access phone storage ...

Page 16: ...n 3 Go to My Route and select the route Click the in the upper right corner to download the route to your Bryton device 4 In the Device Main Menu navigate to Course Route find the route and tap on to start following the track Import routes from 3rd Party Platforms 1 Download routes in gpx file from 3rd party platform 2 Select Open in Active for iOS or Open files with Bryton Active App for Android 3 S...

Page 17: ... based on your status and stay motivated along the way 1 Go to Course My Routes in Bryton Active App 2 Select the route you would like to add POIs 3 Press POI at the bottom then click Add POI 4 Choose a POI type by selecting the icon Slide your finger on the bar below to place the POI anywhere along your route 5 Press save and name the POI after confirming the position 6 Click the in the upper rig...

Page 18: ...te then Find the planned route in the list 2 Press to start riding Reverse Route Simply upload any Bryton Active Strava Komoot or any other 3rd party route to your Rider S500 and reverse the route swapping the start and end points and other guidance so you can follow a route any way you want to 1 Select Course Route then select a disred route in the list 2 Swipe to the bottom of the page and press...

Page 19: ...e Press to nvigate to the start Press to nvigate to the closest path of the route Without connection with Bryton Active App If the Rider S500 is not connected to the app the map will display a dash line to show you the direaction to the route Press to show the directin to the start Press to display to the closest path of the route Lyell St 561 Lyell St 561 Sherman St 280 Navigate to the starting p...

Page 20: ... a glance You can setup the climb challengae page in the Settings Bike Settings select a bike profile Ride Config Choose to automatically or maunually display the page while riding You can also check the climbs information in the saved route Go to Course Route select a disred route Climbs 99 03 CLIMBS 10 3 km 349 0 m 3 km 147 m 01 52 3 km 3 7 km 268 m 4 2 02 67 1 km 6 Data Page RIDE CONFIG Quick S...

Page 21: ... for a long period by selecting Course Workout Plan to copy from exsisting workout or plan a new workout for different dates 4 Click in the top right to sync the workout plan for the next 7 days Import workout from 3rd party platforms 1 Create a workout plan on TrainingPeaks website 2 Enable TrainingPeaks auto sync in the Course tab or in My Workout 3rd party account link to establish a link with ...

Page 22: ... to workout or select to save the record or click to delete the record 2 Choose to go to the meter page to see your cycling data Then tap on to go back to the previous page Note After you synced the workout plan from the app for the 7 day period the workouts will disapper when the date passed If you want to save a particular workout to the Rider S500 please download the workout from the app to the...

Page 23: ...ses in the home page 2 Find Workout tap on 3 Click Bryton Test Select a test type and start testing 4 Press to skip to the next section 5 Press to pause workout 6 Select or Save the result to end the Bryton Test 8 Choose to go to the workout page to see your data Then tap on to go back to the previous page 9 Tap on to continue testing Overview Description Warm up 00 10 00 Time 00 20 00 Time 94 111...

Page 24: ...s and can simulate planned routes from the Bryton Active App 1 Select Course in the home page 2 Select Smart Trainer Virtual Ride 3 You can view all the planned routes that you have downloaded on the device Ride on a Route 1 Select the route you would like to start with 2 Tap on to start riding End Virtual Ride 1 Press to stop the ride 2 Select Save to save the record 3 Select Discard to discard t...

Page 25: ...which are synced from the app Or select to view all the workouts that you have saved Delete Workout 1 To delete the workout click then select the workout s and click again to delete 2 Select to confirm Start Workout 1 Select the workout you would like to start with 2 Select to be ready for the workout then press button to start the workout Stop Workout 1 Press to puase workout then select to retur...

Page 26: ...home page 2 Select Smart Trainer Power 3 Switch to different zones by tapping or adjust resistance level by clicking 4 Tap on to start training 5 Power training will automatically stop once you start Virtual Ride or the Smart Trainer lost connection Note You need to connect a smart trainer to the Rider S500 before having access to the Virtual Ride Smart Workout Resistance and Power Workout Power C...

Page 27: ...ice Search 1 Tap the icon to activate voice search 2 Single tap on the icon and say keywords names or addresses of a desired location 3 Tap the middle icon again to stop receiving voice 4 After processing search pick the most relevant spot Adjust to More Accurate Position 1 After choosing a relevant spot tap and hold on blank space to move the map for an accurate location 2 Use to adjust map size ...

Page 28: ... map size Generate a Route 1 Select to view the direction to your destination 2 Tap on to start navigation Navigate on Bryton Active App 1 Pair the Rider S500 with Bryton Active App select Course Navigation 2 Input keywords or address or POI type in the search bar then click 3 Select a result from the search list 4 Confirm the location then click Navigate to see the route 5 Click in the top right ...

Page 29: ...Course Route Retrace Ride 2 The device will generate a route for leading you back to the starting point via the exact same path you took at first Follow the arrows to the right direction Note 1 You need to start recoding a ride before using retrace feature 2 You can choose to pause or not to pause recoding when you want to active retrace route 147 2 3790 km m 999 9 9999 km m Beach Road St Kilda to...

Page 30: ...on MAP Update folder If there is not enough free space on the device to add the map s please remove unnecessary map folders are stored in the following locations Bryton MAP Update Bryton Map MapData After adding the map file s please ensure that the device still retains at least 100MB of storage space in order to operate properly 4 After the map file s has been successfully added to the device go ...

Page 31: ... to your smart phone with Bryton USB C cable You will need a USB C to USB Adapter while using an iPhone c Select the BRYTON root folder to allow Bryton Active app gets permission to access the device for downloading maps d Select the Add Maps and choose a desired map to download to the Rider S500 ...

Page 32: ...to your smart phone with Bryton USB C cable You will need a USB C to USB Adapter while using an iPhone c Select the BRYTON root folder to allow Bryton Active app gets permission to access the device for downloading maps d Select the Bryton OpenStreetMap and choose the map which you want to delete ...

Page 33: ...ew details 3 Tap Details or Summary to see different data Edit Record 1 Select in the home page 2 Tap on to enter the delete page 3 Choose the record s then tap to delete the record 4 Press to confirm 2021 12 15 Summary Details 05 17 10 05 31 05 193 8 km 182 8 km Results 2021 11 30 01 50 42 53 2 km 2021 11 27 05 45 23 129 9 km 2021 11 20 02 14 52 999 9 km 2021 11 08 05 31 05 182 8 km 9 182 8 km 18...

Page 34: ...t o v i e w o r edit more settings Data Page x Turn on data pages and click a page to modify grids numbers x In order to show graphics on the data page the height of the desired data field must be at least one third of the screen or larger x Press to preview data fields Tap to confirm or to go back Overview Ride Config GPS System Speed Priority BIKE 1 Overview Note You can also edit bike profiles ...

Page 35: ...ion Quick Status x You can customize the quick status by selecting diiferent data for each grid x Color of the top grid will change by different zones which are based on the settings See P 7 for more information Alert x Enable status x Adjust desired settings for Time Distance Speed Heart Rate or Cadence AUTO LAP Location Auto Lap Trigger 51 507877 0 087732 Lap At AUTO LAP TRIGGER Distance Locatio...

Page 36: ...ufficient for regular usages while consuming less battery power than the 2 sets above x Power Saving Trade off accuracy to achieve maximum battery life Use this mode in open sky Disable GPS System 1 Turn off GPS to save battery power when GPS signal is not available or when GPS information is not mandatory such as indoor training Speed Priority 1 Select in the home page 2 Find Bike Settings 3 Choo...

Page 37: ...t Trip 1 or Trip 2 to 0 when you install new tires After a few rides you can view the total trip distance since you changed the tires to see how many distance remains to change tires Display You can change the display seeting such as Brightness Backlight and Meter Page Mode 1 Select in the home page 2 Select Display Brightness Backlight Duration 1 Swipe up and dowm for selecting preferred duration...

Page 38: ...ensor you would like to deactivate 2 Turn off the status to disband the sensor Activate Paired Sensors 1 Select the sensor you would like to activate 2 Turn on sensor status then sensors will be connected automatically 3 If the sensor failed to be connected or you want to switch to this sensor select to reconnect it with your device Remove sensors 1 Choose the sensor you would like to remove 2 Tap...

Page 39: ...nd Sensors 3 Select the electronic shifter you paired 4 Enter Sensor Details to input the tooth numbers Remote Setup 1 Enter Remote Setup 2 Click on in each option to set up different fuctions for each button Sensor Details Front Gear 120345 ANT Type ID Rear Gear Remote Setup Gear 1 Gear 2 Gear 3 Gear 4 Gear 5 Rear Gear 21 19 18 17 Left Single Press Right Single Press Left Long Press Right Long Pr...

Page 40: ...e Radars E bikes and Ess Di2 please turn the power on before starting pairing 5 Let the device detect sensors automatically or enter a sensor ID manually 6 Pick a detected sensor you would like to pair with then select OK to save Manage Sensors 1 Select the sensor you would like to edit 2 Turn on or off the status to activate or deactivate the sensor 3 Edit the name by clicking 4 Remove the sensor...

Page 41: ...veichle around you in 150m the color strip will not show on the screen Please go to Page 29 to see how to pair a bike radar with Rider S500 Using E bike The Rider S500 incorporates Shimano Steps and ANT LEV e bike support for compatible brands to display various e bike data including assist mode assist level shifting mode E Bike battery travel range and rear gear position 1 Before you can use a co...

Page 42: ...ystem System Settings Language 1 Select your desired language Backlight Duration 1 Select desired setting 2 Select to confirm Keytone 1 Enable or disable Key Tone to change the settings for key presses Sound 1 Turn on or off Sound to change the settings for alerts and notifications Time Unit 1 Select Dlight Saving Date Format Time Format Unit and Temperature to change the settings Key Tone Sound L...

Page 43: ...ecorded or All and select to confirm Start Remind When the device detects the motion of your bike a reminder will pop up and ask you if you would like to start recording You can set the frequency of the reminder 1 Select in the home page 2 Find System Recording Settings Start Remind 3 Select to confirm ODO 6WDUW 5HPLQG Smart Recording ODO Setup Recording Settings 4 Sec Recorded 3 3 km NOTE All mea...

Page 44: ...cations for auto calibrating Find and set the positions NOTE The value of altitude on the meter mode will be changed once current altitude is adjusted About You can view your device current firmware version 1 Select in the home page 2 Select About 3 Firmware information and current latitude and longitude will show on the device ALTITUDE 15 m Please make sure you re at ground level for more accurat...

Page 45: ...s Customize Power Zone 1 Select MAP x Use keyboard to enter MAP x Press to edit details for each zone x Select to confirm x Scroll up and down to edit more zones 2 Select FTP x Use keyboard to enter FTP x Press to edit details for each zone x Select to confirm x Scroll up and down to edit more zones NOTE Heart Rate Graphical Data will be displayed based on the selection of LTHR or MHR Power Graphi...

Page 46: ...e only e Tap on Finish to complete pairing 1 Android Phone Pairing a Go to your phone Settings Bluetooth and enable Bluetooth b Go to Bryton Mobile App and Tap on Settings Device Manager c Select and add your device by pressing d Tap on Finish to complete pairing 2 Allow Notification Access a Tap on Settings Notification b Tap on OK to enter setting to allow Notification Access for Bryton app c Ta...

Page 47: ...tenna 2 4GHz band 0dBm Water Resistant Water resistant to a depth of 1 meter for up to 30 minutes Barometer Equipped with barometer Wireless Local Area Network IEEE 802 11 b g n 2 4GHz band 8dBm Smart Speed Sensor Optional Item Description Physical Size 36 9 x 34 8 x 8 1 mm Weight 6 g Water Resistance Incidental exposure to water of up to 1meter for up to 30mins Transmission Range 3 m Battery Life...

Page 48: ...63 x 34 3 x 15 mm Weight 14 5 g sensor 31 5 g correa Water Resistance Incidental exposure to water of up to 1 meter for up to 30 minutes Transimission Range 3 m Battery Life Up to 2 years Operating Temperature 0 C 50 C Radio Frequency protocol 2 4GHz Bluetooth 4 0 and Dynastream ANT Sport wireless communications protocol Battery Information Smart Speed Sensor and Smart Cadence Sensor Both sensors ...

Page 49: ...nnector will easily deform and malfunction x Be careful not to damage or lose O ring gasket on the cover x Contact your local waste disposal department to properly dispose of used batteries Smart Heart Rate Monitor The heart rate monitor contains a user replaceable CR2032 battery To replace the battery 1 Locate the circular battery cover on the back of the heart rate monitor 2 Use a coin to twist ...

Page 50: ...50 Appendix Back to Top Install Rider S500 Use Sport Mount to Mount Rider S500 2 4 3 1 Use F Mount to Mount Rider S500 3 4 1 2 ...

Page 51: ...r NOTE x Once sensors are waken the LED blinks twice The LED continues to blink when you continue to pedal for pairing After around 15 times blink it stops blinking If not used for 10 minutes sensor would go into sleep mode to preserve power Please complete the pairing during the time the sensor is awake ...

Page 52: ...ose during the exercise x If the sensor cannot be detected or the reading is abnormal please warm up for about 5 minutes x If the heart rate belt is not used for a period of time remove the sensor from the heart rate belt NOTE Improper battery replacement may cause an explosion When replacing a new battery use only the original battery or a similar type of battery specified by the manufacturer Dis...

Page 53: ...1785 24x1 1 8 1795 24x1 1 4 1905 26 x 1 559 1913 26x1 25 1950 26x1 40 2005 26x1 50 2010 26x1 75 2023 26x1 95 2050 26x2 10 2068 26x2 125 2070 26x2 35 2083 Wheel Size L mm 26x3 00 2170 26x1 1 8 1970 26x1 3 8 2068 26x1 1 2 2100 650C Tubular 26 x7 8 1920 650x20C 1938 650x23C 1944 650 x 25C 26 x1 571 1952 650x38A 2125 650x38B 2105 27 x 1 630 2145 27x1 1 8 2155 27x1 1 4 2161 27x1 3 8 2169 27 5x1 50 2079...

Page 54: ...traveled for current activity ODO The accumulated total distance until you reset it LapDistance The distance traveled for the current lap LLapDist The distance traveled for the last finished lap Trip 1 Trip 2 Cumulative mileage recorded before you reset it They are 2 separate trip measurements You are free to use Trip 1 or Trip 2 to record for example weekly total distance and use another to recor...

Page 55: ...rt rate for current activity MHR Your current heart rate divided by Maximum Heart Rate MHR means that the maximum number of beats made by your heart in 1 minute of effort MHR is different from Max HR You will need to set MHR in User Profile LTHR Your current heart rate divided by Lactate Threshold Heart Rate LTHR means that the average heart rate while in the intense exercise at which the blood co...

Page 56: ...the ride A way of measuring how much stress is put on the body from a ride IF Intensity Factor Intensity Factor is the ratio of the normalized power NP to your Functional Threshold Power FTP An indication of how hard or difficult a ride was in relation to your overall fitness SP Specific Power Power to weight ratio FTP Zone The current range of your Functional Threshold Power Per centage Zone1 to ...

Page 57: ...how evenly a rider is applying force to the pedals throughout each pedal stroke AvgPS LR The average left right percentage of how evenly a rider is applying force to the pedals throughout each pedal stroke Workout Target power You can set a power target for your workout plan Target cadence You can set a cadence target for your workout plan Target heartrate You can set a target of heart rate zone f...

Page 58: ...le distance that a rider could ride with the ebike Assist Mode Various modes provided by the ebike with assigned levels of assistance Assist Level The level of electronic assistance provided by the ebike in a given power mode Ebike Rear Gear The gear position of the rear derailleur of Ebike displayed by the graphic Assist Mode Level The current ebike assist mode and level of electronic assistance ...

Page 59: ...ce Any attempt to do so will make the warranty invalid Copyright 2021 Bryton Inc All rights reserved RF Exposure Information MPE This device meets the EU requirements and the International Commission on Non Ionizing Radiation Protection ICNIRP on the limitation of exposure of the general exposure requirements this equipment must be operated in a minimum of 20 cm separation distance to the user Her...

Reviews: