


4-29
Confidential
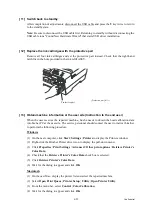
[ 11 ] Switch back to standby
After completion of adjustments, disconnect the USB cable and press the
9
key twice to return
to the standby state.
Note:
Be sure to disconnect the USB cable first. Returning to standby without disconnecting the
USB cable runs "Found New Hardware Wizard" that starts USB driver installation.
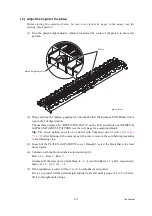
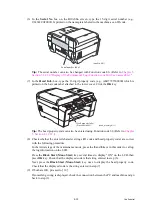
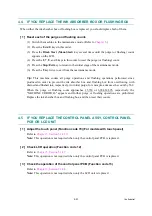
[ 12 ] Replace the ink cartridges with the protective part
Remove all four ink cartridges and set the protective part instead. Check that the right-hand
latch fits in the hole provided in the ink refill ASSY.
[ 13 ] Obtain machine information at the user site (Instruction to the end user)
When the user receives the repaired machine, he/she needs to obtain the head calibration data
into his/her PC at the user site. The service personnel should contact the user to instruct him/her
to perform the following procedure.
Windows
(1) On the user computer, click
Start
|
Settings
|
Printers
to display the Printers window.
(2) Right-click the Brother Printer driver icon to display the pull-down menu.
(3) Click
Properties
|
Print Settings
|
Advanced
|
Other print options
|
Retrieve Printer’s
Color Data
.
(4) Check that the
Retrieve Printer’s Color Data
check box is selected.
(5) Click
Retrieve Printer’s Color Data
.
(6) Wait for the dialog to appear and click
OK
.
Macintosh
(1) On the user Mac, display the printer list and select the repaired machine.
(2) Select
Open
Print Queue
|
Printer Setup
|
Utility
|
Open Printer Utility
.
(3) From the menu bar, select
Control
|
Color Calibration
.
(4) Wait for the dialog to appear and click
OK
.
(Protective_part_M11)
Protective part
Summary of Contents for MFC-J6510DW
Page 15: ...xii Confidential ...
Page 16: ...xiii Confidential ...
Page 17: ...xiv Confidential ...
Page 18: ...xv Confidential ...
Page 19: ...xvi Confidential ...
Page 128: ...3 3 Confidential 3 2 PACKING For models with paper tray 2 ...
Page 273: ...4 13 Confidential EXIT Adjust Check Pattern 1 ...
Page 274: ...4 14 Confidential EXIT Adjust Check Pattern 2 ...
Page 275: ...4 15 Confidential EXIT Adjust Check Pattern 3 ...
Page 276: ...4 16 Confidential KEISEN2 LF300 EXIT ADJUST PATTERN ...
Page 278: ...4 18 Confidential KEISEN GAP EXIT ADJUST PATTERN Line 1 Line 2 Line 3 ...
Page 280: ...4 20 Confidential Vertical Alignment Check Patterns ...
Page 283: ...4 23 Confidential Left Right and Bottom Margin Check Pattern ...
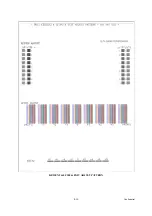
Page 286: ...4 26 Confidential Print Pattern for Creating Head Calibration Data ...
Page 302: ...4 42 Confidential ADF Copy Chart C A B D ...
Page 312: ...5 8 Confidential Print Pattern for Creating Head Calibration Data ...
Page 314: ...5 10 Confidential Scanning Compensation Data List ...
Page 317: ...5 13 Confidential Nozzle Test Pattern ...
Page 320: ...5 16 Confidential Configuration List ...
Page 337: ...5 33 Confidential EXIT Adjust Check Pattern 1 ...
Page 338: ...5 34 Confidential EXIT Adjust Check Pattern 2 ...
Page 339: ...5 35 Confidential EXIT Adjust Check Pattern 3 ...
Page 340: ...5 36 Confidential KEISEN2 LF300 EXIT ADJUST PATTERN ...
Page 346: ...5 42 Confidential Vertical Alignment Check Pattern ...
Page 349: ...5 45 Confidential Left Right and Bottom Margin Check Pattern ...
Page 383: ...6 4 Confidential Power supply PCB 100 V series ...
Page 384: ...6 5 Confidential Power supply PCB 200 V series ...
Page 385: ...6 6 Confidential Wiring diagrams ...


