


3-47
Confidential
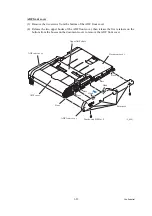
Note:
When storing the removed head/carriage unit for a long period, put it in the head
casing correctly using the following steps. Leaving it out of the casing causes the head
nozzles and ink supply ports to dry up so that the head/carriage unit can no longer provide
the original performance.
When taking the head/carriage unit out of the casing, reverse the storage order.
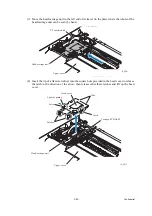
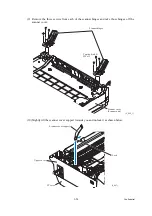
1) Set the head/carriage unit in the lower head casing and slide it to the right.
2) Release the latch of the cap holder and use it to press the head to seal up the head
nozzles.
3) Set the joint cap on the head joint rubber.
4) Mount the upper head casing.
5) Fit the cap stopper into the lower head casing and slide it towards you to secure the head/
carriage unit.
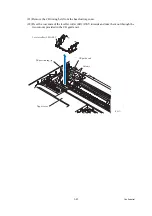
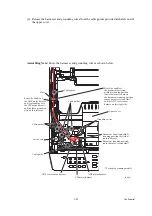
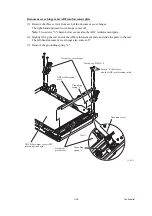
Assembling Note:
Mount the head/carriage unit, using the following steps.
1) Set the leveler roller ASSY. (See
2) When mounting a new head/carriage unit, apply the specified lubricant to the specified
points on the unit, referring to
.
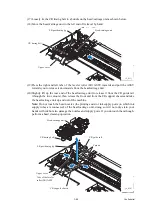
3) When mounting the CR timing belt, insert it into the slit provided in the head/carriage unit
so that the toothed side faces inwards as shown below. Make sure that the belt is fully
inserted inside the latches.
Cap stopper
Joint cap
Cap holder
Head joint rubber
(3_013)
Head/carriage unit
Latch
Head casing (lower)
Head casing (upper)
Latches
Viewed from
the bottom
(3_013_1)
Summary of Contents for MFC-J6510DW
Page 15: ...xii Confidential ...
Page 16: ...xiii Confidential ...
Page 17: ...xiv Confidential ...
Page 18: ...xv Confidential ...
Page 19: ...xvi Confidential ...
Page 128: ...3 3 Confidential 3 2 PACKING For models with paper tray 2 ...
Page 273: ...4 13 Confidential EXIT Adjust Check Pattern 1 ...
Page 274: ...4 14 Confidential EXIT Adjust Check Pattern 2 ...
Page 275: ...4 15 Confidential EXIT Adjust Check Pattern 3 ...
Page 276: ...4 16 Confidential KEISEN2 LF300 EXIT ADJUST PATTERN ...
Page 278: ...4 18 Confidential KEISEN GAP EXIT ADJUST PATTERN Line 1 Line 2 Line 3 ...
Page 280: ...4 20 Confidential Vertical Alignment Check Patterns ...
Page 283: ...4 23 Confidential Left Right and Bottom Margin Check Pattern ...
Page 286: ...4 26 Confidential Print Pattern for Creating Head Calibration Data ...
Page 302: ...4 42 Confidential ADF Copy Chart C A B D ...
Page 312: ...5 8 Confidential Print Pattern for Creating Head Calibration Data ...
Page 314: ...5 10 Confidential Scanning Compensation Data List ...
Page 317: ...5 13 Confidential Nozzle Test Pattern ...
Page 320: ...5 16 Confidential Configuration List ...
Page 337: ...5 33 Confidential EXIT Adjust Check Pattern 1 ...
Page 338: ...5 34 Confidential EXIT Adjust Check Pattern 2 ...
Page 339: ...5 35 Confidential EXIT Adjust Check Pattern 3 ...
Page 340: ...5 36 Confidential KEISEN2 LF300 EXIT ADJUST PATTERN ...
Page 346: ...5 42 Confidential Vertical Alignment Check Pattern ...
Page 349: ...5 45 Confidential Left Right and Bottom Margin Check Pattern ...
Page 383: ...6 4 Confidential Power supply PCB 100 V series ...
Page 384: ...6 5 Confidential Power supply PCB 200 V series ...
Page 385: ...6 6 Confidential Wiring diagrams ...


