background image

62

Machine Specifications

Use

Light- to heavy-weight materials

Sewing speed 

1,300 stitches per minute

Stitch width

2.3  mm  to  7  mm  (5/64  to  9/32  inch)  (Two-needle 
models)
3.0 mm to 3.5 mm (1/8 to 9/64 inch) (One-needle 
models)

Stitch length (pitch)

2 mm to 4 mm (5/64 to 5/32 inch)

Needle bar stroke

25 mm (1 inch)

Presser foot

Free presser type

Presser foot lift

5 mm to 6 mm (3/16 to 15/64 inch)

Needle

SCHMETZ 130/705H

No. of needles and threads

Three/Four threads convertible
Two needles or single needle

Machine net weight

7.0 kgs.

Needle set SCHMETZ 130/705H. 
#80 (2)
#90 (2)

재봉기 사양

용도
경량 ~ 중량 원단

재봉 속도
분당 1,300 땀

땀폭
2.3 ~ 7 mm(5/64 ~ 9/32 인치) (2바늘 모델)
3.0 ~ 3.5 mm(1/8 ~ 9/64 인치) (1바늘 모델)

땀길이(피치)
2 ~ 4 mm(5/64 ~ 5/32 인치)

바늘대 스트로크
25 mm(1 인치)

노루발
자유 압착형

노루발 리프트
5 ~ 6 mm(3/16 ~ 15/64 인치)

바늘
SCHMETZ 130/705H

바늘 및 실 수
3/4실 전환
2바늘 또는 1바늘

재봉기 순무게
7.0 kg

바늘 세트 SCHMETZ 130/705H.
#80 (2)
#90 (2)

Summary of Contents for 2034D

Page 1: ... Product Code 884 345 제품 코드 884 345 5 4 6 5 4 6 5 4 6 5 4 6 Please visit us at http solutions brother com where you can get product support and answers to frequently asked questions FAQs http solutions brother com 을 방문하시면 제품 지원과 잦은 질문 FAQ 의 답변을 얻으실 수 있습니다 ...

Page 2: ......

Page 3: ...3 Do not pull or push fabric while stitching It may deflect the needle causing it to break 14 Switch the sewing machine to the symbol O position when making any adjustments in the needle area such as threading needle changing needle or changing presser foot etc 15 Always unplug the sewing machine from the electrical outlet when removing covers lubricating or when mak ing any other user servicing a...

Page 4: ...ust be switched off or the plug must be removed from the socket outlet When servicing the sewing machine or when removing covers or changing the light bulb the machine or the electrical set must be disconnected from the supply by removing the plug from the socket outlet FOR USERS IN THE UK EIRE MALTA AND CYPRUS ONLY IMPORTANT In the event of replacing the plug fuse use a fuse approved by ASTA to B...

Page 5: ...11 항상 올바른 침판을 사용하세요 잘못된 판을 사용하면 바늘이 부러질 수 있습니다 12 휜 바늘을 사용하지 마세요 13 재봉할 때 천을 당기거나 밀지 마세요 바늘이 빗나가 부러질 수 있습니다 14 바늘에 실을 끼우거나 바늘을 교환하거나 노루발을 교환하는 등 바늘 구역에서 조정 작업을 할 때에는 재 봉기를 O 기호 위치에 놓으세요 15 커버를 제거하거나 윤활할 때 사용설명서에 나온 기타 사용자 정비 조정을 할 때에는 전기 콘센트에서 플 러그를 뽑으세요 16 이 재봉기는 어린이나 병약자가 감독자 없이 사용해서는 안 됩니다 17 어린이가 재봉기를 가지고 놀지 않도록 감독해야 합니다 18 재봉기를 분해하지 마세요 주의 안전한 기계 사용 1 미국에만 해당 감전 위험을 줄이기 위해 이 재봉기의 유극 플러그 한쪽 날이...

Page 6: ...지역 공인 대리점에 문의하세요 이 설명서를 보관하세요 이 재봉기는 가정용입니다 주의 재봉기에서 자리를 비울 때에는 메인 전원 및 조명 스위치를 끄거나 콘센트에서 플러그를 뽑아야 합니다 재봉기를 점검하거나 커버를 제거하거나 전구를 교환할 때에는 콘센트에서 플러그를 뽑아 재봉기와 전기 장 치에 전원 공급을 차단해야 합니다 영국 에이레 몰타 키프로스 사용자만 해당 중요 플러그 퓨즈를 교체하는 경우 ASA 마크가 부착된 ASTA 승인 BS 1362 규격 퓨즈를 사용하세요 반드시 퓨즈 커버를 다시 덮으세요 절대 퓨즈 커버를 덮지 않은 채 플러그를 사용하지 마세요 재봉기와 함께 제공된 플러그가 전기 콘센트에 맞지 않으면 공인 대리점에 문의하여 맞는 플러그를 구해 야 합니다 AC 입력 220 240V 국가 및 멕시코 사...

Page 7: ...HEN THREADING REPLACING NEEDLE OR LIGHT BULB BE SURE TO TURN OFF THE MAIN POWER SWITCH OF THE MACHINE WHEN THE MACHINE IS NOT IN USE IT IS RECOMMENDED THAT THE ELECTRIC SUPPLY PLUG IS DISCONNECTED FROM THE WALL SOCKET TO AVOID ANY POSSIBLE HAZARDS 이 콤팩트 오버로크 재봉기를 선택하신 것을 축하 드립니다 이 재봉기는 품질이 우수하고 사용하기 쉬운 제품입니다 모든 기능을 충분히 사용할 수 있게 이 설명서를 살펴보실 것을 권합니다 재봉기 사용에 관해 자세한 정보가 필요하면 가장 가까운 공인 대리점이 언제든지 기꺼이 도와...

Page 8: ...ese holes When the motor is running sparks can be seen through the ventilating hole in the motor bracket on the side opposite the hand wheel These sparks are produced by the carbon brushes and the commutator and are part of the machines normal operation WHEN THREADING THE MACHINE REPLACING A NEEDLE OR WHEN THE MACHINE IS NOT IN USE WE RECOMMEND DISCONNECTING THE ELECTRIC SUPPLY PLUG TO AVOID ANY P...

Page 9: ...ng the left needle 26 Chapter 6 Comparison Chart of Sewing Materials Threads and Needles 28 Chapter 7 Thread Tension 30 Chapter 8 Chart of Thread Tension Adjustment 32 Chapter 9 Test sewing 36 Chaining off 37 Chapter 10 Sewing 38 To start sewing 38 To remove work 39 If threads break during sewing 39 To sew heavy materials 40 To sew fine materials 40 Presser foot pressure 41 Chapter 11 Troubleshoot...

Page 10: ...0 아랫루퍼에 실 끼우기 22 오른쪽 바늘에 실 끼우기 2바늘 모델 24 왼쪽 바늘에 실 끼우기 26 6장 재봉 원단 실 바늘 비교표 29 7장 실 장력 30 8장 실 장력 조절표 32 9장 시험 재봉 36 체인 엮기 37 10장 재봉 38 재봉 시작 38 작업물 빼기 39 재봉 중에 실이 끊어지는 경우 39 무거운 원단 재봉 40 고운 원단 재봉 40 노루발 압력 41 11장 문제 해결 43 12장 스티치 선택 44 좁은 오버로크 스티치 말은 단 스티치 45 13장 좁은 오버로크 말은 단 스티치 표 49 14장 이 재봉기를 사용한 재봉 예 50 공그르기 노루발을 사용한 공그르기 51 공그르기 노루발을 사용한 플랫로크 스티칭 53 공그르기 노루발을 사용한 핀턱 스티칭 55 장식 스티칭 57 15장 윗칼과 아...

Page 11: ...3 ...

Page 12: ...4 Names of parts and their functions 부품의 이름과 기능 5 4 6 5 4 6 5 4 6 5 4 6 J E K L N M Q P 1 2 3 4 5 0 6 7 8 9 O T S R A B C D G E F H I ...

Page 13: ...ial slide plate for overlock stitch J Main power switch and light switch K Stitch length adjustment dial L Differential feed ratio adjustment lever M Lowerlooper threading lever N Stitch finger O Stitch width lever P Upperlooper Q Lowerlooper R Free arm cover S Bed extension T Knife lever 1 실걸이 2 손잡이 3 노루발 압력 조절 나사 4 실패꽂이 5 실패 받침대 6 실채기 커버 7 바늘 8 윗칼 9 노루발 0 원단판 커버 A 실패 스탠드 실걸이 봉 B 왼쪽 바늘 실 장력 다이얼 C...

Page 14: ...uded with your serger 9 0 A OPTION 재봉기 부속물 9 0 A 옵션 1 X77871 000 2 122991052 4 X75904000 5 X77260000 7 X77128002 3 X75902001 9 X76590002 8 X75917001 0 XB0958001 6 X75906001 A X76663001 OPTION 옵션 SA212 U S A CANADA 미국 캐나다 ...

Page 15: ... Option A Tape presser foot Option Foot controller XC7359021 110 120V Area XC7438321 220 240V Area XC7456321 UK XE0629001 Australia New Zealand XD0852021 Korea XD0112121 Argentina XD0105021 China XE3414001 Brazil 번호는 부품 코드입니다 1 소프트 커버 2 부속물 주머니 3 핀셋 4 그물망 2바늘 모델 4 1바늘 모델 3 5 실패 캡 2바늘 모델 4 1바늘 모델 3 6 청소용 솔 7 육각 앨런 렌치 2바늘 모델 8 바늘 세트 SCHMETZ 130 705H 80 12 2 pcs 90 14 2 pcs 9 공그르기 노루발 옵션 0 보푸라기 정돈함 옵...

Page 16: ...dle bar is at its highest position 3 Hold the needle with its flat side away from you and insert it up as far as it will go 4 Tighten the needle set screw securely with the hexagonal wrench 5Place the needle on its flat side and check to see if the space is parallel 6Flat side 7 needle plate glass etc 바늘 이 재봉기는 표준 가정용 재봉기 바늘을 사용합니다 SCHMETZ 130 705H를 권장합니다 바늘 제거 1 메인 전원 스위치를 OFF 위치에 놓으세요 2 손으로 풀리 다...

Page 17: ... set screw holds both needles Keep this in mind when you loosen the set screw to exchange one or both needles 8Needle set screw 9Tighten 0Loosen AHexagonal wrench 참고 2바늘 모델 2바늘 모델에서는 2개의 바늘을 한손으로 잡고 동시에 삽입할 것을 권장합니다 바늘들이 올바르게 삽입되었다면 오른쪽 바늘이 왼쪽 바늘보다 약간 아래에 위치합니다 주의 바늘 고정 나사는 2개의 바늘을 동시에 고정합니다 1개의 바늘을 교체할 때에도 고정 나사를 풀어야 합니다 8바늘 고정 나사 9조임 0풀림 A육각 렌치 One needle models BNeedle set screw CTighten DLoose...

Page 18: ...home sewing machine 1Hand wheel 모터 회전 방향 이 재봉기의 모터와 풀리 다이얼은 시계 반대 방향 화살표 방향 으로 회전합니다 일반적인 가정용 재봉기와 같은 방향입니다 1풀리 다이얼 Opening and closing the front cover Itisnecessarytoopenthefrontcoverwhenthreading this machine NOTE For your safety make sure that the front cover is closed when operating the machine 앞커버 열고 닫기 재봉기에 실을 끼울 때 앞커버를 열어야 합니다 참고 안전을 위해 재봉기를 작동할 때에는 앞커버를 닫으세요 1 ...

Page 19: ...ow speed As the pedal is pressed further the machine will increase speed When the pedal is released the machine stops 2Foot Controller Note For U S A only Foot controller Model KD 1902 This foot controller can be used on the machine with productcode884 345 Theproductcodeismentioned on the machine rating plate 작동 전원 켜기 준비 3핀 플러그를 재봉기 오른쪽 아래 소켓에 꽂으세요 전원 플러그를 콘센트에 꽂으세요 메인 전원 및 재봉 조명 스위치 이 스위치로 전원과 재봉...

Page 20: ...xtension Free arm sewing enables tubular pieces to be sewn more easily For free arm sewing remove the bed extension and position the fabric as shown in the illustration 프리암 재봉을 위한 확장 작업대 분리 확장 작업대 분리 프리암 재봉은 원통형 부위를 더 쉽게 재봉할 수 있습니다 프리암 재봉을 위해 그림과 같이 확장 작업대를 분리하고 천을 놓으세요 ...

Page 21: ...Stitch Width Two needle models To change the stitch width 1 Move the stitch width lever located on the left side of the machine toward the front up to reduce the stitch width or down to increase the width The stitch width can be set between R4 5 mm 11 64 inch and 7 mm 9 32 inch Thenormalstitchwidthsettingforregularoverlock stitch is 5mm 13 64 inch One needle models The width is factory set to 3 5m...

Page 22: ...ster than the back feed dogs gathering the fabric as it is sewn This function assists in removing the rippling when serging stretch fabrics To adjust the differential feed 1 Locate the differential feed adjustment lever on the left side of the machine 2 The normal setting is 1 0 on the differential feed adjustment lever 3 To set less than 1 0 move the lever back 4 To set greater than 1 0 move the ...

Page 23: ... thin materials from puckering 1 0 Without differential feed Normal sewing 1 0 2 0 Material is gathered or pushed together Prevents stretch materials from stretching or puckering 이송비 메인 이송 뒤 차동 이송 앞 효과 용도 0 7 1 0 원단이 팽팽하게 당겨집니다 얇은 원단이 주름지는 것을 방지 1 0 차동 이송 없음 일반 재봉 1 0 2 0 원단이 한데 모이거나 밀립니다 스트레치 원단이 펴지거나 주름지는 것을 방지 ...

Page 24: ...further toward 2 0 the differential feed ratio should be set Test sew with a scrap of the fabric to find the correct adjustment CAUTION When sewing thick non stretchable material such as denim do not use the differential feed as it may damage the fabric 조절이 필요한 예 스트레치 원단을 차동 이송을 사용하지 않고 재봉할 경우 가장자리가 물결칩니다 가장자리를 평평하게 하려면 이송비를 1 0에서 2 0 쪽으로 조절하세요 이송비는 원단의 탄력성에 따라 결정됩니다 탄력성이 큰 원단일수록 차동 이송비를 2 0 쪽에 가깝...

Page 25: ...s as illustrated below 1Thread holder on thread tree 2Spool pin 3On Two needle models 4Correct position 실 끼우기 전에 실 끼우기 전 준비 접히는 실걸이를 가장 높은 위치로 올리세요 아래 그림처럼 실 홀더가 실패꽂이 위에 정렬되게 하세요 1실걸이의 실 홀더 2실패꽂이 32바늘 모델 4바른 위치 CAUTION When threading always thread in this order upperlooper lowerlooper right needle and then the left needle 주의 실을 끼울 때에는 항상 윗루퍼 아랫루퍼 오른쪽 바늘 왼쪽 바늘 순서로 끼우세요 4 1 2 3 ...

Page 26: ...조 1실패 캡 그물망 사용법 느슨하게 감긴 나일론실로 재봉하는 경우 실이 실패에서 빠지는 것을 막기 위해 제공된 그물망을 실패에 씌울 것을 권장합니다 그물망을 실패 모양에 맞추세요 그림 B 참조 1그물망 B A 장력 릴리스 버튼 이 재봉기에는 실 장력 릴리스 버튼이 있습니다 실을 끼울 때 다음과 같이 하세요 1 장력 조절 다이얼 바로 위의 장력 릴리스 버튼을 오른쪽으로 누르세요 2 장력 조절 다이얼 옆의 통로에 있는 장력 원판에 실을 통과시키세요 3 버튼을 놓으세요 1실 장력 릴리스 버튼 2실 장력 다이얼 3오른쪽으로 미세요 Tension release button This serger is equipped with a thread tension release button When threading be s...

Page 27: ...eadtheupperlooperthread lowerlooper thread right needle thread and then the left needle thread The proper threading order for this serger is upperlooper lowerlooper right needle and then the left needle 1Slide to the right 2Thread tension discs 3Correct 4Wrong 실 끼우기 전에 1 안전을 위해 메인 전원 스위치를 끄세요 2 노루발 레버를 사용하여 노루발을 올리세요 주의 바늘에 실을 끼울 때에는 항상 노루발 레버를 올리고 실 끼우는 순서에 주의하세요 3 풀리 다이얼을 앞으로 돌려 바늘대를 가장 높은 위치로 올...

Page 28: ...on release button to the right then pass the thread through the tension disc which is in the channel next to the green tension adjustment dial Release the button 6Guide the thread down the channel and pass the thread through the threading points next to the green color marks following the numerical order in the accompanying illustration 윗루퍼에 실 끼우기 녹색과 실을 끼우는 각 지점 옆의 번호를 따라 그림 순서대로 실을 통과시키세요 1앞커버를 ...

Page 29: ...퍼에 다시 실을 끼우세요 NOTE If the upperlooper thread breaks during sewing Thismaybecausedbythelowerlooperthreadgetting caught on the upperlooper If this happens lower the upperlooper by turning the hand wheel remove the lowerlooper thread from the upperlooper and re thread the upperlooper from at least the tension disc 8 5 7 6 7 8 ...

Page 30: ...and guiding the top toward you 2Pull the thread off the spool and directly up through the thread guide on the thread tree from back to front 3Pull the thread about an extra 15cm 6 inches through the front of the thread tree 4Pass the thread through the proper thread guide 1앞커버를 오른쪽으로 밀고 윗부분을 앞으로 당겨 여세요 2실패에서 실을 풀어 바로 위에 있는 실걸이의 실 가이드에 뒤에서 앞으로 통과시키세요 3실을 15 cm 6 인치 정도 여분을 두고 실걸이 앞으로 당기세요 4실을 올바른 실 ...

Page 31: ...erlooper threading lever to the left which returns it to its standard position 5 Make sure that the pink triangular marks line up CAUTION Whenslidingthelowerlooperthreadinglever totheleft alwaysmakesurethatthetwopink triangular marks line up as illustrated 1Lowerlooper 2Lowerlooper threading lever CAUTION Threadtheneedlesafterthelowerlooperand upperlooper have been threaded CAUTION Slidethethreadi...

Page 32: ...ion disc which is in the channelnexttothepinktensionadjustment dial Release the button 5Guide the thread down the channel and acrossthroughthethreadingpointsnextto thepinkcolormarksfollowingthenumerical order in the accompanying illustration 6Bring the thread down through the guide 7 above the needle and through the right needle from front to back 오른쪽 바늘에 실 끼우기 2바늘 모델 분홍색과 실을 끼우는 각 지점 옆의 번호를 따라 25...

Page 33: ...25 2 3 4 5 6 7 2 1 2 3 6 7 6 4 5 ...

Page 34: ...is in the channel next to the yellow tension adjustment dial Release the button 5Guide the thread down the channel and across through the threading points next to the yellow color marks following the numerical order in the accompanying illustration 6Bring the thread down through the guide 7 above the needle and through the left needle from front to back 왼쪽 바늘에 실 끼우기 노란색과 실을 끼우는 각 지점 옆의 번호를 따라 그림 순...

Page 35: ...27 2 3 5 6 4 7 2 1 2 3 4 3 6 7 6 7 6 4 5 ...

Page 36: ...ch Smaller than 2 0 Needle thread Polyester 80 Nylon 80 Looper thread Polyester 80 Nylon 80 Woolly nylon thread SCHMETZ 130 705H 70 80 Poplin Gingham Medium Seersucker materials Gabardine Serge Knitted Overlock stitch 2 5 3 5 Spun 60 80 Cotton 60 80 Silk 50 80 Nylon 50 80 Polyester 50 80 SCHMETZ 130 705H 80 90 Cashmere Heavy Tweed materials Denim Jersey Overlock stitch 3 0 4 0 Cotton 40 60 Silk 40...

Page 37: ...디 좁은 말은 단 스 티치 2 0보다 작게 바늘 실 폴리에스테르 80 나일론 80 루퍼 실 폴리에스테르 80 나일론 80 울리 나일론 실 SCHMETZ 130 705H 70 80 중간 원단 포플린 깅엄 시어서커 개버딘 서지 편물 오버로크 스티치 2 5 3 5 스펀 60 80 코튼 60 80 실크 50 80 나일론 50 80 폴리에스테르 50 80 SCHMETZ 130 705H 80 90 무거운 원단 캐시미어 트위드 데님 저지 오버로크 스티치 3 0 4 0 코튼 40 60 실크 40 60 폴리에스테르 30 60 나일론 30 60 SCHMETZ 130 705H 90 참고 패션 재봉에는 윗루퍼에 장식 실을 사용하는 것이 가장 좋습니다 ...

Page 38: ...to decrease tension 7Dial down to increase tension 실 장력 실 장력 다이얼 왼쪽에서 오른쪽으로 1노란색 표시 장력 원판은 왼쪽 바늘용입니다 2분홍색 표시 장력 원판은 오른쪽 바늘용입니다 3녹색 표시 장력 원판은 윗루퍼용입니다 4파란색 표시 장력 원판은 아랫루퍼용입니다 5장력 선택 표시 6장력을 낮추려면 위로 돌리세요 7장력을 높이려면 아래로 돌리세요 CAUTION Make sure that the thread is properly seated in the tension discs by holding the tension release button to the right while passing the thread through the tension discs 주의 실...

Page 39: ...ead tension may vary according to the type and thickness of the fabric and the type of thread used Thread tension adjustments may be necessary for any change in sewing materials If the stitch quality is insufficient select a different tensionsettingfromtheillustrationontheprevious or following pages Adjusting the thread tension 1 Toselectthecorrecttension refertotheillustration on the previous pag...

Page 40: ...니다 Right needle thread is loose 왼쪽 바늘 실이 팽팽합니다 Upperlooper thread is tight 윗루퍼 실이 팽팽합니다 Lowerlooper thread is loose 아랫루퍼 실이 느슨합니다 Upperlooper thread is loose 윗루퍼 실이 느슨합니다 Lowerlooper thread is tight 아랫루퍼 실이 팽팽합니다 Upperlooper thread is loose 윗루퍼 실이 느슨합니다 Lowerlooper thread is loose 아랫루퍼 실이 느슨합니다 A Reverse 뒷면 B Surface 표면 C Left needle thread 왼쪽 바늘 실 D Right needle thread 오른쪽 바늘 실 E Upperlooper thre...

Page 41: ... obtain the correct thread tension 참고 실 장력 조절 순서 다음 순서대로 실 장력을 조절하세요 1 왼쪽 바늘 실 2 오른쪽 바늘 실 3 윗루퍼 실 4 아랫루퍼 실 이렇게 하면 올바른 실 장력을 가장 쉽게 찾을 수 있습니다 Tighten left needle thread yellow 왼쪽 바늘 실을 조이세요 노란색 Tighten right needle thread pink 오른쪽 바늘 실을 조이세요 분홍색 Loosen left needle thread yellow 왼쪽 바늘 실을 늦추세요 노란색 Loosen upperlooper thread green 윗루퍼 실을 늦추세요 녹색 Tighten lowerlooper thread blue 아랫루퍼 실을 조이세요 파란색 Tighten u...

Page 42: ... Lowerlooper thread is loose 아랫루퍼 실이 느슨합니다 Upperlooper thread is loose 윗루퍼 실이 느슨합니다 Lowerlooper thread is tight 아랫루퍼 실이 팽팽합니다 Upperlooper thread is loose 윗루퍼 실이 느슨합니다 Lowerlooper thread is loose 아랫루퍼 실이 느슨합니다 One needle Three thread A Reverse 뒷면 B Surface 표면 C Needle thread 바늘 실 D Upperlooper thread 윗루퍼 실 E Lowerlooper thread 아랫루퍼 실 ...

Page 43: ...r thread This is the easiest way to obtain the correct thread tension Loosen needle thread yellow 바늘 실을 늦추세요 노란색 Loosen upperlooper thread green 윗루퍼 실을 늦추세요 녹색 Tighten upperlooper thread green 윗루퍼 실을 조이세요 녹색 Loosen lowerlooper thread blue 아랫루퍼 실을 늦추세요 파란색 Tighten upperlooper thread green 윗루퍼 실을 조이세요 녹색 Tighten lowerlooper thread blue 아랫루퍼 실을 조이세요 파란색 참고 실 장력 조절 순서 다음 순서대로 실 장력을 조절하세요 1 바늘 실 2 윗루퍼 ...

Page 44: ... may cause an uneven seam 2 Holding the needle threads with your left hand turn the pulley slowly a few times in the counter clockwisedirectionwithyourrighthand andcheck toseethatthethreadsentwinethemselvesbefore using the foot pedal to sew 시험 재봉 실을 끼운 후 시험 재봉하세요 1 시험 재봉을 위해 원단 조각을 노루발 밑에 놓으세요 참고 천을 밑에 놓기 전에 항상 노루발을 올리세요 노루발을 올리지 않고 노루발 밑으로 천을 통과시키면 솔기가 고르지 않게 될 수 있습니다 2 왼손으로 바늘 실을 잡고 오른손으로 풀리를 시계...

Page 45: ...ad tension is not correctly balanced the chaining off result will be uneven If this happens pull the threads slightly Check the threading order and adjust the thread tension to create an even chain See page 28 체인 엮기 시험 재봉 후 계속해서 발판을 가볍게 밟아 4 인치 길이로 체인 엮기를 하세요 자동으로 실들이 체인으로 엮입니다 참고 실 장력의 균형이 올바르지 않으면 체인 엮기 결과가 고르지 않습니다 이런 경우에는 실들을 살짝 당기세요 실 끼우기 순서를 확인하고 실 장력을 조절하여 고른 체인을 만드세요 29 페이지 참조 ...

Page 46: ... the stitch formation stitch chain to see if it is uniform If the stitch is not uniform re check that the threading has been done properly and in sequence Follow the Seam Allowance Guide 3 8 1 2 5 8 1 for consistent cutting of the fabric seams 1Presser foot 2Upper knife 재봉 재봉 시작 재봉기에 실을 끼우고 실들을 노루발 뒤로 15 cm 6 인치 정도 당겨 빼세요 재봉을 시작하기 전에 노루발을 올리고 원단을 노루발 밑에 잘 놓으세요 손으로 풀리를 돌리면서 천천히 몇 땀을 재봉하세요 천이 자동으로 이...

Page 47: ...right needle and then the left needle Replace the material under the presser foot and sew 3 5 cm 1 1 8 to 2 inches over the previous stitches CAUTION Do not leave straight pins in the fabric when sewing as they will damage the needles and knives 작업물 빼기 재봉을 마쳤으면 재봉기를 저속으로 계속 돌려 체인 엮기를 하세요 그런 다음 작업물에서 5 cm 2 인치 여유를 두고 실을 절단하세요 체인 엮기를 위한 이송이 충분하지 않으면 실을 살짝 당기세요 재봉 중에 실이 끊어지는 경우 원단을 빼고 올바른 순서로 실을 다시 끼...

Page 48: ...thread tension but remember that if the tension is too loose the thread may break and stitches may be skipped 3 Dull knives will not cut a clean seam and will also causethefabrictopucker Thecuttingknives need to be replaced if you notice the fabric puckering while sewing 무거운 원단 재봉 원단이 윗칼 앞에 닿도록 노루발 밑에 놓으세요 재봉을 시작하세요 재봉하는 동안 노루발을 올리지 마세요 고운 원단 재봉 1 원단이 주름지지 않고 곡선 재봉이 가능하도록 노루발을 조절하세요 다음 페이지 참조 2 실 ...

Page 49: ...n very light materials the presser foot pressure should be loosened When sewing very heavy materials the presser foot pressure should be tightened 1Pressure adjustment screw 2Less pressure 3More pressure 4Pressure adjustment screw 5 Standard height for medium material 노루발 압력 노루발의 압력은 재봉기 왼쪽 위의 압력 조절 나사를 돌려 조절할 수 있습니다 이 재봉기는 가벼운 천부터 중간 천에 알맞게 압력이 이미 조절되어 있으므로 아주 무겁거나 아주 가벼운 원단을 재봉하는 경우가 아니면 추가 조절이 ...

Page 50: ... tangled thread 3 Thread tension too tight See pages 30 35 Thread tension 4 Needles incorrectly installed Install needles correctly See page 8 5 Wrong needle used Use correct needle Schmetz 130 705H suggested 4 Skipped stitches 1 Needle bent or needle tip blunt Replace with new needle 2 Needle incorrectly installed Install needle correctly See page 8 3 Wrong needle used Use correct needle Schmetz ...

Page 51: ... 실 홀더 등을 확인하고 엉킨 실 을 제거하세요 3 실 장력이 너무 조입니다 30 35 페이지 실 장력 을 참조하세요 4 바늘을 잘못 설치했습니다 바늘을 바르게 설치하세요 8 페이지 참조 5 잘못된 바늘을 사용했습니다 올바른 바늘을 사용하세요 Schmetz 130 705H 권장 4 땀이 건너뜁니다 1 바늘이 휘었거나 바늘 끝이 뭉툭 합니다 새 바늘로 교체하세요 2 바늘을 잘못 설치했습니다 바늘을 바르게 설치하세요 8 페이지 참조 3 잘못된 바늘을 사용했습니다 올바른 바늘을 사용하세요 Schmetz 130 705H 권장 4 실을 잘못 끼웠습니다 실을 바르게 끼우세요 17 27 페이지 참조 5 노루발 압력이 너무 느슨합니다 압력 조절 나사를 시계 방향으로 돌려 노루 발 압력을 높이세요 5 땀이 일정하지 않습니다...

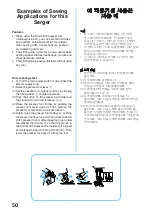
Page 52: ...봉할 수 있습니다 1 3실 오버로크 스티치 3 5 mm 9 64 인치 용도 슈트 블라우스 슬랙스 등에 오버로크 스티칭용 2 좁은 말은 단접기 스티치 2 0mm 1 32 인치 장식 또는 마감 스티치로 사용합니다 2 1 Stitch Selection Two needle models Thissewingmachinecansewfivedifferentstitches by following the simple steps below 1 Four thread overlock stitch Useallfourthreadsandtwoneedlesforproducing four thread overlock stitches Use Ideal for sewing knits and wovens 2 Three thread overloc...

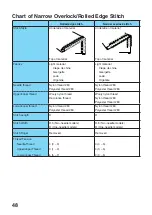
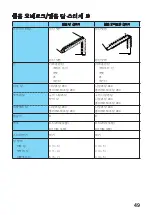
Page 53: ...hread overlock using the right needle 4 Remove the stitch finger 1 Raise the presser foot lever 2 Pull all threads toward the back of the ma chine 3 Check to make sure that the thread is no longer wrapped around the stitch finger 4 Open the front cover 5 Turn the hand wheel until the upperlooper is at its lowest position 좁은 오버로크 스티치 말은 단 스티치 좁은 오버로크 말은 단 스티치는 가벼운 천부터 중 간 무게 천에까지 사용하는 장식 마감입니다 천의 단...

Page 54: ... 6 스티치 핑거 릴리스 레버를 눌러 스티치 핑거를 제거하세요 7 그림처럼 앞커버 안쪽에 스티치 핑거 저장 공간이 있습니다 참고 일반 오버로크 스티치를 재봉할 때에는 스티치 핑거를 설치하세요 1윗루퍼 2스티치 핑거 3스티치 핑거 릴리스 레버 4앞커버 5스티치 핑거 홀더 6스티치 핑거 B 5 Adjust the stitch width for rolled hemming Move the stitch width lever located on the left side of the machine toward the front up to the R position 7Stitch width lever 8Needle plate with stitch finger removed A Two needle models B One n...

Page 55: ...h This application rolls the edge of the fabric inside of the hem stitch The lowerlooper tension should be tightened This pulls the upperlooper thread causing the edge of the fabric to fold around the remaining stitch finger After completing steps 1 through 6 above adjust your machine to these recommended thread tension settings Upperlooper thread tension at 1 4 Lowerlooper thread tension at 5 7 R...

Page 56: ...thread 80 Polyester thread 80 Nylon thread 80 Polyester thread 80 Upperlooper thread Wooly nylon thread Decorative thread Wooly nylon thread Nylon thread 80 Polyester thread 80 Lowerlooper thread Nylon thread 80 Polyester thread 80 Nylon thread 80 Polyester thread 80 Stitch Length R R Stitch Width R 5 Two needle models R One needle models R 5 Two needle models R One needle models Stitch Finger Rem...

Page 57: ... 오건디 가벼운 원단 크레프 드 신 조젯 론 오건디 바늘 실 나일론 실 80 폴리에스테르 실 80 나일론 실 80 폴리에스테르 실 80 윗루퍼 실 울리 나일론 실 장식 실 울리 나일론 실 나일론 실 80 폴리에스테르 실 80 아랫루퍼 실 나일론 실 80 폴리에스테르 실 80 나일론 실 80 폴리에스테르 실 80 땀길이 R R 땀폭 R 5 2바늘 모델 R 1바늘 모델 R 5 2바늘 모델 R 1바늘 모델 스티치 핑거 제거 제거 실 장력 바늘 실 윗루퍼 실 아랫루퍼 실 4 3 5 3 1 4 6 5 7 4 3 5 4 3 5 4 3 5 ...

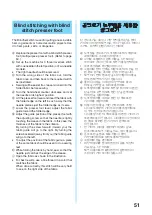
Page 58: ...pushing the presser foot lever upward Then remove the presser foot and store it in a safe location 5 Again raise the presser foot farther by pushing thepresserfootleverupward Thenplacetheblind stitch presser foot multipurpose foot just under the presser foot holder A so that the groove in the bottom of the presser foot holder B is aligned and catches the bar on the top of the foot C Then lower the...

Page 59: ...rion By turning the screw forward toward you the fabric guide will go to the right By turning the screw backward away from you the fabric guide will go to the left To adjust the position of the fabric guide a piece of the same fabric should be used to do a sewing test h While folding the fabric by hand sew so that the needle just catches the edge of the crease i Open the fabric as shown in the ill...

Page 60: ...htly Tightened 5 7 Lower Looper Thread Tension Slightly Slackened 2 4 Test sew on a scrap of the fabric to adjust the fabric guide and the thread tension 1Reverse 2Needle path 3Adjusting screw 4Fabric guide 참고 다음은 권장 설정입니다 땀폭 5 mm 2바늘 모델 3 5 mm 1바늘 모델 땀길이 3 4 mm 바늘 실 장력 약간 느슨하게 0 2 윗루퍼 실 장력 약간 팽팽하게 5 7 아랫루퍼 실 장력 약간 느슨하게 2 4 천조각에 시험 재봉하여 천 가이드와 실 장력을 조절하세요 1뒷면 2바늘 경로 3조절 나사 4천 가이드 a c gh i 3 4 1 4 ...

Page 61: ...he adjusting screw so that the needle moves down to a position 1 8 inch 2 5 3 0 mm inside the folded edge of the fabric so that some of the stitching loops over the edge By turning the screw forward toward you the fabric guide will go to the right By turning the screw backward away from you the fabric guide will go to the left To adjust the position of the fabric guide a piece of the same fabric c...

Page 62: ... 0 3 Upper Looper Thread Tension 2 5 Lower Looper Thread Tension 6 9 Test sew on a scrap of the fabric to adjust the fabric guide and the thread tension 1Reverse 2Adjusting screw 3Fabric guide 이 재봉법은 얇은 천에 적합하지 않습니다 다음은 권장 설정입니다 땀폭 5 mm 2바늘 모델 3 5 mm 1바늘 모델 땀길이 2 4 mm 바늘 실 장력 0 3 윗루퍼 실 장력 2 5 아랫루퍼 실 장력 6 9 천조각에 시험 재봉하여 천 가이드와 실 장력을 조절하세요 1뒷면 2조절 나사 3천 가이드 a c gh i 2 3 i 1 1 4 2 1 2 3 4 A B C ...

Page 63: ...e fabric guide toward the folded edge g Align the blind stitch presser foot guide with the line on the right side of the stitch finger By turning the screw forward toward you the stitch guide will go to the right By turning the screw backward away from you the stitch guide will go to the left h Align the fold with the guide and insert the fabric up to the needle position i Guidethefoldinthefabrict...

Page 64: ...h width lever 6Regular needle plate 7Stitch length adjustment lever 8Making lines 9Fold in two 0Adjusting screw AFabric guide 천조각에 시험 재봉하여 천 가이드와 실 장력을 조절하세요 12바늘 모델 2윗루퍼 3스티치 핑거 4스티치 핑거 릴리스 레버 5땀폭 레버 6일반 바늘판 7땀길이 조절 레버 8표시선 9둘로 접으세요 0조절 나사 A천 가이드 j 0 A 1 4 2 1 2 3 4 A B C 1 5 2 R 4 3 7 R 7 6 5 3 4 2 6 8 9 a b j ghi c ...

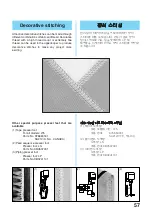
Page 65: ...tive stitches can be made through differentcombinationsoffabricandthread Decorative thread with a high thread count or extremely fine thread can be used in the upperlooper to produce decorative stitches to make any project more exciting Other special purpose presser feet that are available 1 Tape presser foot For all models LT5 Parts No X76663001 SA212 U S A CANADA 2 Pearl sequence presser foot Pr...

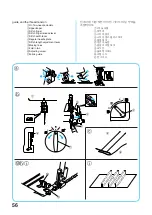
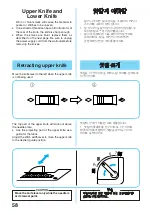
Page 66: ...fe is not being used 윗칼과 아랫칼 닳거나 무뎌진 칼은 원단을 주름지게 하거나 스티치를 고르지 않게 합니다 실 한 가닥을 칼의 앞이나 뒤에서 절단할 수 있다면 칼은 충분히 날카롭습니다 칼이 무뎌졌으면 다음 페이지의 설명대로 교체하세요 칼을 제거하기 전에 벽면 콘센트에서 전원 코드를 뽑으세요 윗칼 접기 윗칼을 사용하지 않을 때에는 칼 레버를 왼쪽으로 이동시키세요 윗칼의 상부가 바늘판 위로 돌출합니다 윗칼의 돌출부를 천 가이드로 사용하세요 땀폭 레버를 조절하여 윗칼을 원하는 가이드 위치로 움직이세요 The top part of the upper knife will stick out above the needle plate Use the projecting part of the upper knif...

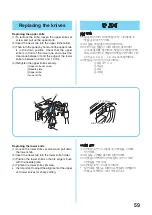
Page 67: ...r one and adjust the clearance between it and the edge of the lower knife to between 0 5 mm and 1 0 mm 4 Retighten the upper knife securely 1Upper knife set screw 2Needle plate 3Upper knife 4Lower knife 아랫칼 교체 1 아랫칼 고정 나사를 풀고 아랫칼을 아래로 당기세요 2 새 칼을 아랫칼 홀더에 삽입하세요 3 아랫칼 가장자리가 바늘판과 수평이 되게 아랫칼을 놓으세요 4 아랫칼 고정 나사를 조이세요 날카로운 절단을 위해서는 윗칼과 아랫칼의 정렬을 조절하는 것이 중요합니다 Replacing the lower knife 1 Loosen the lower k...

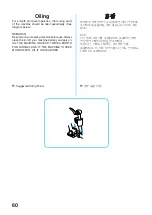
Page 68: ...e Always clean the lint off your machine before you apply oil OIL THE MACHINE ONCE OR TWICE A MONTH FOR NORMAL USE IF THE MACHINE IS USED MORE OFTEN OIL IT ONCE A WEEK Suggested Oiling Points 윤활 부드럽고 정숙한 작동을 위해 재봉기의 가동부를 주기적으로 윤활하는 것이 좋습니다 아래 그림 참조 참고 사용 전에 재봉기를 윤활하세요 윤활하기 전에 항상 재봉기에서 실밥을 청소하세요 일반 사용 시에는 1달에 1 2회 재봉기를 윤활하세요 더 자주 재봉기를 사용하는 경우에는 1주에 1회 윤활하세요 권장 윤활 지점 ...

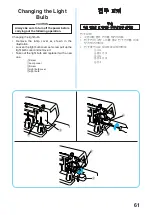
Page 69: ... shown in the illustration Loosen the light bulb cover set screw pull up the light bulb cover and remove it Take out the light bulb and replace it with a new one 1Screw 2Lamp cover 3Screw 4Light bulb cover 5Light bulb 전구 교체 주의 다음 작업을 할 때에는 항상 전원을 끄세요 전구 교체 그림처럼 램프 커버를 제거하세요 전구 커버 고정 나사를 풀고 전구 커버를 위로 당겨 제거하세요 전구를 꺼내고 새것으로 교체하세요 1나사 2램프 커버 3나사 4전구 커버 5전구 1 2 3 4 4 5 ...

Page 70: ...presser type Presser foot lift 5 mm to 6 mm 3 16 to 15 64 inch Needle SCHMETZ 130 705H No of needles and threads Three Four threads convertible Two needles or single needle Machine net weight 7 0 kgs Needle set SCHMETZ 130 705H 80 2 90 2 재봉기 사양 용도 경량 중량 원단 재봉 속도 분당 1 300 땀 땀폭 2 3 7 mm 5 64 9 32 인치 2바늘 모델 3 0 3 5 mm 1 8 9 64 인치 1바늘 모델 땀길이 피치 2 4 mm 5 64 5 32 인치 바늘대 스트로크 25 mm 1 인치 노루발 자유 압착형 노루발 리프...

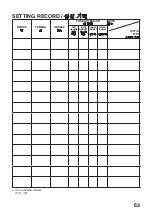
Page 71: ...63 SETTING RECORD 설정 기록 FABRIC 천 THREAD 실 NEEDLE 바늘 THREAD TENSION 실 장력 NOTE 참고 left needle 왼쪽 바늘 right needle 오른쪽 바늘 upper looper 윗루퍼 lower looper 아랫루퍼 STITCH TYPE 스티치 유형 on Two needle models 2바늘 모델 ...

Page 72: ...English Korean 2034D XB2073 001 Printed in Taiwan ...

Reviews: