background image

 1 

Treadwall M6 Pro-V Owner’s Manual—2018 

INTRODUCTION 

Vertical movement 

is a new category of training that works the whole body and 

mind together. 

The Treadwall 

delivers a full range of workout opportunities - from a remarkable 

aerobic burn to an upper-body core and grip-strength workout that challenges the 
fittest athletes. 

When introducing 

the wall, it is important that the staff understands how to 

unlock the potential benefits of this powerful fitness tool. 

The owner's manual 

is designed to help managers, staff and trainers take full 

advantage of this equipment. This reference tool emphasizes the benefits of 
vertical movement with links and resources to help integrate the wall into fitness 
routines. In addition, there are incentive programs to help ramp up popularity and 
much more. 

PRODUCT REGISTRATION 

Record your serial number here:________________________________ 


Please visit 

brewerfitness.com/OwnersManual 

to register your new Treadwall with us. 

You can also email us at [email protected] with your contact information and 
serial number to complete your product registration. 


You must make sure to register your new Treadwall to receive service updates. 

Summary of Contents for M6 Pro-V

Page 1: ...Treadwall M6 Pro V Owner s Manual 87 York Ave Randolph MA 02368 781 961 5200 www brewerfitness com Copyright 2017 Brewer Fitness...

Page 2: ...ur Treadwall a Success 11 Information for Your Staff 13 Training Tips Guidelines 14 Activities Promotional Ideas 16 Frequently Asked Questions 18 General Maintenance 20 Troubleshooting 22 Service Inst...

Page 3: ...esigned to help managers staff and trainers take full advantage of this equipment This reference tool emphasizes the benefits of vertical movement with links and resources to help integrate the wall i...

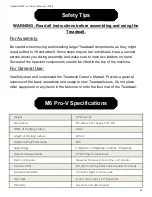
Page 4: ...s Manual Provide a general overview of the basic opera ons and usage to new Treadwall users Do not place other equipment or any items in the fall zone or onto the oor mat of the Treadwall M6 Pro V Spe...

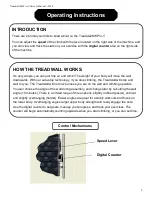
Page 5: ...op climbing the Treadwall will stop and wait for you The Treadwall will not move unless you are on the wall and climbing upwards You can choose the angle of the wall during assembly and change later b...

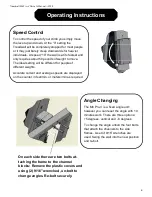
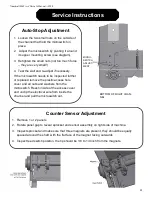
Page 6: ...e of different weights Accurate current and average speeds are displayed on the counter in feet min or meters min as required Angle Changing The M6 Pro V is a fixed angle unit however you can reset th...

Page 7: ...0 00 0 1 2 3 4 5 6 7 8 9 0 Clear Home Screen The home screen shows real time data for a single climb When you pause for 5 seconds the counter will hold your data on the screen until you begin climbing...

Page 8: ...entire wall and label individual routes with colored pieces of tape If you want to try your own hand at route setting one of the most fun ways to start is to place holds almost randomly with one hold...

Page 9: ...ty for most We recommend that a staff person be chosen as the main advocate for the product s introduction period This person might take on the following responsibilities 1 Read through the manual tho...

Page 10: ...ndurance or as part of a circuit routine with oth er equipment Customize it to suit YOUR needs and GOALS 1 You should use the equipment yourself Get a first hand look at how the workout makes you feel...

Page 11: ...icles on the benefits of climbing etc 2 Refer to our website for full training program ideas and short workouts Climbing is a progressive activity there is a great deal to learn about balance and tech...

Page 12: ...Devil s Tower Wyoming 5267 Mt Katahdin Maine 6288 Mt Washington New Hampshire 7310 Mt Koscivsko high point in Australia 7569 El Capitan Yosemite National Park 8842 Half Dome Yosemite National Park 95...

Page 13: ...old pattern get repetitious Eventually but it takes much longer that you might expect The Treadwall has no beginning or end and it con nually presents you with new challenges and possibili es It is si...

Page 14: ...ng play equipment and trees For adults climbing on the Treadwall recaptures much of that simple joy and natural vertical movement What kind of bodies does Vertical Movement build Climbing and gymnasti...

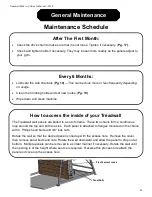
Page 15: ...inside of your Treadwall The Treadwall wall panels are bolted to a set of chains These two chains form a continuous loop around the top and bottom axles Each panel is attached to flanges mounted on t...

Page 16: ...frames however if the whole wall appears tilted to one side you can re adjust the wall with the back x bracing You can use a level on the side frame to get the alignment vertical You will have to loo...

Page 17: ...microswitch needs to be inspected further or replaced remove the plastic access hole cover and all nuts and washers from the microswitch Reach inside of the access cover and unclip the electrical wire...

Page 18: ...r s Manual Provide a general overview of the basic operations and usage to new Treadwall users Do not place other equipment or any items in the fall zone or onto the floor mat of the Treadwall M6 Pro...

Page 19: ...TREADWALL M6 V INSTALL AND SERVICE MANUAL Copyright 2016 Brewer s Ledge Inc www treadwall com...

Page 20: ...PACER HARDWARE BAG WM 3 A FRAME HARDWARE BAG WM 2 SUPPORT FRAME PARTS Page 1 M6 V install manual 1 15 16 TOOLS NEEDED PER PERSON 9 16 COMBINATION WRENCH 3 4 COMBINATION WRENCH MEDIUM SIZE ADJUSTABLE W...

Page 21: ...S THAT ALLOW THE PLUG TO BE PUSHED OVER THE WIRE AND BACK INTO THE HOLE FINISHED SUPPORT FRAME ASSEMBLY ASSEMBLE THE LEFT SIDE FRAME THE ONE WITH NO WIRES FIRST BY SLIPPING THE TOP SECTION ONTO THE BO...

Page 22: ...MPORTANT THAT THE TREADWALL REMAIN AGAINST A BACKING WALL THE WOOD PANEL AT THE TOP HORIZONTAL IS DESIGNED TO BE ATTACHED TO THE WALL WITH APPROPRIATE FASTENERS IF THERE IS ANY POSSIBILITY THAT THE MA...

Page 23: ...RO TREADWALL ON THE FOLLOWING PAGES MANY OF THE ILLUSTRATIONS ARE TAKEN FROM THE M6 PRO MANUAL AND SHOW THE COMPONENTS MOUNTED ON AN M6 PRO SUPPORT FRAME ALTHOUGH THE FRAMES ARE DIFFERENT THE INSTRUCT...

Page 24: ...assembly parts Page 5 M6 V install manual 1 15 16 Top shroud Back guard Right channel Stiffies Climbing panels Upper shaft Lower shaft Left channel Hardware box Holds box Ladderline box Chain boxes 2...

Page 25: ...8 foot stepladders and two people for this part of the installation Position your ladders inside the front of the A frame and lift the main shaft into position Note that the end with two chain sprocke...

Page 26: ...h two people When the channel is in place attach it to the square bearing with three flange bolts and nuts as shown but leave the nuts loose so that the shroud can be slipped under the bolt heads in a...

Page 27: ...ten the bearing out Insert the shaft one end at a time push it into the bearing until the stop collar on the shaft presses against the bearing and tighten the setscrews firmly Notice that one sprocket...

Page 28: ...FRAMES ATTACH THE TWO SPACERS TO THE CHANNELS WITH SHORT BOLTS AS SHOWN THE RIGHT SPACER IS WIDER THAN THE LEFT SWING THE CHANNELS TO THE DESIRED ANGLE AND ATTACH THE SPACERS TO THE CROSS BARS WITH T...

Page 29: ...earing should have only 3 bolts at this point The top rear bolt must be installed once you get the shroud in place Use the ladders to raise the shroud and slip the curved slots under the two front bol...

Page 30: ...the counter timer that mounts at the top of the channel and the wire comes down through wire clips to the same grommet Bring that wire through the grommet and plug it in as well Page 11 M6 V install 1...

Page 31: ...nk is provided to connect the chain If you are unfamiliar with installation of master links here is a good source http www wrrdualsport com tech guide chassis 73 masterlink Once the chain is attached...

Page 32: ...f the chains are different as shown below Attach the end of chain A with a single extra link to the end of chain B that has five links This will insure that the spacing between the chain tabs is corre...

Page 33: ...you are doing the second chain be aware that the tabs must be synchronized between the two chains When a tab on one chain is level with the spreader bar the tab on the opposite chain must also be leve...

Page 34: ...does not dig into the panel Notice the plastic wear buttons in the corners of the panel The buttons in the front of the panel should always be at the TOP corners of the panel The panels come with whi...

Page 35: ...s use blocks of wood at the bottom on both sides as shown to jam the wall and prevent it from backing up The last three panels cannot be put in the same way They must be put in from the bottom slid up...

Page 36: ...ne and climbing holds going through the final check list next page and installing the last climbing panel Climbing hold instructions are included in each box Install the ladderline first When everythi...

Page 37: ...d for sensitivity if required by loosening its small mounting screws and pivoting it 3 Check the drive chain at the top of the right channel The slack should be adjusted out of it but it should not be...

Page 38: ...nd will be aligned when the first panel is installed Rough Initial Operation There may be air trapped in the hydraulic oil after transport this will cause the unit to run quite rough cavitation until...

Page 39: ...t all the angles The micro switch is pre set at the factory but it can be adjusted for sensitivity if required by loosening its small mounting screws and pivoting it 3 Check the drive chain at the top...

Page 40: ...ich tracks the climbers progress Hold The plastic or wood attachment that a climber uses to hold or stand on Ladder Line A wooden climbing hold that allows for easy and aerobic climbing Mat A foam pad...

Page 41: ...anties implied warranty of merchantabil ity or fitness for a particular purpose is limited in its duration to the duration of the written limited warranties set forth herein b In no case shall Brewer...

Reviews: