background image

checked as a destination, refer to
page 213

.

3.

Select a contact in the list or, if desired, with
"A-Z search".

4.

If necessary, select "Business address" or
"Home address".

Storing the destination in the address

book

After entering the destination, store the desti‐
nation in the address book.

1.

Open "Options".

2.

"Store as new contact" or "Add to existing
contact"

3.

Select an existing contact, if available.

4.

Select "Business address" or "Home
address".

5.

Enter "Last name" and, if necessary, "First
name".

6.

"Store in vehicle"

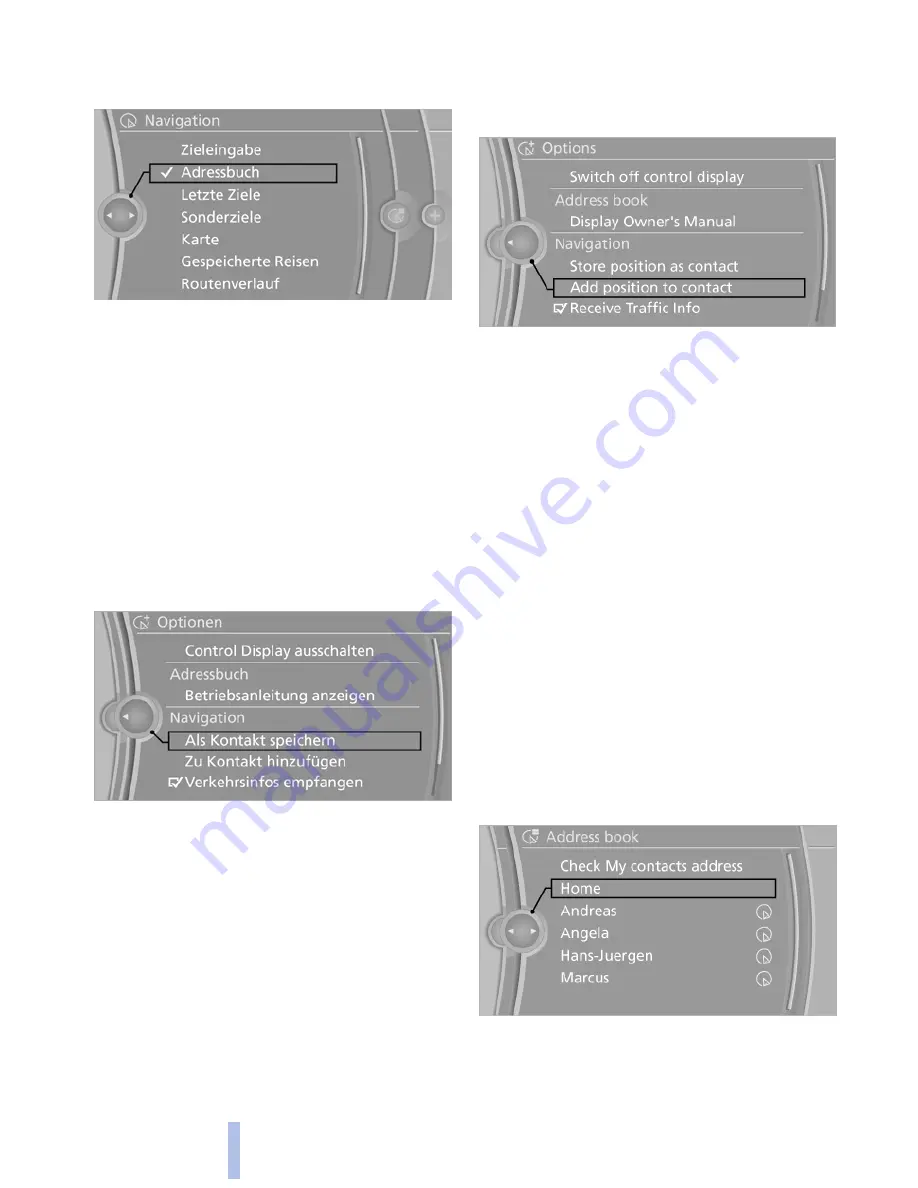
Storing the position

The current position can be stored in the ad‐
dress book.

1.

"Navigation"

2.

Open "Options".

3.

"Store position as contact" or "Add position
to contact"

4.

Depending on the selection, choose an ex‐
isting contact from the list. Select the type
of address and enter the first and last name.

5.

"Store in vehicle"

Editing or deleting an address

1.

"Navigation"

2.

"Address book"

3.

Highlight the entry.

4.

Open "Options".

5.

"Edit in Contacts" or "Delete entry"

Using the home address as the

destination

The home address must be stored. 

Specify the

home address, refer to page 212

.

1.

"Navigation"

2.

"Address book"

3.

"Home"

4.

Start destination guidance.

Seite 150

150

Online Edition for Part no. 01 41 2 603 958 - 03 10 500

Navigation

Summary of Contents for 2011 7 Series

Page 1: ...Owner s Manual for Vehicle The Ultimate Driving Machine Contents A Z Online Edition for Part no 01 41 2 603 958 03 10 500 ...

Page 2: ......

Page 3: ...Manual in your vehicle It con tains important information on vehicle operation that will help you make full use of the technical features available in your BMW The manual also contains information designed to enhance operating reliability and road safety and to contribute to maintaining the value of your BMW Supplementary information can be found in the additional bro chures in the onboard literat...

Page 4: ...ich Germany Reprinting including excerpts only with the written consent of BMW AG Munich English I 10 03 10 500 Printed on environmentally friendly paper bleached without chlorine suitable for recycling Online Edition for Part no 01 41 2 603 958 03 10 500 ...

Page 5: ...uipment 134 Storage compartments Driving tips 140 Things to remember when driving Navigation 148 Navigation Entertainment 166 Tone 168 Radio 175 CD multimedia 191 Rear entertainment 196 Professional rear entertainment Communication 204 Telephone 212 Contacts 215 BMW Assist Mobility 222 Refueling 223 Fuel 224 Wheels and tires 230 Engine compartment 232 Engine oil 234 Maintenance 236 Replacing compo...

Page 6: ...s Control Display texts used to se lect individual functions Verbal instructions to use with the voice ac tivation system Identifies the answers generated by the voice activation system Refers to measures that can be taken to help protect the environment Symbols on vehicle components Recommends that you study the relevant section of this Owner s Manual in connection with a particular part or assem...

Page 7: ...fety use genuine parts and ac cessories approved by BMW When you pur chase accessories tested and approved by BMW and Genuine BMW Parts you simultane ously acquire the assurance that they have been thoroughly tested by BMW to ensure optimum performance when installed on your vehicle BMW warrants these parts to be free from de fects in material and workmanship BMW will not accept any liability for ...

Page 8: ... vehicle to meet different prevailing operating conditions and homologation requirements You should also be aware of any applicable warranty limita tions or exclusions for such country or region In such case please contact Customer Relations for further information Reporting safety defects For US customers The following only applies to vehicles owned and operated in the US If you believe that your...

Page 9: ...9 Online Edition for Part no 01 41 2 603 958 03 10 500 Reference Mobility Communication Entertainment Navigation Driving tips Controls At a glance ...

Page 10: ...10 Online Edition for Part no 01 41 2 603 958 03 10 500 ...

Page 11: ...s of buttons switches and displays are intended to familiarize you with your vehicle You will also become quickly acquainted with the available control concepts and options 11 Online Edition for Part no 01 41 2 603 958 03 10 500 ...

Page 12: ... Power windows 45 5 Exterior mirror operation 59 6 Driver assistance systems Active Blind Spot Detec tion 101 Lane departure warning 100 Night Vision with pedestrian de tection 117 Head up Display 120 7 Lamps Front fog lamps 92 Parking lamps 89 Low beams 89 Automatic headlamp con trol 90 Daytime running lights 90 High beam Assistant 91 Instrument lighting 92 8 Steering column stalk left 12 Online ...

Page 13: ...nment source Volume Voice activation 25 Telephone 204 12 Steering column stalk right Windshield wipers 72 Rain sensor 72 Clean the windshields and head lamps 72 13 Start stop the engine and switch the ignition on off 66 14 Horn 15 Steering wheel heating 61 16 Adjust steering wheel 61 17 Open trunk lid 41 18 Unlocking the hood 13 Online Edition for Part no 01 41 2 603 958 03 10 500 Reference Mobili...

Page 14: ...s Instrument cluster The indicator and warning lamps can light up in a variety of combinations and colors Several of the lamps are checked for proper functioning when the engine is started or the ig nition is switched on and light up briefly in the process Overview indicator warning lamps Symbol Function or system Turn signal Parking brake Automatic Hold Front fog lamps High beams 14 Online Editio...

Page 15: ...BS Antilock Brake System ABS in Cana dian models Text messages Text messages in combination with a symbol in the instrument cluster explain a Check Control message and the meaning of the indicator and warning lamps Supplementary text messages Additional information on the Control Display e g on the cause of a malfunction or the re quired action can be called up via Check Con trol refer to page 87 ...

Page 16: ...plays 1 Symbols and messages e g warnings 14 2 Range 80 3 Computer 82 4 Navigation display 148 Service display 86 5 Selection list e g radio 81 6 Transmission displays 76 16 Online Edition for Part no 01 41 2 603 958 03 10 500 Cockpit ...

Page 17: ...atic climate control 122 8 Controller with buttons 19 9 Parking brake 68 Auto Hold 70 10 PDC Park Distance Con trol 109 Top View 115 Backup camera 112 Side View 114 11 Dynamic Driving Control 105 DSC Dynamic Stability Con trol 105 12 Transmission selector lever 17 Online Edition for Part no 01 41 2 603 958 03 10 500 Reference Mobility Communication Entertainment Navigation Driving tips Controls At...

Page 18: ... the headliner 1 Emergency Request 243 2 Glass sunroof powered 47 3 Indicator lamp front passenger airbag 95 4 Reading lamps 92 5 Interior lamps 92 18 Online Edition for Part no 01 41 2 603 958 03 10 500 Cockpit ...

Page 19: ...The buttons can be used to open the menus directly The controller can be used to select menu items and create the settings Control Display Notes To clean the Control Display follow the care instructions refer to page 252 Do not place objects close to the Control Display otherwise the Control Display can be damaged Switching off 1 Press the button 2 Switch off control display Switching on Press the...

Page 20: ...lected 1 Turn the controller until the desired menu item is highlighted 2 Press the controller Menu items in the Owner s Manual In the Owner s Manual menu items that can be selected are set in quotation marks e g Settings Changing between panels After a menu item is selected e g Radio a new panel is displayed Panels can overlap Move the controller to the left The current panel is closed and the pr...

Page 21: ...e selected main menu e g for Radio If applicable further operating options for the selected menu e g Store station Changing settings 1 Select a field 2 Turn the controller until the desired setting is displayed 3 Press the controller Activating deactivating the functions Several menu items are preceded by a check box It indicates whether the function is acti vated or deactivated Selecting the menu...

Page 22: ...ception Status field symbols The symbols are grouped as follows Radio symbols Symbol Meaning Traffic bulletins switched on One of the symbols is displayed HD Radio switched on Satellite radio switched on Telephone symbols Symbol Meaning Incoming or outgoing call Missed call Wireless network reception strength Symbol flashes network search Wireless network not available Bluetooth activated Roaming ...

Page 23: ...e pro grammable memory buttons and called up di rectly e g radio stations navigation destina tions phone numbers and entry points into the menu The settings are stored for the remote control currently in use Saving a function 1 Highlight the function via the iDrive 2 Press the desired button for more than 2 seconds Running a function Press the button The function will run immediately This means fo...

Page 24: ... Enter the numbers Switching between upper and lower case letters Depending on the menu you can switch be tween entering upper and lower case letters Symbol Function Move the controller up switch from upper to lower case letters Move the controller up switch from lower to upper case letters Entry comparison Entry of names and addresses the selection is narroweddowneverytimealetterisenteredand lett...

Page 25: ...n the steering wheel or Cancel Possible commands Having possible commands read aloud The commands available in each case depend on the menu item selected on the Control Dis play Have the available spoken instructions read aloud using Voice commands If for example Settings is selected the com mands to the settings are read aloud Executing functions using short commands Functions on the main menu ca...

Page 26: ...oice and vocal pitch can change This can unnecessarily delay the establishment of a tel ephone connection Instead use the SOS button refer to page 243 in the vicinity of the interior mirror Environmental conditions Say the commands numbers and letters smoothly and with normal volume empha sis and speed Always say commands in the language of the voice activation system When selecting a radio statio...

Page 27: ...ferring to the present function Therelevantinformationcanbeopeneddirectly Opening via the iDrive To move directly from the application on the Control Display to the options menu 1 Press the button or move the controller to the right repeatedly until the Options menu is displayed 2 Display Owner s Manual Opening when a Check Control message is displayed Directly from the Check Control message on th...

Page 28: ...ttons General information The Owner s Manual can be stored on the pro grammable memory buttons refer to page 23 and called up directly Storing 1 Select Owner s Manual via the iDrive 2 Press the desired button for more than 2 seconds Executing Press the button The Owner s Manual is displayed im mediately 28 Online Edition for Part no 01 41 2 603 958 03 10 500 Integrated Owner s Manual in the vehicl...

Page 29: ...c motor is supplied by the high voltage battery Energy recovery The high voltage battery of the hybrid system is charged through energy recovery The electric motor acts as a generator and con verts the motion of the vehicle into electric cur rent Charging can take place in various situations while the vehicle is being driven When the vehicle is rolling if the accelerator is not pressed During vehi...

Page 30: ...efer to page 127 Auxiliary air conditioning refer to page 128 Display The displays of the hybrid system refer to page 80 help to make full use of the system Energy saving driving Please observe the following notes on energy saving driving Saving fuel refer to page 145 Using the hybrid system efficiently refer to page 140 Safety information Please note the information on the safety of the hybrid sy...

Page 31: ...31 Online Edition for Part no 01 41 2 603 958 03 10 500 Reference Mobility Communication Entertainment Navigation Driving tips Controls At a glance ...

Page 32: ...32 Online Edition for Part no 01 41 2 603 958 03 10 500 ...

Page 33: ... you with information that will give you complete control of your vehicle All features and accessories that are useful for driving and your safety comfort and convenience are described here 33 Online Edition for Part no 01 41 2 603 958 03 10 500 ...

Page 34: ...te control Service data in the remote control refer to page 234 Integrated key Press the button on the back of the remote con trol arrow 1 and pull out the key arrow 2 The integrated key fits the following locks Driver s door Trunk lid Storage compartment in the front center armrest The storage compartment contains a switch for separately securing the trunk lid refer to page 42 Replacing the batte...

Page 35: ...Personal Profile The concept You can set several of your vehicle s functions to suit your personal needs and preferences The settings are automatically saved in the profile currently activated The remote control used is detected when thevehicleisunlockedandthestoredprofile is called up Your personal settings will be recognized and called up again even if the vehicle has beenusedinthemeantimebysome...

Page 36: ...h start for selecting the desired profile 1 Settings 2 Profiles 3 Options 4 Display user list at startup Personal Profile settings The following functions and settings can be stored in a profile More information on the settings can be found under Exterior mirror position refer to page 59 CD Multimedia refer to page 175 audio source listened to last Dynamic Driving Control sport program re fer to p...

Page 37: ...the remote control Via the driver s door lock Via the door handles Via the button in the trunk lid The following takes place simultaneously when locking unlocking the vehicle via the remote control Anti theft protection is switched on off Doors cannot be unlocked using the lock buttons or the door opener The welcome lamps interior lamps and courtesy lamps are switched on and off The alarm system r...

Page 38: ...lamps and welcome lamps Press the button on the remote control with the vehicle locked Panic mode You can trigger the alarm system if you find yourself in a dangerous situation Press the button on the remote control for at least 3 seconds To switch off the alarm press any button Switching on the headlamp courtesy delay feature Briefly press the button on the remote control The duration refer to pa...

Page 39: ...rate this equipment Using the door lock General information Locking from the outside Do not lock the vehicle from the outside if there are people in it as the vehicle cannot be unlocked from inside without special knowl edge Remove the key before pulling the door handle Before pulling the outside door handle remove the key to avoid damaging the paintwork and the key In some country specific versio...

Page 40: ...ngs 2 Door locks 3 Select the desired function Lock if no door is opened The vehicle locks automatically after a short period of time if a door is not opened Lock after start to drive The vehicle locks automatically after you drive away Doors Automatic Soft Closing To close the doors push lightly It is closed automatically Danger of pinching Make sure that the closing path of the doors is clear ot...

Page 41: ...s in the interior trim of the trunk lid make it easier to pull down the lid Danger of pinching Make sure that the closing path of the trunk lid is clear otherwise injuries may result Automatic Soft Closing To close it completely push the trunk lid down lightly It is closed automatically Locking the vehicle Press the button on the inside of the trunk lid The vehicle is locked completely Automatic t...

Page 42: ... interrupted when the vehicle starts moving Danger of pinching Make sure that the closing path of the trunk lid is clear otherwise injuries may re sult Manual operation If an electrical malfunction occurs 1 Manually unlock the trunk lid refer to page 41 2 Open or close the trunk lid slowly and smoothly Locking separately The trunk lid can be locked separately using the switch in the front center a...

Page 43: ...rox 2 seconds The engine can only be started if the remote control is inside the vehicle Comparison with ordinary remote control The functions can be controlled by pressing the buttons or via Comfort Access Unlocking Fully grasp a door handle arrow 1 This corre sponds to pressing the button Locking Press the area on the door handle arrow 2 with your finger for approx 1 second This corresponds to p...

Page 44: ...system Unlocking via the door lock will trigger the alarm on some country specific versions This alarm can only be ended by pressing the button on the remote control Trunk lid and armed alarm system The trunk lid can be opened using the remote control even if the alarm system is armed Press the button on the remote control for approx 1 second After the trunk lid is closed it is locked and monitore...

Page 45: ...ndows General information Take the remote control with you Take the remote control with you when leaving the vehicle so that children for example cannot operate the power windows and injure themselves Opening Press the switch to the resistance point The window opens while the switch is held Press the switch beyond the resist ance point The window opens automatically Pressing again stops the motion...

Page 46: ...roller sunblinds using the switches in the rear Adjustment of the power rear seats Adjustment of the power head restraints in the rear Switching on and off Press the button The LED lights up if the safety function is switched on Safety switch for rear operation Press the safety switch when transporting children in the rear otherwise injury may result if the windows are closed without supervision T...

Page 47: ... them selves Raising the glass sunroof Press the switch briefly The closed roof is raised and the sliding visor opens slightly The opened roof closes until it is in its raised position The sliding visor stays completely open Pressing the switch again closes the sliding visor al most completely Sliding visor with raised roof Do not use force to close the sliding visor as this may damage the mechani...

Page 48: ...espite the pinch protection system check that the roof s closing path is clear otherwise the closing action may not be interrupted in certain extreme situations such as when thin objects are present Closing without the pinch protection system For example if there is an external danger pro ceed as follows 1 Press the switch forward beyond the resist ance point and hold Pinch protection is limited a...

Page 49: ...ng loss of vehicle control could lead to an accident Do not incline the backrest too far to the rear Do not incline the backrest on the front passen ger side too far to the rear during driving Oth erwise there is the danger of sliding under the safety belt in an accident This would eliminate the protection normally provided by the belt At a glance 1 Lumbar support 2 Backrest width 3 Shoulder suppo...

Page 50: ...rvature is shifted up down Backrest width Change the width of the backrest using the side wings to adjust the lateral support To make it easier to enter and exit the vehicle the backrest width temporarily opens fully Shoulder support Also supports the back in the shoulder area Results in a relaxed seating position Reduces strain on the shoulder muscles Gentleman function The front passenger seat c...

Page 51: ... Temperature distribution The heating action in the seat cushion and back rest can be distributed in different ways 1 Climate 2 Seat heating distribution 3 Select the required seat 4 Turn the controller to set the temperature distribution Active seat ventilation The seat surface is cooled by means of the in tegrated fan The ventilation rapidly cools the seat e g if the vehicle interior is overheat...

Page 52: ...rd back 2 Seat tilt 3 Backrest tilt Lumbar support The contour of the seat backrest can be ad justed in such a way that it supports the lumbar region of the spine The lower back and the spine are supported for upright posture Press the front rear section of the switch The curvature is increased decreased Press the upper lower section of the switch The curvature is shifted up down Adjusting the fro...

Page 53: ...ch on press the button once for each massage level The highest level is active when two LEDs are lit Switching off To switch off press and hold the button The LEDs go out Seat heating Switching on Press the button once for each temper ature level The maximum temperature is reached when three LEDs are lit Switching off Press the button longer The LEDs go out Temperature distribution The heating act...

Page 54: ...the left and right The belt buckle embossed with the word CENTER is intended exclusively for use by passengers riding in the center position One person per safety belt Never allow more than one person to wear a single safety belt Never allow infants or small children to ride on a passenger s lap Putting on the belt Lay the belt without twisting snugly across the lap and shoulders as close to the b...

Page 55: ... the belt anchors checked Checking and replacing safety belts Have the work performed only by your service center otherwise it cannot be ensured that this safety feature will function properly Front head restraints Correctly adjusted head restraint A correctly adjusted head restraint reduces the risk of injury to cervical vertebrae in the event of an accident Adjusting the head restraint Correctly...

Page 56: ...ead restraints of all occu pied seats otherwise there is an increased risk of injury in an accident Height Adjust the head restraint so that its center is ap proximately at ear level Distance Adjust the distance so that the head restraint is as close as possible to the back of the head Adjusting the height manual head restraints To raise pull To lower press the button arrow 1 and push the head res...

Page 57: ...the seat otherwise the pro tective function of the head restraint is unavail able Removing power head restraints Note Do not remove the rear head restraints To avoid damage they can only be installed by your service center Removing Only remove the head restraint if no one will be sitting in the seat in question 1 Completely raise the head restraint 2 Completely pull out the head restraint with a f...

Page 58: ...river s door or switch on the ig nition 2 Press and hold the desired button 1 or 2 until the adjustment procedure is completed Calling up of a seat position deactivated After a brief period the calling up of stored seat positions is deactivated to save battery power To reactivate calling up of a seat position Open or close the door or trunk lid Press a button on the remote control Press the Start ...

Page 59: ...s downward slightly on the front pas senger side This improves your view of the curb and other low lying obstacles when parking for example Activating 1 Slide the mirror changeover switch to the driver s mirror position 2 Engage transmission position R Deactivating Slide the mirror changeover switch to the pas senger s mirror position Fold in and out Press the button Possible up to approx 15 mph 2...

Page 60: ...lean Do not cover the area between the inside rearview mirror and the windshield Illuminated vanity mirror in the rear Folding down Press the button The vanity mirror folds down The angle can be adjusted by hand Folding up Press the mirror up Steering wheel General information Adjusting while driving Do not adjust the steering wheel while driving otherwise an unexpected movement could result in an...

Page 61: ...and out The steering wheel temporarily moves into the highest position to make it easier to enter and exit the vehicle Steering wheel heating Switching on off Press the button On the LED lights up Off the LED goes out 61 Online Edition for Part no 01 41 2 603 958 03 10 500 Reference Mobility Communication Entertainment Navigation Driving tips Controls At a glance ...

Page 62: ...n the airbags are triggered even with a child restraint fixing system Installing child restraint fixing systems Before mounting Before mounting a child restraint fixing system on the rear middle seat return both outer backr ests to the basic position Notes Manufacturer s information for child re straint fixing systems To select mount and use child restraint fixing systems observe the information p...

Page 63: ...ems To mount and use the LATCH child restraint fix ing systems observe the operating and safety information from the system manufacturer oth erwise the level of protection may be re duced Mounts for the lower LATCH anchors Correctly engage the lower LATCH an chors Make sure that the lower LATCH anchors have properly engaged and that the child restraint fix ing system is resting snugly against the ...

Page 64: ...ng strap guide Retaining strap Make sure the upper retaining strap does not run over sharp edges and is not twisted as it passes to the top anchor Otherwise the strap will not properly secure the child restraint fixing system in the event of an accident 1 Direction of travel 2 Head restraint 3 Hook for upper retaining strap 4 Mounting point eye 5 Rear window shelf 6 Seat backrest 7 Upper retaining...

Page 65: ... for the rear Press the button on the driver s door if children are being transported in the rear This locks various functions so that they cannot be operated from the rear safety switch refer to page 46 65 Online Edition for Part no 01 41 2 603 958 03 10 500 Reference Mobility Communication Entertainment Navigation Driving tips Controls At a glance ...

Page 66: ...ngaged automatically When in an automatic car wash for example ensure that the ignition is not switched off accidentally When the vehicle is locked using the central locking system the ignition switches off auto matically Radio ready state The radio ready state is activated by pressing the Start Stop button in the following situations When the engine is running When the engine is switched off auto...

Page 67: ...he vehicle is able to roll when the following steps are adhered to 1 Depress the brake pedal 2 Engage transmission position N 3 Release the parking brake or deactivate Au tomatic Hold refer to page 70 4 Switch the engine off Transmission position P with the ignition off When the ignition is switched off position P is engaged automatically When in an automatic car wash for example ensure that the i...

Page 68: ...e The engine does not start automatically when the seat belt is unbuckled after the combustion engine has been switched off automatically and the driver s door is opened or the engine com partment lid was unlocked The indicator lamps come on The engine can only be started via the Start Stop button Note Even if you do not want to drive off the deacti vated combustion engine starts up automati cally...

Page 69: ...ing the vehicle so that children for example cannot release the parking brake Manual release The parking brake can be released manually in the event of a power failure or electrical fault Before releasing secure the vehicle against rolling Before releasing the parking brake manually and whenever you park the vehicle with the parking brake released ensure that position P of the automatic transmissi...

Page 70: ...tomatically setting and releasing the parking brake such as when moving in stop and go traffic The vehicle is automatically held in place when it is stationary On inclines the system prevents the vehicle from rolling backward when driving away For your safety AutomaticHoldisdeactivatedautomaticallyand the parking brake is set when The engine is switched off A door is opened and the driver s safety...

Page 71: ... roll Parking The parking brake is automatically set if the en gine is switched off while the vehicle is being held by Automatic Hold The indicator lamp changes from green to red The parking brake is not set if the engine is switched off while the vehicle is coast ing to a halt Automatic Hold is deacti vated The parking brake can also be released after the engine is switched off e g in a car wash ...

Page 72: ...l po sition when released Normal wiping speed press up once The wipers switch to intermittent operation when the vehicle is stationary Fast wiping speed press up twice or press once beyond the resistance point Thewipersswitchtonormalspeedwhenthe vehicle is stationary Switching off and brief wipe Press the wiper levers down The lever automatically returns to its initial po sition when released Brie...

Page 73: ...hen the reservoir is empty otherwise you could damage the pump Windshield washer nozzles The washer jets are automatically heated whenever the ignition is switched on Fold out position of the wipers Required when changing the wiper blades or under frosty conditions for example 1 Switch off the ignition 2 Under frosty conditions ensure that the wiper blades are not frozen onto the wind shield 3 Pre...

Page 74: ...everse Select only when the vehicle is stationary N is Neutral Use in automatic car washes for example The vehicle can roll When the ignition is switched off refer to page 66 position P is engaged automatically P Park Select only when the vehicle is stationary The drive wheels are blocked P is engaged automatically After the engine is switched off if the car is in radio ready state refer to page 6...

Page 75: ...left out of trans mission position D DS is displayed in the instrument cluster This position is recommended for a perform ance oriented driving style Activating the M S manual mode Push the selector lever to the left out of trans mission position D Push the selector lever forward or backward Manual mode becomes active and the gear is changed The engaged gear is displayed in the instrument cluster ...

Page 76: ...s the brake when releasing the transmission lock When manually releasing the transmission lock depress the brake otherwise the vehicle could roll Only release the transmission lock in the event of a malfunction e g for towing After parking the vehicle engage the transmis sion lock again If the parking brake needs to be manually re leased as well adhere to the following se quence 1 Secure the vehic...

Page 77: ...position P is no longer engaged Locking the transmission lock again After parking the vehicle lock the trans mission lock again to prevent the vehicle from rolling Locking Pull out the release tool The transmission lock is locked again 77 Online Edition for Part no 01 41 2 603 958 03 10 500 Reference Mobility Communication Entertainment Navigation Driving tips Controls At a glance ...

Page 78: ...ss the knob When the ignition is switched off thetime externaltemper ature and odometer are dis played When the ignition is switched on the trip odometer is reset External temperature External temperature warning If the display drops to 37 3 a signal sounds A message is displayed in the in strument cluster There is the increased danger of ice Ice on roads Even at temperatures above 37 3 there can ...

Page 79: ...ngine the pointer is at the low tem perature end Drive at moderate engine and vehicle speeds Normal operating temperature the pointer is in the middle or in the right half of the tem perature display Hot engine the pointer is at the high tem perature end Switch off the engine imme diately and allow it to cool down Check the oil level refer to page 232 Current fuel consumption Displays the current ...

Page 80: ...er Displays of the hybrid system Displays instrument panel The concept The following functions of the hybrid system are alternately shown in the instrument panel The display depends on the system s operating con dition Energy recovery Automatic Engine Start Stop Function Boost At a glance 1 Energy recovery 2 Automatic Engine Start Stop Function 3 Acceleration boost Energy recovery The high voltage...

Page 81: ...low 1 Vehicle Info 2 Hybrid 3 Select the symbol to display the energy flow Utilization of the hybrid system Each bar indicates the percentage of the driving time during which the hybrid system provided support to the vehicle drive system or during which brake energy was recovered One bar stands for one minute Displaying the hybrid system utilization 1 Vehicle Info 2 Hybrid 3 Select the symbol to d...

Page 82: ... entering the distance or when desti nation guidance is activated in the naviga tion system Distance to destination After entering the distance or when desti nation guidance is activated in the naviga tion system Arrow view of navigation system When destination guidance is activated in the navigation system Adjusting the info display You can select what information from the com puter is to be disp...

Page 83: ...p computer There are two types of computer Onboard info the values can be reset as often as necessary Tripcomputer thevaluesprovideanover view of the current trip Resetting the trip computer 1 Vehicle Info 2 Trip computer 3 Reset all values are reset Automatically reset all values are reset approx 4 hours after the vehicle comes to a standstill Display on the Control Display Display the computer o...

Page 84: ...ed Setting the time format 1 Settings 2 Time Date 3 Format 4 Select the desired format The time format is stored Date Setting the date 1 Settings 2 Time Date 3 Date 4 Turn the controller until the desired day is displayed 5 Press the controller 6 Make the necessary settings for the month and year The date is stored Setting the date format 1 Settings 2 Time Date 3 Format 4 Select the desired format...

Page 85: ...the desired dialog Units of measure Setting the units of measure To set the units for fuel consumption route dis tance and temperature 1 Settings 2 Language Units 3 Select the desired menu item 4 Select the desired unit The setting is stored for the remote control cur rently in use Brightness Setting the brightness To set the brightness of the Control Display 1 Settings 2 Control display 85 Online...

Page 86: ...ter be fore a service due date Automatic Service Re quest refer to page 216 Detailed information on service requirements More information on the scope of service re quired can be displayed on the Control Display 1 Vehicle Info 2 Vehicle status 3 Service required Required maintenance procedures and le gally mandated inspections are displayed 4 Select an entry to call up detailed informa tion Symbol...

Page 87: ...ontrol Dis play Indicator warning lamps The indicator and warning lamps can light up in a variety of combinations and colors Several of the lamps are checked for proper functioning and light up temporarily when the engine is started or the ignition is switched on Text messages Text messages in combination with a symbol in the instrument cluster explain a Check Control message and the meaning of th...

Page 88: ...s are hidden automatically after approx 20 seconds They are stored and can be displayed again later Displaying stored Check Control messages 1 Vehicle Info 2 Vehicle status 3 Check Control 4 Select the text message Messages after trip completion Malfunctions indicated during a trip are dis played again after the ignition is switched off 88 Online Edition for Part no 01 41 2 603 958 03 10 500 Displ...

Page 89: ...ing lamps refer to page 90 Low beams Switch position with the ignition switched on the low beams light up Welcome lamps When parking the vehicle leave the switch in position or the parking and interior lamps light up briefly when the vehicle is un locked Activating deactivating the welcome lamps 1 Settings 2 Lighting 3 Welcome light The setting is stored for the remote control cur rently in use He...

Page 90: ...n 0 and After the ignition is switched off the parking lamps light up in posi tion Activating deactivating 1 Settings 2 Lighting 3 Daytime running lamps The setting is stored for the remote control cur rently in use Roadside parking lamps The vehicle can be illuminated on one side Switching on With the ignition switched off press the lever either up or down past the resistance point for approx 2 s...

Page 91: ...ating the high beam assistant 1 Turn the light switch to or 2 Press the button on the turn signal lever ar row The indicator lamp in the instrument cluster lights up When the lights are switched on the high beams are switched on and off automati cally The system responds to light from oncoming traffic and traffic driving ahead of you and to ad equate illumination e g in towns and cities Switching ...

Page 92: ...h on the front fog lamps Cornering lamp In the switch position a cornering lamp is switched on for a broader light distribution at speeds up to 68 mph 110 km h Instrument lighting Adjusting The parking lamps or low beams must be switched on to adjust the brightness Adjust the brightness using the thumb wheel Interior lamps General information The interior lamps footwell lamps entry lamps and court...

Page 93: ...n Airbags are not triggered in every impact situa tion e g in less severe accidents or rear end collisions Information on how to ensure the optimal protective effect of the airbags Keep at a distance from the airbags Always grasp the steering wheel on the steering wheel rim holding your hands at the3o clockand9o clockpositions tokeep the danger of injury to your hands or arms as low as possible if...

Page 94: ...s mantled and the airbag generator scrapped by your service center or a workshop that has the necessary authorization for handling explosives Non professional attempts to service the sys tem could lead to failure in an emergency or un desired triggering of the airbag either of which could result in injury Warnings and information on the airbags are also found on the sun visors Automatic deactivati...

Page 95: ...ibrate the front seats when a corresponding message appears on the Control Display Calibrating the front seats A corresponding message appears on the Con trol Display 1 Move the respective seat forward all the way 2 Move the respective seat forward again It moves forward briefly 3 Readjust the seat to the desired position The calibration procedure is completed when the message on the Control Displ...

Page 96: ...M is being reset Disturbance by systems or devices with the same radio frequency Malfunction Resetting the system Reset the system after each correction of the tire inflation pressure and after every tire or wheel change 1 Vehicle Info 2 Vehicle status 3 Reset TPM 4 Start the engine do not drive away 5 Reset the tire pressure using Reset 6 Drive away The tires are shown in gray and Resetting TPM i...

Page 97: ...e TPM is active 1 Vehicle Info 2 Vehicle status 3 Tire Pressure Monitor TPM The status is displayed Malfunction The yellow warning lamp flashes and thenlightsupcontinuously Thetiresare displayed in gray on the Control Display No flat tire can be detected Display in the following situations Malfunction have the system checked A wheel without wheel electronics is fitted havetheservicecentercheckitif...

Page 98: ...M Flat Tire Monitor The concept The system detects a pressure loss on the basis of speed differences between the individual wheels while driving In the event of a pressure loss the diameter and therefore the rotational speed of the corre sponding wheel change This is detected and reported as a flat tire Functional requirements The system must have been initialized when the tire inflation pressure ...

Page 99: ...te loss of tire inflation pressure With a light load 1 to 2 people without lug gage approx 90 miles 150 km With a medium load 2 people trunk full or 4 people without luggage approx 50 miles 80 km With a full load 4 people trunk full approx 30 miles 50 km If there is minor tire damage especially on the tire tread the distance that you can travel with the damaged tire can be extended After notificat...

Page 100: ...e and if a lane line has been detected the steering wheel begins vibrating If the turn signal is set before changing the lane a warning is not issued End of warning The warning ends Automatically after approx 3 seconds When returning to your own lane When braking hard When using the turn signal System limits Personal responsibility The system cannot serve as a substitute for the driver s personal ...

Page 101: ...o radar sensors below the rear bumper mon itor the area behind and next to the vehicle at speeds above approx 30 mph 50 km h Thesystemindicateswhethertherearevehicles in the blind spot arrow 1 or approaching from behind on the adjacent lane arrow 2 The lamp in the exterior mirror housing lights up dimly Before you change lanes after setting the turn signal the system issues a warning in the situa ...

Page 102: ...vation of the steering wheel vibra tion causes the system to overheat This causes Active Blind Spot Detection to be come deactivated Let the system cool and reactivate it by pressing the button Radar sensors The radar sensors are located under the rear bumper The system may not be fully functional in the following situations Dirty or icy bumper Stickers on the bumper A message is displayed when th...

Page 103: ...ation the outer brake lamps light up During heavy brake application the inner brake lamps light up in addition 103 Online Edition for Part no 01 41 2 603 958 03 10 500 Reference Mobility Communication Entertainment Navigation Driving tips Controls At a glance ...

Page 104: ...bility of the driver The laws of physics cannot be repealed even with DSC Therefore do not reduce the additional safety margin by driving in a risky manner Deactivating activating the DSC OFF program The program can be deactivated activated via Dynamic Driving Control refer to page 105 Indicator warning lamps The indicator lamp flashes DSC con trols the drive forces and brake forces The indicator ...

Page 105: ...trol buttons Operating the programs Press the button Program DSC OFF TRACTION SPORT SPORT NORMAL COMFORT For Dynamic Damper Control the lower button is labeled with COMFORT Automatic program change The system automatically switches to NORMAL in the following situations Failure of Dynamic Damping Control The vehicle has a flat tire DSC OFF Driving stability is limited during acceleration and when d...

Page 106: ...amp lights up in the in strument cluster Indicator warning lamps SPORT is displayed in the tachometer The indicator lamp lights up DTC Dy namic Traction Control is activated SPORT Consistently sporty tuning of the suspension for greater driving agility with maximum driving sta bilization The program can be configured to individual specifications The configuration is stored for the remote con trol ...

Page 107: ...es can be displayed briefly on the Control Display To do so make the following settings 1 Settings 2 Control display 3 Display driving settings Drive off assistant Thissystemsupportsdrivingawayongradients The parking brake is not required 1 Hold the vehicle in place with the foot brake 2 Release the foot brake and drive away with out delay After the foot brake is released the vehicle is held in pl...

Page 108: ...ed limit is switched on DSC Dy namic Stability Control refer to page 104 is switched on as well if necessary Switching off Deactivated or interrupted system If the system is deactivated or interrupted actively intervene by braking and if necessary with evasive maneuvers otherwise there is the danger of an accident occurring Press the button If active press twice If interrupted press once The displ...

Page 109: ...e vehicle to accel erate more rapidly The rocker switch can be pressed while inter rupted to maintain and store the current speed Resuming the desired speed Press the button The stored speed is reached and maintained Displays in the instrument cluster 1 Display of desired speed 2 Indicator lamp 3 Brief status display Desired speed Display in the speedometer The marking lights up in green the syste...

Page 110: ...With tow bars and trailer hitches With thin or wedge shaped objects With low objects With objects with corners and sharp edges Low objects already displayed e g curbs can move into the blind area of the sensors before or after a continuous tone sounds High protruding objects such as ledges may not be detected False warnings PDC may issue a warning under the following conditions even though there i...

Page 111: ...ting is stored for the remote control cur rently in use Visual warning The approach of the vehicle to an object can be shown on the Control Display Objects that are farther away are displayed on the Control Dis play before a signal tone sounds A display appears as soon as Park Distance Control PDC is activated Depending on the vehicle s equipment the screen mask can also be turned by 90 If the bac...

Page 112: ... blind driveways and intersections Backup camera The concept Thebackupcameraprovidesassistanceinpark ing and maneuvering backwards The area be hind the vehicle is shown on the Control Display System limits Check the traffic situation as well Check the traffic situation around the ve hiclewithyourowneyes Otherwise anaccident could result from road users or objects located outside the picture area o...

Page 113: ... to page 114 Turning circle lines Can be shown in the backup camera image Show the course of the smallest possible turning circle on a level road Only one turning circle line is displayed when the steering wheel is turned Show the parking aid lines refer to page 114 Parking using pathway and turning circle lines 1 Position the vehicle so that the turning circle lines lead to within the limits of t...

Page 114: ...controller until the desired setting is reached and press the controller Camera The camera lens is located in the handle of the trunk lid The image quality may be impaired by dirt Clean the lens refer to page 252 Side View The concept Side View provides an early look at cross traffic at blind driveways and intersections Road users concealed by obstacles to the left and right of the vehicle can onl...

Page 115: ...ns refer to page 252 Top View The concept Top View assists you in parking and maneuver ing The area around the doors and the road area around the vehicle are shown on the Control Display for this purpose Capturing the image The image is captured by two cameras inte grated in the exterior mirrors and by the backup camera The range equals approx 10 ft 3 m to the side approx 7 ft 2 m to the rear In t...

Page 116: ...ntrol Display When the distance to an object is small a red bar is shown in front of the vehicle as it is in the PDC display The display appears as soon as Top View is ac tivated If the backup camera image was selected last it again appears on the display To switch to Top View 1 Rear view camera Select the symbol on the Control Display 2 Press the controller The setting is stored for the remote co...

Page 117: ...tection function that detects pedestrians and cyclists Warm objects that are similar in shape to human beings are detected by the system Personal responsibility Night Vision cannot replace the driver s personal judgment of the visibility conditions and the traffic situation The view ahead and the actual visibility conditions must always be the basis on which the vehicle speed is adjusted otherwise...

Page 118: ...e right or left to the central area The symbols in the Head up Display corre spond to the symbols in the Control Display For people located in the central area the distance to the person is indicated by the size of the sym bol Although both the shape and the heat radiation areanalyzed falsewarningscannotberuledout System limits Animals are not detected by the pedestrian de tection function even if...

Page 119: ... again The pedestrian detection and warning system only operates in darkness and only when a heat image is displayed Adjustments via the iDrive With Night Vision switched on 1 Activate Night Vision with pedestrian detec tion 2 Press the controller 3 Open the desired menu item 1 Brightness 2 Contrast 3 Pedestrian detection The settings are stored for the remote control currently in use Camera Rain ...

Page 120: ...check the basic set tings Switching on off Press the button Display 1 Lane departure warning 2 Active Cruise Control 3 Desired speed 4 Navigation system 5 Speed The collision warning or Check Control mes sages are displayed briefly if needed Selecting displays in the Head up Display 1 Settings 2 Head up display 3 Displayed information 4 Select the desired displays in the Head up Display The settin...

Page 121: ...troller The height is adjusted The setting is stored for the remote control cur rently in use Special windshield The windshield is part of the system The shape of the windshield makes it possible to display a precise image A film in the windshield prevents double images from being displayed Therefore have the special windshield replaced by a service center only 121 Online Edition for Part no 01 41...

Page 122: ...omatic recirculated air control recircu lated air mode 15 Cooling function 16 Rear window defroster 17 ALL program 18 Active seat ventilation left side 51 19 Seat heating left side 51 Climate control functions in detail Manual air distribution Press the button repeatedly to select a program Upper body region Upper body region and footwell Footwell Windows and footwell driver s side only Windows up...

Page 123: ...right side of the button decrease or increase air volume The selected air volume is shown on the display of the automatic climate control Defrosting windows and removing condensation Press the button Ice and condensation are quickly re moved from the windshield and the front side windows The air volume can be adjusted when the pro gram is active Maximum cooling Press the button The system is set t...

Page 124: ...n and AUTO program are transferred to the front pas senger side and to the left and right rear The program is switched off if the settings on the front passenger side and in the rear are changed Residual heat The heat stored in the engine is used to heat the interior Functional requirement Up to 15 minutes after the engine has been switched off Warm engine The battery is sufficiently charged Exter...

Page 125: ...partially bundled This maximizes the air supply Direct ventilation Thumb wheel arrow 3 in level the air is bundled and can be directed to a specific point Adjusting the ventilation Ventilation for cooling Adjust the vent to direct the air in your di rection e g if the vehicle interior is hot from the sun Draft free ventilation Adjust the vent to let the air flow past you Ventilation in rear center...

Page 126: ...d air distribution can be adjusted Press the left or right side of the button decrease or increase the intensity The selected intensity is shown on the display of the automatic climate control Temperature Turn the wheel to set the desired temperature The automatic climate control achieves this temperature as quickly as possible if necessary with the maximum cooling or heating capacity and then kee...

Page 127: ...n the driver s side is shown on the display of the automatic cli mate control The interior temperature air volume and air dis tribution can be adjusted with the radio ready state switched on Switching off At the lowest fan speed press the left side of the button on the driver s side onthedisplayoftheautomaticclimatecontrol goes out Parked car ventilation The concept The parked car ventilation vent...

Page 128: ...ol reduces the inte rior temperature with high cooling power for ap prox two minutes Next the parked car ventilation refer to page 127 is activated automatically for a maxi mum of 30 minutes Remote control The concept The master key activates the auxiliary air condi tioning for two minutes starting at external tem peratures of 59 15 At a glance 1 Unlocking 2 Locking 3 Opening the trunk lid 4 Panic...

Page 129: ...ble with the universal remote control If you have any questions please contact Your service center www homelink com on the Internet Programming LED arrow 1 Memory buttons arrow 2 Fixed code hand held transmitters 1 Switch on the ignition 2 Initial setup Press both outer buttons 1 and 3 for approx 20 seconds until the LED flashes All programs of the three memory buttons arrow 2 are cleared 3 Hold t...

Page 130: ...ould become activated when the but ton is pressed briefly If the LED flashes for approx 2 seconds and then lights up continuously con tinue the programming procedure be ginning with step 4 4 Locate the button on the receiver of the de vice to be set e g on the drive 5 Press the button on the receiver of the de vice to be set You have approx 30 seconds for the next step 6 Press the programmed memor...

Page 131: ... them selves Rear Opening Press on the cover Emptying Take out the insert Lighter Push in the lighter Danger of burns Only hold the hot lighter by its head oth erwise there is the danger of getting burned Take the remote control with you when leaving the vehicle so that children cannot use the lighter and burn themselves The lighter can be removed as soon as it pops back out Connecting electrical ...

Page 132: ... hinges is clear otherwise injuries can occur Pulling on the handle draw the table up and out and fold it down Close the folding table when driving Keep the folding table closed as much as possible to prevent the any danger of injury dur ing driving through objects on the folding table or the folding table itself Ski bag Capacity The ski bag can be used to transport three pairs of skis with a leng...

Page 133: ...ecure the ski bag by tightening the re taining strap otherwise the contents could present a source of danger to the passengers for example during braking or evasive maneu vers Removing the ski bag The ski bag can be removed entirely e g to dry quickly or to use other inserts 1 Pull the handle forward and lift the ski bag out 2 Close the cover in the trunk Moreinformationonthevariousinsertsavailabl...

Page 134: ...n stance during braking and avoidance maneu vers Glove compartment Front passenger side Opening Pull the handle The light in the glove compartment switches on Close the glove compartment again im mediately Close the glove compartment immediately after use while driving otherwise injury may occur during accidents Closing Fold up the cover Opening the top cover Press the button The top cover opens a...

Page 135: ...e storage compartment in the armrest can be locked with a key to separately secure the trunk lid refer to page 42 for example After the storage compartment is locked the re mote control can be handed out without the in tegrated key refer to page 34 for instance at a hotel This prevents access to the storage compart ment and to the trunk Connection for an external audio device This can be used to c...

Page 136: ...s Otherwise there is the increased danger of injury in an accident Unsuitable containers Do not forcefully push unsuitable contain ers into the cupholders This may result in dam age Front To open press on the cover Rear In the front of the center armrest To open press the button To close slide back Clothes hooks The clothes hooks are located next to the grab handles in the rear and on the door pil...

Page 137: ...the side Under the cover on the side of the trunk is a storage compartment that can be used to store the printed Owner s Manual for example Remove the cover Lashing eyes To secure cargo refer to page 144 with nets or draw straps the trunk is fitted with lashing eyes 137 Online Edition for Part no 01 41 2 603 958 03 10 500 Reference Mobility Communication Entertainment Navigation Driving tips Contr...

Page 138: ...138 Online Edition for Part no 01 41 2 603 958 03 10 500 ...

Page 139: ...Driving tips This chapter provides you with information useful in dealing with specific driving and operating modes 139 Online Edition for Part no 01 41 2 603 958 03 10 500 ...

Page 140: ...otors Drive conservatively during this breaking in period Following part replacement The same breaking in procedures should be ob served if any of the components mentioned above have to be renewed in the course of the vehicle s operating life Using the hybrid system efficiently The concept Yourvehicle shybridsystemrunsautomatically Through foresighted driving the hybrid proper ties are used to the...

Page 141: ...xhaust system High temperatures are generated in the exhaust system Do not remove the heat shields installed and never apply undercoating to them When driv ing standing at idle and while parking take care to avoid possible contact between the hot ex haust system and any highly flammable materi als such as hay leaves grass etc Such contact could lead to a fire and with it the risk of serious person...

Page 142: ... not endanger other road users The heat generated in this process helps dry the brake discs and pads In this way braking efficiency will be available when you need it Hills Drivelongorsteepdownhillgradientsinthegear inwhichtheleastbrakingisrequired Otherwise the brake system may overheat resulting in a reduction in the brake system efficiency You can increase the engine s braking effect by shiftin...

Page 143: ...hicle 3 Subtract the combined weight of the driver and passengers from XXX kilograms or YYY pounds 4 The resulting figure equals the available amount of cargo and luggage load capacity For example if the YYY amount equals 1 400 lbs and there will be five 150 lbs pas sengers in your vehicle the amount of avail able cargo and luggage load capacity is 650 lbs 1 400 lbs minus 750 lbs 650 lbs 5 Determi...

Page 144: ...system as optional accessory A special rack system is available as an optional accessory Follow the directions given in the installation in structions Anchorage points On the outside of the vehicle press on the edge of the cover Mounting Be sure that adequate clearance is maintained for raising and opening the glass sunroof Magnetic roof mounted luggage rack Because of the aluminum roof magnetic r...

Page 145: ...the vehicle remains stationary Start driving right away but at moderate engine speeds This is the fastest way for the cold engine to reach its operating temperature Look well ahead when driving Avoid unnecessary acceleration and braking By maintaining a suitable distance to the vehicle driving ahead of you Driving smoothly and looking ahead reduces fuel consumption Braking longer will charge the h...

Page 146: ...146 Online Edition for Part no 01 41 2 603 958 03 10 500 ...

Page 147: ...Navigation This chapter contains various examples of how the navigation system can guide you reliably to your destination 147 Online Edition for Part no 01 41 2 603 958 03 10 500 ...

Page 148: ...eet names and house numbers by automatically completing the entry and providing entry com parisons refer to page 24 Stored town city and street names can be called up quickly Iftheexistingentriesshouldnotbechanged the entries for the state province and town city can be skipped Destination guidance is started to the town city center if no street is entered Entering a state province 1 Press the MENU...

Page 149: ...eets of the selected state province are of fered The associated town city is displayed af ter the street name Thedesiredstreetdoesnotexistinthespecified city town because it belongs to another part of the city town 1 Navigation 2 Enter address 3 Select Street or the displayed street 4 Change to the list of street names 5 In the displayed state province 6 Select the letters 7 Change to the list of ...

Page 150: ... Storing the position The current position can be stored in the ad dress book 1 Navigation 2 Open Options 3 Store position as contact or Add position to contact 4 Depending on the selection choose an ex isting contact from the list Select the type of address and enter the first and last name 5 Store in vehicle Editing or deleting an address 1 Navigation 2 Address book 3 Highlight the entry 4 Open ...

Page 151: ... select special destinations e g hotels or tourist attractions 1 Navigation 2 Points of Interest Narrow the search for special destinations by specifying the location and category Position of special destinations 1 Search area 2 Select the location where the system is to search for the special destination At current location At destination At a different destination Along route Special destination...

Page 152: ...is available a connection can be established if necessary Destination entry via BMW Assist A connection is established to the Concierge service refer to page 216 1 Navigation 2 Enter address 3 Open Options 4 BMW Assist dest entry Entering the special destination by its name 1 Navigation 2 Points of Interest 3 Name A Z search 4 Select the letters Depending on the distance the search may take some t...

Page 153: ... location marked on the map Exit interactive map View in northern direction Display destination the map section around the destination is displayed Display current location the map section around your current location is displayed Find points of interest Destination entry by voice General information Instructions for voice activation system re fer to page 25 When entering the destination by voice ...

Page 154: ... entry Select an entry Entry e g entry 2 To spell an entry Spell city Entering a street or intersection Enter a street or intersection in the same way as you would enter a town city Entering a house number House numbers can be entered up to the num ber 999 999 House number Say each digit separately Starting destination guidance Start guidance or if necessary Enter new destination Storing a destina...

Page 155: ...trip move an intermediate destination to another po sition in the list Delete dest in the trip Deleting a trip 1 Stored trips 2 Highlight the desired trip 3 Open Options 4 Delete all trips or Delete trip Destination guidance Starting destination guidance 1 Navigation 2 Make a destination entry refer to page 148 3 Accept destination 4 Start guidance The route is shown on the Control Display The dis...

Page 156: ...s toll roads are avoided wherever possible Avoid ferries ferries are avoided where possible Dynamic destination guidance The route is automatically changed in the event of traffic obstructions The system does not point out traffic ob structions along the original route Traffic bulletins continue to be displayed on the map Depending on the type of road and the na ture and length of the traffic obst...

Page 157: ...3 Recommended refuel A list of the gas stations is displayed 4 Highlight a gas station The position of the gas station is shown on the split screen 5 Select the gas station 6 Select the symbol 7 Start guidance or Add as another dest Switching spoken instructions on off The setting is stored for the remote control cur rently in use 1 Navigation 2 Map 3 Select the symbol Symbol Meaning Spoken instru...

Page 158: ...s played The map shows the entire range from your location to the destination Settings for the map view The map is shown on the Control Display 1 Open Options 2 Settings Set the optimized map view Day night mode Select and create the necessary settings depending on the light conditions When the traffic situation gray card is activated this setting is not taken into account Satellite images Dependi...

Page 159: ... and road conditions route usability or speed C The licensed material is provided to li censee as is and where is Total Traffic Network including but not limited to any and all third party providers of any of the li censed material expressly disclaims to the fullest extent permitted by law all warranties or representations with respect to the li censed material including without limita tion that t...

Page 160: ...es or gray bars along the calculated route Filtering of traffic bulletins Set which traffic bulletins are to be displayed in the map 1 Navigation 2 Map 3 Open Options 4 Traffic Info categories 5 Set the filter Traffic bulletins of the selected category are dis played in the map Traffic bulletins on incidents along the route are always displayed For your own safety traffic bulletins that no tify yo...

Page 161: ...f needed After an interruption of the trip follow the in structions on the Control Display What to do if Thecurrenttransmissionpositioncannotbe displayed The vehicle is located in an unrecognized region is in a poor reception area or the system is currently determining the posi tion Reception is usually best when you have an unobstructed view of the sky Thedestinationwithoutstreetinformationis not...

Page 162: ...the system requires a few seconds to cal culate a new route suggestion 162 Online Edition for Part no 01 41 2 603 958 03 10 500 Navigation ...

Page 163: ...163 Online Edition for Part no 01 41 2 603 958 03 10 500 Reference Mobility Communication Entertainment Navigation Driving tips Controls At a glance ...

Page 164: ...164 Online Edition for Part no 01 41 2 603 958 03 10 500 ...

Page 165: ...ainment The chapter helps assure your enjoyment when receiving radio and television stations and playing CDs DVDs and tracks from the music collection 165 Online Edition for Part no 01 41 2 603 958 03 10 500 ...

Page 166: ...the controller Equalizer Setting for individual audio frequency ranges Adjusting the equalizer 1 CD Multimedia Radio or Settings 2 Tone 3 Equalizer 4 Select the desired setting 5 To adjust turn the controller 6 To store press the controller Multi channel playback surround Choosebetweenstereoandmulti channelplay back surround Setting multi channel playback surround 1 CD Multimedia Radio or Settings...

Page 167: ...fety belt reminder compared to the en tertainment sound output Adjusting the volume 1 CD Multimedia Radio or Settings 2 Tone 3 Volume settings 4 Select the desired volume setting 5 To adjust turn the controller 6 To store press the controller Resetting the tone settings 1 CD Multimedia Radio or Settings 2 Tone 3 Reset 167 Online Edition for Part no 01 41 2 603 958 03 10 500 Reference Mobility Comm...

Page 168: ...tion 1 Radio 2 FM or AM 3 Highlight the desired station 4 Press the controller for an extended period 5 Select the desired memory location The stations are stored for the remote control currently in use The stations can also be stored on the program mable memory buttons refer to page 23 Selecting a station manually Station selection via the frequency 1 Radio 2 FM or AM 3 Manual 4 To select the fre...

Page 169: ...elayed broadcasting there may be repe titions or interruptions In this case switch off digital radio reception Displaying additional information Some stations broadcast additional information on the current track such as the name of the ar tist 1 Select the desired station 2 Open Options 3 Station info Selecting a substation This symbol indicates that a main station also broadcasts additional subs...

Page 170: ...to enable or unsubscribe from the channels you must have reception It is usually at its best when you have an unobstructed view of the sky The channel name is displayed in the status line Enabling channels The Unsubscribed Channels category contains all disabled channels 1 Radio 2 Satellite radio 3 Category 4 Select the Unsubscribed Channels cate gory 5 Select the desired channel The phone number ...

Page 171: ... confirm the highlighted channel 7 Select the desired memory location The channels are stored for the remote control currently in use The channels can also be stored on the pro grammable memory buttons refer to page 23 Changing the list view The list view changes every time the first symbol on the navigation bar is pressed Information on the channel is displayed Symbol Meaning Channel name Artist ...

Page 172: ... 1 Radio 2 Satellite radio 3 Replay Time shift 4 Automatic time shift To deactivate Automatic time shift Storing favorites Up to 30 favorites can be stored in the favorites list Available favorites are artist track game league and team Storing the artist track or game It is only possible to store favorites that are cur rently being broadcast The channel information must be available 1 Radio 2 Sate...

Page 173: ... Open Options 4 Set jump 5 Select the desired region The region is stored for the remote control cur rently in use Activating deactivating the jump 1 Radio 2 Satellite radio 3 Jump to Information for the selected region is broadcast as soon as it is available A new panel opens Canceling the Traffic Jump Cancel Symbol Meaning Information will be broadcast shortly Information is currently being broa...

Page 174: ...stored 1 Radio 2 Presets 3 Store station 4 Select the desired memory location The list of stored stations is stored for the re mote control currently in use The stations can also be stored on the program mable memory buttons refer to page 23 Deleting a station 1 Radio 2 Presets 3 Select the desired station 4 Open Options 5 Delete entry 174 Online Edition for Part no 01 41 2 603 958 03 10 500 Radio...

Page 175: ...CD DVD player or changer 1 CD Multimedia 2 CD DVD 3 Select the desired CD or DVD Symbol Meaning CD DVD player DVD changer CD DVD player rear Playable formats DVD DVD ROM DVD R DVD R DVD RW DVD RW DVD R DL DVD R DL DVD audio video part only DVD video CD CD ROM CD R CD RW CD DA VCD SVCD Compressed audio files MP3 WMA AAC Audio playback Selecting the track using the button Press the button repeatedly...

Page 176: ...information on the track If information about a track has been stored it is displayed automatically Interpret Album track Number of tracks on the CD DVD File name of track Random playback 1 CD Multimedia 2 CD DVD 3 Select the desired CD or DVD 4 Open Options 5 Random CDs DVDs with compressed audio files all tracks within the selected directory are played in random order Random mode is switched off...

Page 177: ...automatic trans mission is in position P DVD video 1 CD Multimedia 2 CD DVD 3 Select a DVD with video content 4 DVD menu VCD SVCD 1 CD Multimedia 2 CD DVD 3 Select a CD with video content 4 Select track 5 Select the desired track Video menu To open the video menu turn the controller dur ing playback Press the controller when Back is displayed Symbol Function Open the DVD menu Start playback Pause ...

Page 178: ...desired language Selecting the subtitles The subtitles that are available depend on the DVD 1 Turn the controller during playback 2 Open Options 3 Subtitles 4 Select the desired language or Do not display subtitles Setting the brightness contrast and color 1 Turn the controller during playback 2 Open Options 3 Display settings 4 Brightness Contrast or Color 5 Turn the controller until the desired ...

Page 179: ...for DVD compartments 4 DVD slot 5 Fill DVD compartments Filling the DVD compartments individually 1 Press the button The LED on the first empty compartment flashes 2 Select another compartment if necessary 3 Wait for the LEDs on the DVD slot to flash 4 Insert a single CD or DVD in the middle The CD DVD is drawn in automatically and placed into the selected compartment Sliding in CDs DVDs Do not in...

Page 180: ...stop flashing rapidly Audio playback The audio track of a DVD can be played back even if video playback is not possible in the ve hicle Only the main film without the previews or extras can be played back Starting playback A DVD is located in the DVD changer 1 CD Multimedia 2 CD DVD 3 Select the desired DVD Selecting a chapter using the button Press the button repeatedly until the desired chapter ...

Page 181: ...not subject CDs DVDs to temperatures over 122 50 high humidity or direct sunlight CDs DVDs with copy protection CDs DVDs are often provided with a copy pro tection feature by the manufacturer This can mean that some CDs DVDs cannot be played or can only be played to a limited extent MACROVISION This product contains copyrighted technology that is based on multiple registered US patents and the int...

Page 182: ...e Observe the following during the storage proc ess Do not switch to the CD DVD player and do not remove the CD DVD from the CD DVD player as this will interrupt the storage process You can switch to the other audio sources without inter rupting the storage process Tracks from the current CD DVD that have already been stored can be called up Interrupting storage 1 CD Multimedia 2 CD DVD 3 Storing ...

Page 183: ... input the desired entry Select the desired entry from the list 6 Select other categories if you wish The tracks found are listed in alphabetical order Not all categories need to be selected For example to search for all tracks by a certain artist call up that artist only All of the tracks by that artist are then displayed 7 Start play The list of tracks is repeated automatically Restarting the mu...

Page 184: ...esired album Depending on the album the tracks or the subdirectories of the album are displayed The first track is played automatically if pos sible 4 Change directories if needed to select tracks To go up a level in the directory move the controller to the left Random playback All tracks of the selection are played back in ran dom order 1 CD Multimedia 2 Music collection 3 Open Options 4 Random M...

Page 185: ...en Options 4 Free memory Music collection Backing up the music collection The entire music collection can be stored on a USB device Make sure there is enough free memory capacity on the USB device Depending on the number of tracks backing up the music collection may take several hours Therefore it is best to perform the backup dur ing a long trip 1 Starting the engine 2 Connect the USB device to t...

Page 186: ...headphones or line out connector of the device to the jack plug Playback 1 Connect the audio device switch it on and select a track on the audio device 2 CD Multimedia 3 If necessary External devices 4 AUX front Volume The volume of the sound output is dependent on the audio device If this volume differs mark edly from the volume of the other audio sources it is advisable to adjust the volumes Adj...

Page 187: ... for a good connection Use the cable adapter for the Apple iPod iPhone to connect the Apple iPod iPhone with the AUX IN port and the USB interface The Apple iPod iPhone menu structure is supported by the USB audio inter face Connection of a USB device via the USB audio interface TheUSBaudiointerfaceisinthecenterarmrest Connect using a flexible adapter cable to protect the USB audio interface and t...

Page 188: ...Select the symbol 4 Select the desired category e g Genre or Artist All entries are displayed in a list Open A Z search and input the de sired entry When a letter is entered the results are filtered using this letter as the first letter If multiple letters are entered all results that contain that sequence are displayed Select the desired entry from the list 5 Select other categories if you wish N...

Page 189: ... use the audio interface to recharge external devices Rear audio remote control The concept The rear audio remote control can be used to control the following audio functions in the front Radio CD Multimedia The unit is operated in the same manner as the corresponding buttons on the CD DVD player In the center armrest in the rear Storage is possible in a vertical or horizontal po sition in the cen...

Page 190: ...he cover ar row 1 and push forward arrow 2 2 Insert batteries of the same type 3 Close the cover Taketheusedbatterytoarecyclingcen ter or to your service center 190 Online Edition for Part no 01 41 2 603 958 03 10 500 CD multimedia ...

Page 191: ... on again Screens Adjusting Danger of burns when screen is folded out Do not reach behind the screen other wise there is the danger of getting burned The back of the screen can become very hot To fold out pull at the bottom edge To fold in press against the bottom edge Notes Do not cover lower screen edge since this is where the sensors and the infrared inter face are installed When loading the re...

Page 192: ...s or turn the required button again Replacing the batteries No rechargeable batteries Do not use rechargeable batteries as damage may result from the substances in the batteries 1 Remove the cover Press on the cover ar row 1 and push forward arrow 2 2 Insert batteries of the same type 3 Close the cover Taketheusedbatterytoarecyclingcen ter or to your service center Controls Almost all functions ca...

Page 193: ...ge 181 Tone Only treble and bass can be set in the rear The settings are made separately for the left and right headphones Operation is the same as for the front tone refer to page 166 Adjusting The following settings are available Rear displays Language Units language can be set globally for all screens Tone Options menu The split screen is not available and there is no integrated Owner s Manual ...

Page 194: ...age 191 on the rear CD DVD player Infrared headphones Connection via the infrared interface on the lower edge of the screen Fitting infrared headphones and information on which headphones are supported can be ob tained from your service center When using infrared headphones ensure that the connection between the headphones and the infrared interface is not disrupted Do not place an obstacle betwee...

Page 195: ...he desired volume is set and press the controller What to do if Only a black screen is visible Switch on the system There are no options available on the screen Replace remote control batteries Radio stations or TV channels are grayed out and can not be selected Function is limited due to the selected pri ority Change priority The DVD does not play Playback does not begin automatically Start DVD m...

Page 196: ...ition the system must be switched on again Screens Adjusting Danger of burns when screen is folded out Do not reach behind the screen other wise there is the danger of getting burned The back of the screen can become very hot To fold out pull at the bottom edge To fold in press against the bottom edge Notes Do not cover lower screen edge since this is where the sensors and the infrared inter face ...

Page 197: ...o sta tion is played Operation is the same as for the front radio refer to page 168 CD multimedia CD DVD When the same audio source front CD DVD player rear CD DVD player DVD changer is se lected in the front and rear the same material is played Operation is the same as for the front CD DVD refer to page 175 Notes on CDs DVDs refer to page 180 Music collection Music can only be stored and data can...

Page 198: ...tings 2 Allow rear control 3 Select the desired priority Priority options The driver has priority The source selected via iDrive in the front is output on the vehicle loudspeakers and can be selected but not operated from the rear Other audio or video sources can be oper ated Sound can only be output in the rear via headphones The source that is to be displayed in the rear can be set via the iDriv...

Page 199: ...e between the inter face and headphones Do not cover the interface Do not scratch the interface Fold up display screens for interference free re ception Unfavorable light conditions such as bright am bient light can impair reception Sound output on the headphones or vehicle loudspeakers Operation is only possible in the rear 1 Open Options 2 Headphones or Loudspeakers With the following setting so...

Page 200: ...o if Only a black screen is visible Switch on the system There are no options available on the screen Switch over between the display screens Radio stations or TV channels are grayed out and can not be selected Function is limited due to the selected pri ority Change priority The DVD does not play Playback does not begin automatically Start DVD manually refer to page 177 The volume of the rear veh...

Page 201: ...201 Online Edition for Part no 01 41 2 603 958 03 10 500 Reference Mobility Communication Entertainment Navigation Driving tips Controls At a glance ...

Page 202: ...202 Online Edition for Part no 01 41 2 603 958 03 10 500 ...

Page 203: ...ion All of the options available to you for mobile communication with family friends business partners and service providers are described in this chapter 203 Online Edition for Part no 01 41 2 603 958 03 10 500 ...

Page 204: ...n be found at www bmw com bluetooth These approved mobile phones with a certain software version support the vehicle functions described below Malfunctions may occur with other mobile phones or software versions Donotoperateamobilephonethatisconnected to the vehicle on the mobile phone keypad as this may lead to a malfunction Pairing unpairing the mobile phone Requirements The mobile phone is suit...

Page 205: ...e is running or the ignition is switched on After they have been identified phone book entries are transferred from the SIM card and or mobile phone to the vehicle this de pends on the mobile phone Four mobile phones can be paired Specific settings may be necessary in some mobile phones e g authorization or a se cure connection refer to the mobile phone operating instructions Activating deactivati...

Page 206: ...match Enter the same passkey on the mobile phone and via iDrive Did it take longer than 30 seconds to enter the passkey Repeat the pairing procedure Are too many Bluetooth devices connected to the mobile phone If so delete the con nections with other devices on the mobile phone The mobile phone no longer reacts Switch the mobile phone off and on again Repeat the pairing procedure If all items on t...

Page 207: ... This function might have to be activated by the service provider and the mobile phone must be adjusted accordingly If a second call comes in during an active call you will hear a call waiting signal Accept The call is accepted and the existing call is put on hold Establishing a second call Establish an additional call during an active call 1 Telephone 2 Active calls 3 Hold The existing call is pu...

Page 208: ... symbol Contact with more than one phone number Select the phone number the connection is being estab lished A telephone call is not possible the mobile phone has no coverage or no network or a Serv ice Request is active Editing a contact Change the entries in Contacts When a con tact is changed the changes are not stored on the mobile phone A copy of the entry is stored in the vehicle 1 Highlight...

Page 209: ...n entry in the contacts 1 Highlight the entry 2 Open Options 3 Store as new contact or Add to existing contact 4 Select the type of number Home Business Mobile or Other 5 Complete the entries if necessary 6 If necessary Store contact Messages Display of different messages My Info messages from the BMW Assist portal Message from the Concierge service refer to page 216 MyInfo Starting destination gu...

Page 210: ...follow the instructions on the mobile phone dis play refer also to the mobile phone operating instructions From the hands free system to the mobile phone Calls that are made on the hands free system can in some cases be continued on the mobile phone this depends on the mobile phone Follow the instructions on the mobile phone dis play refer also to the mobile phone operating instructions Snap in ad...

Page 211: ...ow 2 until it engages Removing the mobile phone Press the button and remove the mobile phone 211 Online Edition for Part no 01 41 2 603 958 03 10 500 Reference Mobility Communication Entertainment Navigation Driving tips Controls At a glance ...

Page 212: ...m Enter the address Only addresses con tained in the navigation data in the vehicle can be entered This ensures that destina tion guidance is possible for all addresses 7 If necessary Store 8 Store contact in vehicle Specifying a contact as the home address A contact can be stored as the home address It is placed at the top of My contacts 1 Home 2 Create a contact My contacts General information A...

Page 213: ...st match the navigation data con tained in the vehicle The address can be checked for this purpose 1 Select the desired contact and highlight the address 2 Open Options 3 Check as destination 4 Correct and store the address if necessary If the address is corrected and stored a copy of it is stored in the vehicle The address is not changed on the mobile phone Dialing phone numbers 1 My contacts 2 S...

Page 214: ... 4 Delete contact or Delete all contacts Exporting importing contacts Contacts can be exported and imported via the Personal Profile refer to page 35 214 Online Edition for Part no 01 41 2 603 958 03 10 500 Contacts ...

Page 215: ...s a connection is established to the BMW Assist Response Center after a serious accident If possible the BMW As sist Response Center then speaks with you and takes further steps to help you Enhanced Roadside Assistance BMW Roadside Assistance can be contacted if assistance is needed in the event of a break down If possible the vehicle and position data are transmitted in the process Customer Relat...

Page 216: ...ations or hotels and provides phone numbers and addresses Hotels can be booked directly by the BMW Assist Con cierge service The Concierge service is part of the optional Convenience Plan Starting the Concierge service 1 BMW Assist 2 Concierge 3 Start service A voice connection is established with the BMW Assist Concierge service Phone numbers and addresses can be transmitted to the vehicle Open t...

Page 217: ...ded in a Assist subscription arenotdisplayed theymayneedtobeactivated Activating 1 Make sure that the vehicle can determine its current position Reception is usually best when you have an unobstructed view of the sky 2 Switch on the ignition 3 Activate BMW Assist Activation may take several minutes If another menu is opened activation continues running in the background BMW Search At a glance A bu...

Page 218: ...quipped with BMW Assist or TeleService 1 BMW Assist 2 Customer Relations The Customer Relations phone number is dis played If the mobile phone is paired a con nection is established to Customer Relations Vehicle equipped with BMW Assist or TeleService 1 BMW Assist 2 Customer Relations 3 Start service Service Request At a glance Sends information to your service partner to re quest the arrangement ...

Page 219: ... included in a Assist subscription arenotdisplayed theymayneedtobeactivated Activate BMW Assist Activating TeleService TeleService may need to be activated in the ve hicle Activate TeleService Deactivating TeleService Even if the services of TeleService have been deactivated a voice connection to Roadside As sistance is still possible Deactivate TeleService TeleService report Transmitstechnicaldat...

Page 220: ...220 Online Edition for Part no 01 41 2 603 958 03 10 500 ...

Page 221: ...ain mobile at all times this chapter supplies you with important information on the topics of fuels and lubricants wheels and tires service maintenance and Roadside Assistance 221 Online Edition for Part no 01 41 2 603 958 03 10 500 ...

Page 222: ...layed if the cap is loose or missing Manually unlocking fuel filler flap In the event of an electrical malfunction for ex ample Pull the green knob with the fuel pump symbol This releases the fuel filler flap Observe the following when refueling The fuel tank is full when the filler nozzle clicks off the first time Handling fuels Obey safety regulations posted at the gas station Fuel tank capacity...

Page 223: ...latility composition ad ditives etc among gasolines offered for sale in the United States and Canada Fuels containing up to and including 10 etha nol or other oxygenates with up to 2 8 oxygen by weight that is 15 MTBE or 3 methanol plus an equivalent amount of co solvent will not void the applicable warranties with respect to defects in materials or workmanship Minimum fuel grade The use of poor q...

Page 224: ...re specifications The tire inflation pressure table refer to page 224 contains all pressure specifications for the specified tire sizes at the ambient tem perature Pressure specifications apply to ap proved tire sizes and recommended tire brands This information can be obtained from your service center To identify the correct tire inflation pressure please note the following Tire sizes of your veh...

Page 225: ...old tires F 245 45 R 19 98 Y R 275 40 R 19 101 Y 2 4 35 2 4 35 F 245 40 R 20 99 Y XL R 275 35 R 20 102 Y XL 2 6 38 2 6 38 Tire size Pressure specifica tions in psi kPa F 245 35 R 21 96 Y XL R 275 30 R 21 98 Y XL 2 8 41 3 0 44 245 50 R 18 100 H M S 2 2 32 2 4 35 245 45 R 19 102 V M S XL 2 4 35 2 6 38 With full load Tire size Pressure specifica tions in psi kPa Specifications in psi kilopascal with ...

Page 226: ...lconditionsoftheiruse however and may depart significantly from the norm due to variations in driving habits service practices and differences in road characteristics and cli mate Traction The traction grades from highest to lowest are AA A B and C Those grades represent the tire s ability to stop on wet pavement as measured under controlled conditions on specified government test surfa cesofaspha...

Page 227: ...amage foreign ob jects lodged in the tread and tread wear Indications of tire damage or other vehicle de fects Unusual vibrations during driving Unusual handling such as a strong tendency to pull to the left or right In case of tire damage If there are indications of tire damage re duce your speed immediately and have the wheels and tires checked right away otherwise there is the increased risk of...

Page 228: ... by a star on the tire sidewall With proper use these tires meet the highest standards for safety and handling Retreaded tires The manufacturer of your vehicle does not rec ommend the use of retreaded tires Retreaded tires Possibly substantial variations in the de sign and age of the tire casing structures can limit service life and have a negative impact on road safety Winter tires The manufactur...

Page 229: ...e link snow chains have been tested by the manufacturer of your vehicle classified as road safe and recommended Consult your service center for more informa tion Use Use only in pairs on the rear wheels equipped with the same tire size 245 50 R 18 245 45 R 19 Follow the chain manufacturer s instructions Make sure that the snow chains are always suf ficiently tight Retighten as needed according to ...

Page 230: ...engine compartment Never attempt to perform any service or repair operations on your vehicle without the necessary professional technical training If you are unfamiliar with the statutory guide lines have any work on the vehicle performed only by a service center If this work is not carried out properly there is the danger of subsequent damage and related safety hazards 1 Pull the lever 230 Online...

Page 231: ... and push down on it to lock it fully The hood must audibly engage on both sides Hood open when driving If you see any signs that the hood is not completely closed while driving pull over imme diately and close it securely Danger of pinching Make sure that the closing path of the hood is clear otherwise injuries may result 231 Online Edition for Part no 01 41 2 603 958 03 10 500 Reference Mobility...

Page 232: ...s 200 km Engine oil level too high Have this checked Have the vehicle checked immediately Too much engine oil Have the vehicle checked immedi ately otherwise surplus oil can lead to en gine damage Measurement inactive Have this checked Note the newly calculated remaining mile age until the next oil service Have the sys tem checked as soon as possible Adding engine oil Filler neck When the indicato...

Page 233: ...burns from hot engine Do not open the cooling system while the engine is hot otherwise escaping coolant may cause burns Suitable additives Only use suitable additives otherwise en gine damage may occur The additives are harmful to your health Coolant consists of water and additives Not all commercially available additives are suit able for your vehicle Ask your service center for suitable additive...

Page 234: ...tery was disconnected are not taken into ac count If this occurs have a service center update the time dependent maintenance procedures such as checking brake fluid and if necessary changing the engine oil and the microfilter acti vated charcoal filter Service and Warranty Information Booklet for US models and Warranty and Service Guide Booklet for Canadian models Please consult your Service and W...

Page 235: ...time Data memory Your vehicle records data relating to vehicle op eration faults and user settings These data are stored in the remote control and can be read out with suitable devices particularly when the ve hicle is serviced The data obtained in this way provide valuable information for service proc esses and repair or for optimizing and develop ing vehicle functions further In addition if you ...

Page 236: ...system s high volt age Do not touch high voltage components Donottouchhigh voltagecomponents or there is the risk of fatal injury from electric shock due to the hybrid system s high voltage Tool kit The tool kit is located in a fold down cover in the trunk lid Unscrew the wing nut to open Wiper blade replacement Replacing the wiper blades 1 To change the wiper blades fold up refer to page 73 the w...

Page 237: ...ensation can form on the inside of the ex ternal lamps in cool or humid weather When the light is switched on the condensation evapo rates after a short time The headlamp glasses do not need to be changed If there is a large amount of moisture e g water droplets form in the lamp have it checked by your service center Front lamps bulb replacement At a glance 1 Adaptive light control 2 Parking lamp ...

Page 238: ...nd replace it 6 Insert the new bulb and attach the cover in the reverse order Parking lamps Follow the general instructions on lamps and bulbs refer to page 236 The illustration shows the left side of the engine compartment 35 watt bulb H8 1 Open the folding cover in the engine com partment 2 Turn the cap and remove it 3 Turn the bulb holder Turn in the other direction on the right side 4 Remove t...

Page 239: ...amp 4 Tail lamp 5 Brake lamp 6 Rear reflector Turn signal brake tail and license plate lamps Follow the general instructions on lamps and bulbs refer to page 236 These lights are made using LED technology Contact your service center in the event of a malfunction Rear fog lamp and backup lamps in the trunk lidBackup lamps in the trunk lid Accessing the lamps 1 Remove the three screws using the scre...

Page 240: ...e When mounting new tires or changing from summer to winter tires or vice versa use run flat tires for your own safety No spare tire is available in the case of a flat tire The tools for changing wheels are available as accessories from your service center Jacking points for the vehicle jack The jacking points for the vehicle jack are lo cated in the positions shown Lug bolt lock The lug bolt lock...

Page 241: ...rks according to BMW specifications with appropriately trained personnel Have maintenance performed in the following situations Corresponding Check Control mes sages will be displayed on the instrument panel and the Control Display The high voltage battery has reached the end of its service life due to a defect The high voltage battery has only limited power available The high voltage battery s ma...

Page 242: ...ng wheel memory store the positions again refer to page 58 Time update refer to page 244 Date update refer to page 84 Radio station store again refer to page 168 Navigation system wait for the operability of the navigation Disposing of old batteries Have the service center dispose of old batteriesortakethemtoarecyclingcen ter Maintain the battery in an upright position for transport and storage Se...

Page 243: ... center after you sign a new contract Initiating an Emergency Request 1 Press the cover briefly to open it 2 Press the SOS button until the LED in the button lights up The LED lights up an Emergency Request was initiated If the situation allows wait in your vehicle until the voice connection has been estab lished The LED flashes if the connection to the BMW Assist Response Center has been es tabli...

Page 244: ...sistance in your home country re fer to the Contact brochure Jump starting Notes When the 12 volt battery or the high voltage battery is discharged the combustion engine can be started with the help of a vehicle provid ing assistance using two jumper cables Only use jumper cables with fully insulated clamp handles To prevent personal injury or damage to both vehicles adhere strictly to the followi...

Page 245: ...t cir cuits Starting aid terminals Connecting order Connect the jumper cables in the correct order otherwise there is the danger of injury from sparking The so called starting aid terminal in the engine compartment acts as the battery s positive ter minal The body ground or a special nut acts as the negative terminal Connecting the cables 1 Pull off the cap of the BMW starting aid ter minal 2 Atta...

Page 246: ...tart the combustion engine of the vehicle receiving assistance 5 Disconnect the jumper cables in the reverse order Have the high voltage battery checked if nec essary Charging procedure interrupted Thechargingprocedureofthehigh voltagebat tery could be interrupted during engine start forinstance because the vehicle providing as sistance has not enough battery power Disconnect the jumper cables in ...

Page 247: ...istance of the brake pedal is lon ger than usual Larger steering wheel movements are re quired Switch on the hazard warning system de pending on local regulations If the electrical system has failed clearly identify the vehicle being towed by placing a sign or a warning triangle in the rear win dow Adhere to the towing speed and distance Do not exceed a towing speed of 30 mph 50km handatowingdista...

Page 248: ...isk of fatal injury from electric shock due to the hybrid system s high volt age Hybrid system contact with water The hybrid system is typically safe even in the following example situations Water in the footwell forinstance after a rainstorm when the glass sunroof is open Vehicle is in the water forinstance flooding Liquid escapes in the trunk In these cases there is no risk of injury from elec t...

Page 249: ... injury from electric shock Lock the vehicle after exiting Do not inhale any gases escaping from the high voltage battery if necessary keep a distance to the vehicle Do not touch any fluids escaping from the high voltage battery or the skin can sustain chemical burns 249 Online Edition for Part no 01 41 2 603 958 03 10 500 Reference Mobility Communication Entertainment Navigation Driving tips Cont...

Page 250: ...irrors otherwise they may be damaged depending on the width of the vehicle Deactivate the rain sensor refer to page 72 to avoid unintentional wiper acti vation Guide rails in car washes Avoid car washes with guide rails higher than 4 in 10 cm otherwise the vehicle body could be damaged Before driving into a car wash The vehicle is able to roll when the following steps are taken 1 Press on the brak...

Page 251: ...radually break down the protective layer of the leather surface Suitable care products are available from the service center Upholstery material care Vacuum regularly with a vacuum cleaner If they are very dirty e g beverage stains use a soft sponge or microfiber cloth with a suitable interior cleaner Clean the upholstery down to the seams using large sweeping motions Avoid rubbing the ma terial v...

Page 252: ...ts can be removed from the passenger compartment for cleaning If they are very dirty clean with a microfiber cloth and water or an interior cleaner To prevent mat ting of the carpet rub back and forth in the di rection of travel only Sensors cameras To clean the sensors or cameras of equipment such as the High beam Assistant Active Cruise Control or Night Vision use a cloth moistened with a small ...

Page 253: ...253 Online Edition for Part no 01 41 2 603 958 03 10 500 Reference Mobility Communication Entertainment Navigation Driving tips Controls At a glance ...

Page 254: ...254 Online Edition for Part no 01 41 2 603 958 03 10 500 ...

Page 255: ...e This chapter contains technical data short commands for the voice activation system and an index that will quickly take you to the information you need 255 Online Edition for Part no 01 41 2 603 958 03 10 500 ...

Page 256: ...Technical data Technical data Size ActiveHybrid 7 Width with mirrors height 256 Online Edition for Part no 01 41 2 603 958 03 10 500 Technical data ...

Page 257: ...s Length wheel base Smallest turning circle ActiveHybrid 7 Ø 41 ft 12 5 m 257 Online Edition for Part no 01 41 2 603 958 03 10 500 Reference Mobility Communication Entertainment Navigation Driving tips Controls At a glance ...

Page 258: ...Size ActiveHybrid 7 L Width with mirrors height Width without mirrors 258 Online Edition for Part no 01 41 2 603 958 03 10 500 Technical data ...

Page 259: ... 1 320 Approved rear axle load lbs kg 3 153 1 430 3 197 1 450 Approved roof load capacity lbs kg 220 100 220 100 Trunk capacity cu ft l 13 x 13 368 Engine specifications The rated power outputs are established on the basis of fuel grade AKI 91 Hybrid system Displacement cu in cm 268 2 4 395 No of cylinders 8 259 Online Edition for Part no 01 41 2 603 958 03 10 500 Reference Mobility Communication ...

Page 260: ... speed lb ft Nm rpm 515 698 2 000 3 000 Capacities ActiveHybrid 7 ActiveHybrid 7 L Fuel tank US gal liters approx 21 1 80 Fuel quality refer to page 223 Windshield and headlamp washer system US quarts liters approx 5 3 5 0 260 Online Edition for Part no 01 41 2 603 958 03 10 500 Technical data ...

Page 261: ...rofiles Profiles Opening the computer Onboard info Opening the contacts Contacts Displaying the phone book Phonebook Opening BMW Assist B M W Assist Opening the destination input Enter address CD multimedia CD DVD drive Function Command Playing back a CD C D on Selecting a CD Select C D Selecting a CD and track C D track e g CD 3 track 5 Selecting a track C D track e g track 5 Opening the CD and m...

Page 262: ...g for music opening the menu Music search Playing back the most frequently played tracks Top fifty External devices Function Command Opening external devices External devices Call up Bluetooth devices Bluetooth AUX front AUX front Tone Function Command Opening the tone settings Tone Radio FM Function Command Calling up the radio Radio Calling up an FM station F M Opening manual search Manual 262 O...

Page 263: ...ather band on Selecting a Weather Band station Select a weather channel Satellite radio Function Command Calling up the satellite radio Satellite radio Switching on the satellite radio Satellite radio on Selecting a satellite radio channel Select satellite radio e g satellite radio channel 2 Stored stations Function Command Opening the stored stations Presets Choosing a stored station Select prese...

Page 264: ...ination guidance Start guidance Terminating destination guidance Stop guidance Opening the home address Home address Opening the route criteria Route preference Opening the route Route information Switching on the spoken instructions Switch on voice instructions Repeating a spoken instruction Repeat voice instructions Switching off the spoken instructions Switch off voice instructions Displaying t...

Page 265: ...lit screen current position Split screen direction of travel Split screen map in direction of travel Split screen perspective Split screen perspective Split screen wider intersection zoom Splitscreen Exit ramp view Split screen scale feet Split screen scale feet e g split screen scale 100 feet Split screen scale miles Split screen scale miles e g split screen scale 5 miles Split screen highlightin...

Page 266: ... B M W Assist Opening BMW Search B M W Search Vehicle information Owner s Manual Function Command Opening the Owner s Manual Display Owner s Manual Opening the Quick Reference Quick reference Opening the keyword search Owner s Manual Opening Search by pictures Search by pictures Computer Function Command Opening the computer Onboard info Opening the trip computer Trip computer 266 Online Edition f...

Page 267: ...ing the time and date settings Time and date Opening the language and unit settings Language and units Opening the speed limit settings Speed Opening the light settings Lighting Opening the door lock settings Door locks Opening the profiles Profiles Equipment Function Command Opening the air conditioning settings Climate Opening the Head up Display settings head up display Enabling the rear seat A...

Page 268: ...ock Brake System ABS 104 Anti slip control refer to DSC 104 Approved engine oils 232 Armrest refer to Center arm rest 135 Ashtray 131 Assist 215 Assistance Roadside Assis tance 244 Assistance when driving off 107 Audio playback 175 Audio remote control 189 AUTO intensity 123 Automatic car wash 250 Automatic climate con trol 122 Automatic Curb Monitor 59 Automatic deactivation front passenger airba...

Page 269: ...m 141 Category details special des tinations 151 CBS Condition Based Serv ice 234 CD DVD 175 CD DVD player rear 191 196 CDs storing 181 Cell phone 204 Center armrest 135 Center console 17 Central locking system 37 Centralscreen refertoControl Display 19 Changes technical refer to Safety 7 Changing parts 236 Changing wheels tires 227 Check Control 87 Children seating position 62 Children transporti...

Page 270: ...y Con trol 104 DTC Dynamic Traction Con trol 104 DVD CD 175 DVD CD notes 180 DVD CD player rear 191 196 DVD changer 179 DVD settings 178 DVDs storing 181 DVD video 177 Dynamic Damping Con trol 105 Dynamic destination guid ance 156 Dynamic Driving Control 105 Dynamic Stability Control DSC 104 Dynamic Traction Control DTC 104 E EfficientDynamics refer to Saving fuel 145 Electronic displays instru me...

Page 271: ...menda tion 157 Gear change automatic trans mission 74 General driving notes 141 Gentleman function 50 Glass sunroof powered 47 Glove compartment 134 GPS navigation refer to Navi gation system 148 H Hand brake refer to Parking brake 68 Hand held transmitter alter nating code 130 Hazard warning flashers 243 HD Radio 169 Head airbags 93 Headlamp control auto matic 90 Headlamp courtesy delay fea ture ...

Page 272: ...Vehicle jack 240 Joystick automatic transmis sion 74 K Key remote control 34 Keyless Go refer to Comfort Access 43 Key Memory refer to Personal Profile 35 Kickdown automatic trans mission 74 Knee airbag 93 L Lamp replacement 236 Lamp replacement front 237 Lamp replacement rear 239 Lamps 89 Lamps and bulbs 236 Lane departure warning 100 Lane margin warning 100 Language on Control Dis play 85 Lashin...

Page 273: ...nt fix ing systems 62 MP3 player 186 Multifunction steering wheel buttons 12 Multimedia 175 Music collection 181 Music search 183 Music storing 181 N Navigation 148 Navigation data 161 Neck restraints front refer to Head restraints 55 Neck restraints rear refer to Head restraints 56 New wheels and tires 227 Night Vision with pedestrian detection 117 NORMAL program Dynamic Driving Control 106 Notes...

Page 274: ...orage compart ment 136 Rearview mirror 59 Rear window defroster 124 Recirculated air mode 123 Recommended tire brands 228 Recovery energy recov ery 29 Refueling 222 Release tool 236 Remaining range 80 Remote control key 34 Remote control audio 189 Remote control malfunc tion 39 Remote control rear enter tainment 192 Remote control univer sal 129 repair work 236 Replacement fuse 242 Replacing parts...

Page 275: ... Stop button 66 Start function during malfunc tion 35 Starting aid 244 Starting the engine 66 State province selecting for navigation 148 Stations stored 174 Station storing 168 Status display tires 96 Status information iDrive 22 Status of Owner s Manual 7 Steering wheel adjusting 60 Steering wheel heating 61 Steering wheel memory 57 Steptronic automatic trans mission 74 Stopping the engine 67 St...

Page 276: ...nals rear bulb re placement 239 U Unintentional alarm 45 Units of measure 85 Universal remote control 129 Unlock button automatic transmission 75 Unlocking locking from in side 40 Unlocking locking via door lock 39 Unlocking locking with remote control 37 Upholstery care 251 USB audio interface 186 USB interface 134 V Vanity mirror 60 Variable Damping Control re fer to Dynamic Damping Control 105 ...

Page 277: ...indshield wipers fold out position 73 Winter storage care 252 Winter tires suitable tires 228 Winter tires tread 227 Wiper blades replacing 236 Wiper fluid 74 Wiper system 72 Wood care 251 Word match concept naviga tion 24 Working on the hybrid sys tem 248 Working on the vehicle 236 Wrench 236 X Xenon headlamps bulb re placement 237 Y Your individual vehicle 6 277 Online Edition for Part no 01 41 ...

Page 278: ......

Page 279: ...More about BMW bmwusa com The Ultimate Driving Machine 01 41 2 603 958 ue BL260395800H Online Edition for Part no 01 41 2 603 958 03 10 500 ...

Page 280: ...ActiveHybrid 7 US En ...

Reviews: