background image


Blulog TDL2 Data Logger 

Intended Use


This Blulog TDL2 Data Logger


is 

designed to work only with 
dedicated software and 
accessories.


Do not use the Blulog TDL2 Data 
Logger for any other purpose. 
Incorrect use may void the 
warranty and damage to the device. 


To reduce the risk of damage to the 
device: 


Do not expose the devices to 
rain, water or excessive 
humidity. 


Do not expose the devices to 
direct sunlight, heat or fire. 


Store the devices indoors. 


Never modify this devices in 
any way. 


Check that it is undamaged, 
in good conditions and 
functioning properly. 


Never work with a damaged 
or malfunctioning devices. 


Data Logger Installation


Hanger Installation 


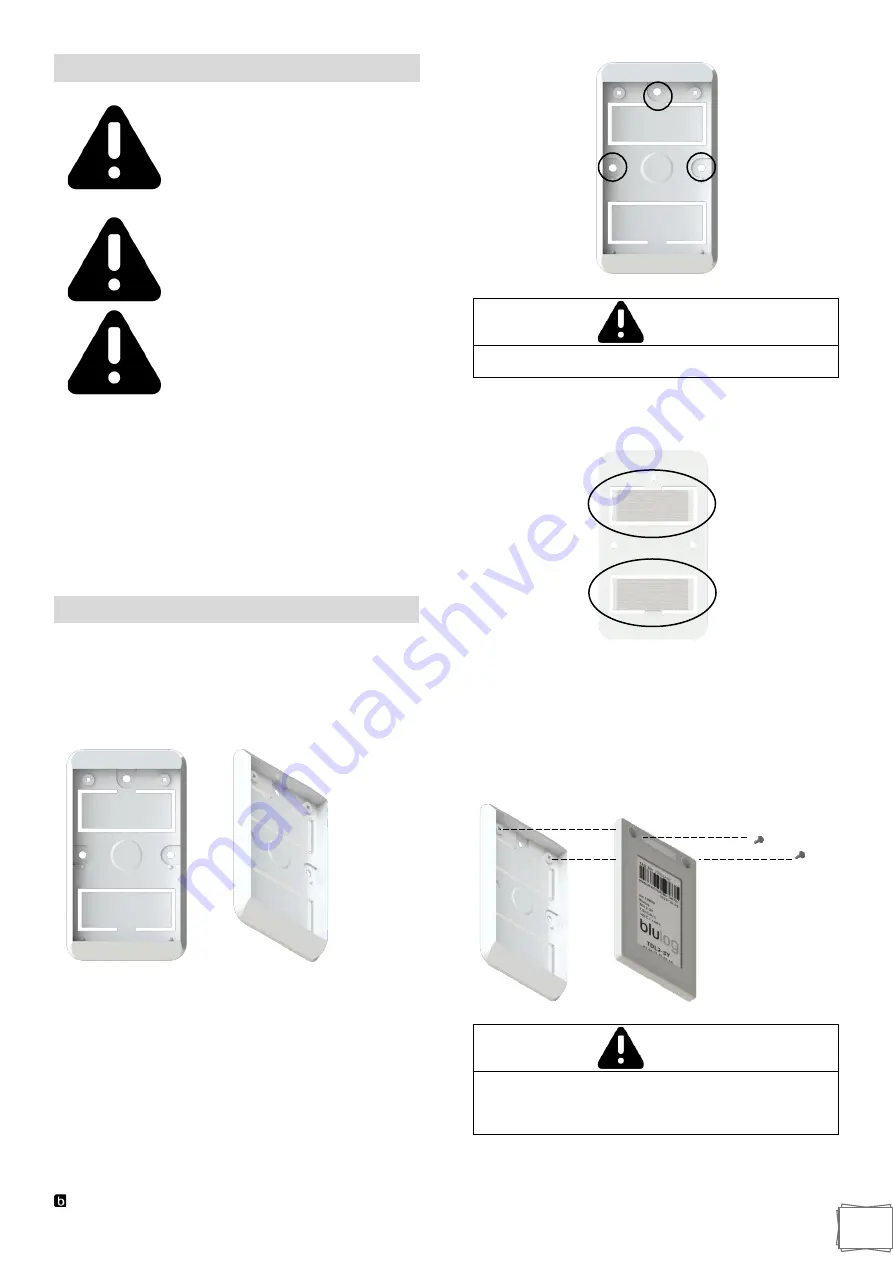
The TDL2 data logger is delivered together with a hanger 
enabling quick installation of the data logger on flat surfaces. 


The hanger can be permanently attached to flat surfaces 
with wall plugs and screws. The hanger has three dedicated 
places for mounting screws marked in the drawing below. 


WARNING


Mounting screws and wall plugs are not part of the set 

and are not included in the set.


The hanger can also be attached to the surface with durable 
self-adhesive foam located on the back of the hanger 
(marked in the drawing below). 


To mount the hanger, simply remove the foam cover and put 
the hanger on a previously prepared surface. 
 

Installation of the TDL2 Data Logger 

 
To mount the TDL2 data logger in the hanger, place the data 
logger in the hanger and attach it to the hanger using the 
screws provided. 


WARNING


The TDL2 data logger should be mounted in a vertical 

position. Installation of TDL2 data loggers should be 

avoided at a distance of less than 50cm from the 

corners of the walls and on surfaces made of metal. 


Summary of Contents for TDL2

Page 1: ...lulog TDL2 Data Logger 1 TDL2 Data Logger Manual Instruction WARNING Read Instruction Manual thoroughly before use and follow all safety precautions improper use can void warranty and damage your device ...

Page 2: ...maging your devices Blulog Team Sielska 10 14 60 129 Poznań Poland info Blulog eu www Blulog eu SAVE THIS MANUAL Because a Blulog TDL2 Data Logger includes an electronic device special precautions must be observed to reduce the risk of personal injury Read this instruction manual thoroughly before use and periodically thereafter Follow all instructions Careless or improper use of the Blulog TDL2 D...

Page 3: ...tion of the data logger on flat surfaces The hanger can be permanently attached to flat surfaces with wall plugs and screws The hanger has three dedicated places for mounting screws marked in the drawing below WARNING Mounting screws and wall plugs are not part of the set and are not included in the set The hanger can also be attached to the surface with durable self adhesive foam located on the b...

Page 4: ... click on the button at the top You will be asked to enter the name type default customer the parent organization please indicate your organization in order to be able to download data from the registrars of this suborganization In addition you can choose whether the sub organization can use the parent organization s SMS package Adding a new user Go to the Users tab and click on the button at the ...

Page 5: ...ick to select the desired loggers Mark the selected loggers click the Assign button which is located at the top next to the and buttons and select the new zone first select the associated organization Change of organization for the logger Go to the Loggers tab click on the serial number of the selected registrar and change the associated organization You can also change the organization for more l...

Page 6: ... temperature limits go to the Loggers tab and click on the Set Limits button which is located on the right side of each logger Then click on the icon and select the temperature limits that suit you humidity also depending on the version Press Submit to complete the process Loggers configuration Go to the Loggers tab and click on the serial number of the selected logger On the window that has been ...

Page 7: ...ber of the selected logger On the window that has been opened you can choose Maintenance mode by clicking on the checkox End time of maintenance can be set by choosing End of maintenance Cyclic maintenance can also be set by selecting Cyclic maintenance mode Daily weekly or monthly temperature reports Go to the Users tab and click on the email address of the selected user From here you can choose ...

Page 8: ...t or upload it to BluConsole Enable NFC Go into Settings on your Android device and enable NFC in the same category as Bluetooth WARNING You can check the following link to see if your device is equipped with NFC https www nfcworld com nfc phones list You can also enable NFC by clicking on the NFC icon on the drop down menu accessible from the desktop Download The Android App Simply place the back...

Page 9: ...pping profile In the Default profile you can add the information regarding product description producer sender recipient or even a tracking number All these elements can help you to facilitate the logistics process If you don t want to add such detailed information choose a Basic profile where you will be asked to fill in only the most important fields For shipping purposes choose a Shipping profi...

Page 10: ...e in TDL2 Data Loggers If you chose the manual start press the PUSH START button on the logger for around 5 seconds until you see diode blinking Stop Recording To stop the recording click on the Stop recording button and place data logger near your device to complete the operation If your data logger is multiuse you can start another recording with new parameters Restart Recording If you want to s...

Page 11: ...o save the details Download PDF Report When you scan the logger the question Do you want download PDF report will pop up automatically You can choose to remember the decision to have PDF reports downloaded automatically at each reading Click the YES button to save the report If you click the NO button or if the question didn t appear follow the instruction below Press the download PDF report butto...

Page 12: ...ld pop up asking you to allow Blutag to access your device s location Press on the ALLOW button WARNING Make sure you are connected to a carrier on your device Press on the 3 dots icon on the top right A drop down menu will appear where you will be able to select GPS status If the GPS position was updated the message should appear at the bottom with date and time of the update Show Logger Route In...

Page 13: ...ofile is a condensed version and a Shipping profile is for logistics In order to create a new profile press the icon at the top right A new window will pop up where you will be able to put your profile name Click the OK button to create the profile Change Profile Field In order to define a new profile field press the icon at the right menu A new window will pop up where you will be able to choose ...

Page 14: ...o remove the field Change Profile In order to make the changes to the profile itself press the 3 dots icon at the top right A new drop down menu will pop up where you can select from Edit profile name Delete profile and Share profile In order to edit the profile name select Edit profile name from the drop down menu A new window will pop up where you can type your new profile name Press the OK butt...

Page 15: ...me Based on your choice the appropriate field will appear while starting a new recording Inside User interface section you will be able to select a duration of message display message font size and mode of numbers input Inside Wi Fi Settings you will be able to select your Wi Fi network Recover AAR In order to recover AAR press on the 3 dots icon on the top right A drop down menu will appear where...

Page 16: ...occupational controlled environment This device contains licence exempt transmitter s receiver s that comply with Innovation Science and Economic Development Canada s licence exempt RSS s Operation is subject to the following two conditions 1 This device may not cause interference 2 This device must accept any interference including interference that may cause undesired operation of the device Thi...

Page 17: ... a period of ONE 3 YEARS from the date of original purchase by the end user purchaser Warranty Period Blulog s published guidelines include but are not limited to information contained in technical specifications user manuals and service communications WHAT IS NOT COVERED BY THIS WARRANTY This Warranty does not apply to any non Blulog branded hardware products or any software even if packaged or s...

Page 18: ...WARRANTY SERVICE Before you contact Blulog please check FAQ section link below If the Blulog Product is still not functioning properly after making use of these resources please contact an Blulog Distributor An Blulog Distributor will help determine whether your Blulog Product requires service and if it does will inform you how Blulog will provide it When contacting Blulog Distributor via telephon...

Page 19: ...immediately upon receipt and notify us if the item has been damaged Please report the damage within 48 hours to Blulog or Blulog Distributor during normal working hours We will need photos of the damaged item as well as photos of the box the damaged item was shipped in Blulog or Blulog Distributor must have the images in order to notify the shipping company and file the necessary damage claims Aft...

Reviews: