background image

IP50HD 

USER MANUAL

Contact:

 [email protected] 

|

 [email protected] 

|

 [email protected]

25

9)  

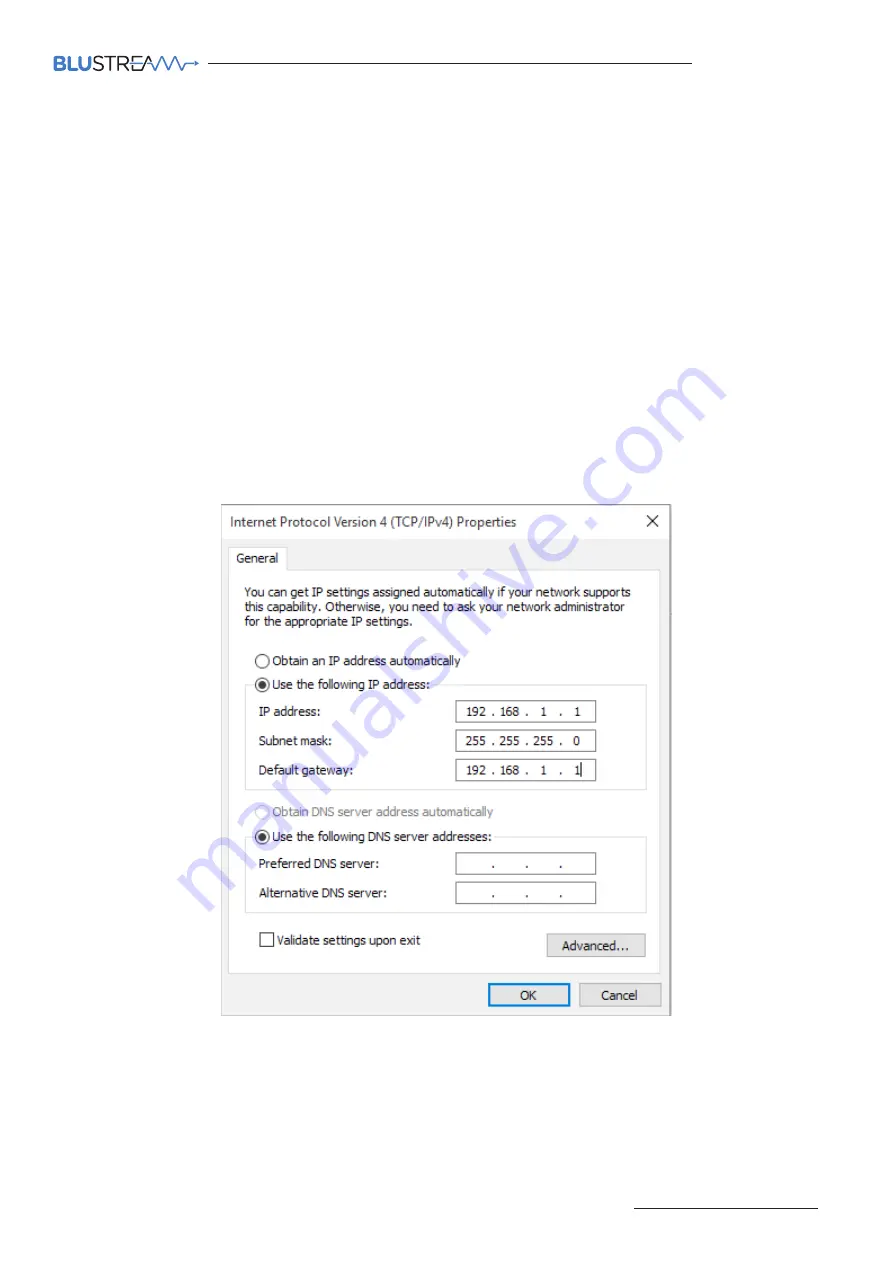
A. Under the ‘General’ tab select ‘USE THE FOLLOWING IP ADDRESS’


B. Enter the following FIXED IP network details for the configuration of the


Network Switch


or the

 ACM200 


(check with the manufacturer of the LAN switch if this address is relevant in advance)

   IP 

Address 

 192.168.1.1

   Subnet 

Mask 

 255.255.255.0

   Default 

Gateway 192.169.1.1


C. Enter the following FIXED IP network details for 

Blustream Multicast products

   IP 

Address 

 169.254.1.100

   Subnet 

Mask 

 255.255.0.0

   Default 

Gateway 169.254.1.1

It is important to have the IP address range of the PC configured to the correct range when setting up the LAN switch. 
Once configuration of the LAN switch has been completed, the IP address range of the PC will need to be amended if 
using the Multicast Tansmitter or Receiver web-GUI's.

10) 

Click ‘OK’ and exit the network setup

11) 

Enter the default Network Switch, ACM200 or Blustream Multicast address into a web browser and check for  


connection to the unit. If the Transmitter and Receiver products have already been configured, enter the    


address of one of these (it is advised to use 169.254.3.1 - this will be the first default Transmitter IP address).

Summary of Contents for Multicast IP50HD-RX

Page 1: ...Blustream Multicast IP50HD TX RX User Manual M U L T I C A S T RevA1_IP50_Manual_210604...

Page 2: ...itter 07 Audio Connections Receiver 07 InfraRed Control 08 Remote Control REM100 08 InfraRed Distribution 09 Infrared Pass Through Source Control 10 Infrared Pass Through Display Control 11 RS 232 Ser...

Page 3: ...ined within this manual have been read and understood and that the network switch has been correctly configured prior to connecting any Blustream Multicast products Failure to do so will result in pro...

Page 4: ...Transmits IR to any IP50HD RX receiver currently viewing the IP50HD TX Supports 5V or 12V IR selectable in product web GUI or ACM200 web GUI 9 IR OUT IR output 3 5mm mono jack routed IR from any IP50H...

Page 5: ...work switch for HDMI video distribution 8 IR IN IR input 3 5mm stereo jack Transmits IR to the IP50HD TX transmitter currently selected Supports 5V or 12V IR selectable in product web GUI or ACM200 we...

Page 6: ...lecting the LAN Switch Guides button on any Multicast product page HDMI over IP Network Configuration Blustream recommend the use of an ACM200 for configuration and control of the IP50HD Multicast sys...

Page 7: ...with analogue L R 2ch line level audio The embedded analogue audio is then distributed with the adjacent HDMI video signal throughout the Multicast system Switching between original HDMI audio and em...

Page 8: ...ds to revert to main control mode Controlling the ACM200 via IR The ACM200 can be controlled via IR using the Blustream REM88 or REM16 remote control up to 16x16 not the REM100 This functions the same...

Page 9: ...Multicast Transmitter and Receiver is supplied with both an IR Receiver and Emitter details below IR Emitter IRE1 IRE2 IRE2 sold separately Blustream 5V IR Emitter designed for discrete IR control of...

Page 10: ...rently selected meaning that individual source control can be achieved with installations consisting of multiple source equipment of the same type i e multiple satellite boxes of the same make model L...

Page 11: ...IR Rx Tx Gnd RS 232 CH IP100UHD RX MULTICAST UHD 1 2 3 4 41 42 43 44 45 46 47 48 49 50 51 52 53 54 55 56 57 58 59 60 61 62 63 64 65 66 67 68 69 70 71 72 73 74 75 76 77 78 79 80 5 6 7 8 9 10 11 12 13...

Page 12: ...er in the system Once established the RS 232 commands can be sent in either direction between products allowing a single command to be sent to 1 or many receivers at the same time i e All displays pow...

Page 13: ...e for 10 seconds to enter Local Configuration mode The LCD front display of the product will show LC when it is in this mode 3 Assign the Transmitter ID IP address once the product is in Local Configu...

Page 14: ...the Receiver once the product ID has been configured the display will begin to flash with an s to indicate that the scaler output is next to be configured Use the UP or DOWN arrows to select the scale...

Page 15: ...is advised that the source EDID is set to output the best video signal possible as this can be down scaled as required at each IP50HD RX Receiver Configuration of Multicast EDID settings can be achiev...

Page 16: ...rough allows native source resolution to pass through to display default setting 01 HDMI 1080p 60Hz 02 HDMI 1080p 50Hz 03 HDMI 1080p 30Hz 04 HDMI 1080p 25Hz 05 HDMI 1080p 24Hz 06 HDMI 720p 60Hz 07 HDM...

Page 17: ...00 web GUI can also be used to show all connected Multicast products within a system Blustream also uses an IP Address schema that keeps all Multicast devices in the Link Local IP range 169 254 xxx xx...

Page 18: ...password prompt will be displayed Enter the username and password the default username and password are listed on the opposing page and press Sign in to login to the web GUI Once signed in you will be...

Page 19: ...e live video feed in the ACM200 web GUI Video Encoding Format H 265 video encoding provides better quality while H 264 provides greater compatibility for older devices Audio Encoding Format PCM audio...

Page 20: ...oad EDID Download the current EDID of the display device connected to the Receiver This then allows you to load it into a Transmitter or open it in third party software for diagnosis Video Timeout Set...

Page 21: ...nsmitter Network Settings Adjust the IP address of the Transmitter or Receiver IR Mode Select 5V or 12V IR mode for compatibilty with 3rd party control systems and IR accessories Security Settings Spe...

Page 22: ...ate the firmware of the device Factory Reset Factory resets the product and resets it back to default settings Reboot Reboots and power cycles the unit with affecting any settings Please note DO NOT u...

Page 23: ...ded to communicate with the either network 1 Connect the computer to the Multicast network switch using an Ethernet cable 2 In the Windows toolbar navigate to CONTROL PANEL 3 Select NETWORK AND INTERN...

Page 24: ...ww blustream us com www blustream co uk 24 7 In the next window select PROPERTIES 8 A In the NETWORKING window highlight select INTERNET PROTOCOL VERSION 4 TCP IPv4 B Select PROPERTIES or double click...

Page 25: ...ddress 169 254 1 100 Subnet Mask 255 255 0 0 Default Gateway 169 254 1 1 It is important to have the IP address range of the PC configured to the correct range when setting up the LAN switch Once conf...

Page 26: ...TX RX Example Schematic ZONE 01 ZONE 02 ZONE 03 SOURCE 02 SOURCE 01 SOURCE 03 ACM200 bridges existing network to Blustream video network IP50HD TX IP50HD RX Existing Network Control Processor HDMI Ov...

Page 27: ...Emitter 1 x Mounting Kit 4 x Rubber Feet IP50HD RX 1 x IP50HD RX 1 x IR Receiver 1 x IR Emitter 1 x Mounting Kit 4 x Rubber Feet IP50HD RX Video Input Connectors 1x LAN RJ45 connector Video Output Co...

Page 28: ...expressly approved by the party responsible for compliance could void the user s authority to operate the equipment CANADA INDUSTRY CANADA IC NOTICES This Class B digital apparatus complies with Canad...

Page 29: ...IP50HD USER MANUAL Contact support blustream com au support blustream us com support blustream co uk 29 Notes...

Page 30: ...www blustream com au www blustream us com www blustream co uk...

Reviews: