background image

ServReach™ KVMultiport


46 

46 

12.4


F7 Defaults 

Press F7 to return the OSD to the factory default settings. 

Note! 

All changes made will be 

erased. 

12.5


The Ports settings 

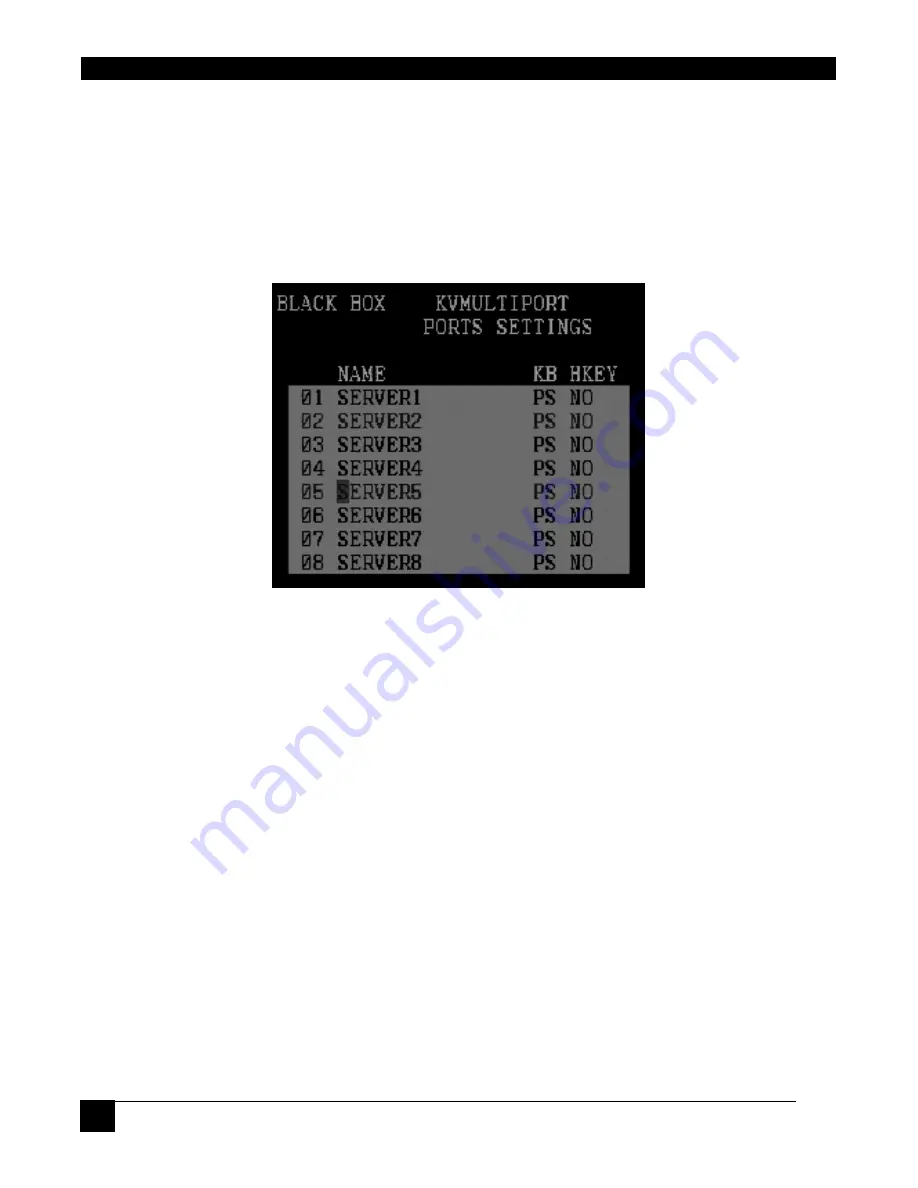
In the Settings window navigate to the Ports line and press 

Enter

. The Ports settings window 

appears see Figure 36. 


Figure 36 Ports Settings window 

12.5.1


Editing the computer name 

In this window you can edit the computer names with up to 15 characters. (To avoid 
confusion the names given in the OSD should match the names given in the web 
configuration).  

To erase a character: 

Select it and press the 

Space bar

. Blank spaces remain in place of the erased character. 

To erase an entire line: 

Place the cursor at the beginning of the line. Keep the 

Space bar

 depressed until the line is 

erased. 

12.5.2


Keyboard (KB) 

The KVMultiport operates with Windows, Linux, HP UX, Alpha UNIX SGI, DOS, Novell, 
MAC-USB or Open VMS. 

By default the keyboard mode is set to PS for Intel based computers.  

For the other systems set the KB column as follows: 

Summary of Contents for KV1120A

Page 1: ...724 746 5500 FREE technical support 24 hours a day 7 days a week Call 724 746 5500 or fax 724 746 0746 Mail address Black Box Corporation 1000 Park Drive Lawrence PA 15055 1018 Web site www blackbox...

Page 2: ......

Page 3: ...t in a residential area is likely to cause interference in which case the user at his own expense will be required to take whatever measures may be necessary to correct the interference Changes or mod...

Page 4: ...aparato el ctrico debe ser montado a la pared o al techo s lo como sea recomendado por el fabricante 8 Servicio El usuario no debe intentar dar servicio al equipo el ctrico m s all a lo descrito en la...

Page 5: ...r una antena externa deber ser localizada lejos de las lineas de energia 16 El cable de corriente deber ser desconectado del cuando el equipo no sea usado por un largo periodo de tiempo 17 Cuidado deb...

Page 6: ...ServReach KVMultiport 44...

Page 7: ...lines 12 4 2 Avoiding general rack mounting problems 12 4 3 Rack mounting the KVMultiport 12 4 4 Client computer operating system 13 5 Connecting the system 14 5 1 The SAMs 14 5 1 1 Connecting a SAM P...

Page 8: ...n 23 8 6 Security Settings 24 8 7 Security SSL Certificate 25 8 8 Maintenance Firmware Upgrade 25 8 9 Restore Factory Settings 26 8 10 Saving changes and logging out 26 9 Operation 27 9 1 Starting a r...

Page 9: ...Switching between computers 41 11 1 The keyboard hotkeys 41 12 The OSD 41 12 1 Navigating the OSD 42 12 2 Selecting a computer 42 12 3 The OSD settings F2 43 12 3 1 The General settings 43 12 4 F7 De...

Page 10: ...Multiport 88 14 Video resolution and refresh rates 53 15 Troubleshooting 54 15 1 Calling Black Box 54 15 2 Shipping and Packaging 54 16 Black Box Technical Support 55 2007 Copyright Black Box All righ...

Page 11: ...connected to the switch via a SAM using only standard CAT5 cable at a distance of up to 10m 33ft in a star configuration No external power is needed at the remote SAM 1 1 Key features BIOS level cont...

Page 12: ...ing a remote KVMultiport session Remote session The process of remotely accessing and controlling Target Servers connected to KVMultiport from a user workstation 2 Package includes The KVMultiport pac...

Page 13: ...to reset the KVMultiport unit Power connector POWER 100 240 VAC 50 60 Hz Server ports I 0 1 2 3 4 5 6 7 8 10 11 12 13 14 15 16 9 Keyboard Mouse Monitor CONSOLE LAN Ethernet connector FLASH LAN SERIAL...

Page 14: ...patible with the maximum rated ambient temperature Reduced airflow Install the equipment in a rack in such a way that the amount of airflow required for safe operation is not compromised Leave a gap o...

Page 15: ...brackets towards the rear of the unit so that the unit can be mounted rear facing Figure 4 illustrates the bracket connected for rear facing Screw the bracket to the KVMultiport using the screws prov...

Page 16: ...n b 2 6 0 0 h p w o rk s ta tio n b 2 6 0 0 To LAN port SAMs Figure 5 KVMultiport system overview 5 1 The SAMs Each computer server is directly connected to the KVMultiport via the appropriate SAM us...

Page 17: ...ltiport Server port To Mouse port To Video port Keybd Mouse 100T Video Serial A Parallel PCI 33Mx32b PCI 33Mx32b PCI 33Mx32b PCI 33Mx32b Serial B NetServer tc2100 SCSI SAM PS 2 Figure 6 SAM PS 2 conne...

Page 18: ...ltiport s Computer ports 3 Follow the above 2 steps for each computer 5 4 Connecting a KVM console To operate the system locally connect a KVM console to the KVMultiport 1 Connect the monitor s connec...

Page 19: ...static IP address 192 168 0 155 Note If a DHCP server later becomes available the unit picks up the IP settings from DHCP server To keep the static IP address disable DHCP explained in section 8 1 1...

Page 20: ...the Network Configuration page See Figure 9 Figure 9 KVMultiport Web interface 5 Bookmark the page for easy reference 7 1 SSL Certificate notes When first connecting to KVMultiport s https configurati...

Page 21: ...is active on the same network to which KVMultiport is connected DHCP provides automatic IP assignment When DHCP is disabled Recommended You can assign a fixed IP address to the KVMultiport Consult yo...

Page 22: ...even if the KVMultiport resides on the same network segment as the KVManager 8 2 Network SNMP settings From the menu click SNMP settings The following appears Figure 10 SNMP settings From this page y...

Page 23: ...nfiguration interface View only View only can view the screen of the currently accessed Target Server without keyboard and mouse control A view only indicator appears on the viewer s local mouse point...

Page 24: ...An alternative to deleting a user is blocking a user This means that the user s name and password is stored but the user is unable to access the system Check Block to block a user Uncheck Block to all...

Page 25: ...e servers easily To do so 1 From the menu click Switch Configuration The Switch Configuration window appears see Figure 13 Figure 13 Switch Configuration 2 In the Server Name section change the name o...

Page 26: ...al block Password Policy You have the option of a standard or high security level of password The table below shows the parameters of the 2 options Standard security policy High security policy 6 char...

Page 27: ...to locate the private key file Key Password Type the private key password 8 8 Maintenance Firmware Upgrade Upgrade the KVMultiport firmware to take advantage of new features Download the firmware from...

Page 28: ...KVMultiport parameters resetting all the information added by the administrators including Network settings Servers Switches Users Passwords etc You have the option to preserve Network settings explai...

Page 29: ...n as an Administrator to your computer to install the ActiveX control Once the ActiveX control is installed all types of users can login On connecting the screen of the lowest numbered Target Server t...

Page 30: ...on to take over the Target Server A User only has this option when the current session is run by another User but not by an Administrator The following message appears Figure 19 Busy remote session op...

Page 31: ...of the selected server appears 9 5 Changing the performance settings You can alter the bandwidth settings from the Toolbar To alter the settings From the Toolbar click The Settings Dialog box appears...

Page 32: ...Video Adjust Auto Video Adjust Each option is explained below 9 6 1 Refresh Select Refresh or press Ctrl R to refresh the Video image Refresh may be needed when changing the display attributes of a T...

Page 33: ...led Scale defines the scale resolution of the session image Select Filter defines the filter of the input video from the server A higher filter reduces the noise level but makes the image heavier Nois...

Page 34: ...Login process To add a keyboard sequence Click Add Remove The Special Key Manager box appears see Figure 22 Figure 22 Special Key Manager box To add a predefined sequence 1 Click Add Predefined A lis...

Page 35: ...k Edit 3 Click Start Recording 4 Press the desired keys The keys appear in the area provided 5 Click Stop Recording 6 Click OK 9 9 Synchronizing mouse pointers When working at the Client computer two...

Page 36: ...ent so calibration is only needed once per Target Server If the Video Noise Level is above zero calibration may not work Go to Video Adjustment and try to eliminate the noise by pressing Auto video ad...

Page 37: ...indows NT4 98 ME 2000 If Mouse Properties were ever changed for the Target Server even if they have been returned to their original state uncheck default Click OK The mouse pointers should be synchron...

Page 38: ...eatures Right click the Black Box icon a menu appears From this menu you can access the connected devices You also have the following features Disconnect You can disconnect the session by clicking Dis...

Page 39: ...Internet Explorer menu bar at the top 3 Right click the Internet Explorer menu bar and check Auto Hide The Internet Explorer menu bar disappears You are in full screen mode To exit full screen mode P...

Page 40: ...pends on whether there is a DHCP server on the network If there is the DHCP server assigns an IP address to the KVMultiport If there is no DHCP server the unit boots with the static IP address 192 168...

Page 41: ...efaults 1 From the menu choose Restore Factory Settings A warning appears see Figure 29 Figure 29 Warning 2 Click A further warning appears see below Figure 30 Warning 3 Click OK the factory defaults...

Page 42: ...e device firmware Save the Upgrade firmware on the hard disk of a computer connected to the network To restore the device firmware 1 From the Safe mode menu choose Firmware Upgrade 2 Locate the Upgrad...

Page 43: ...ckwards press Shift then Release Shift before pressing Note With a US English keyboard you can use the key of the alphanumeric section or of the numeric keypad With a Non US English keyboard only use...

Page 44: ...elevant use the Tab key To exit the OSD or return to a previous window within the OSD press Esc 12 2 Selecting a computer To select a computer 1 Navigate to the desired computer line Or type the port...

Page 45: ...e 34 Settings window Note When the OSD is password protected explained below only the Administrator has access to the F2 settings window 12 3 1 The General settings With the red line on the word GENER...

Page 46: ...unctions only F4 Scan F5 Tune and F6 Moving the Confirmation label 12 3 1 4 User Status U There are 6 different Users in the KVMultiport system Each User has a Profile set by the Administrator that de...

Page 47: ...ctive and inactive computer lines To change the Autoskip setting 1 Navigate to the Autoskip line 2 Toggle between the options using the Space bar 12 3 1 8 Serial port This option is disabled in KVMult...

Page 48: ...with up to 15 characters To avoid confusion the names given in the OSD should match the names given in the web configuration To erase a character Select it and press the Space bar Blank spaces remain...

Page 49: ...see Figure 37 Figure 37 Time settings window 12 6 1 Scan SCN Label LBL Time out T O SCN In the SCN column change the scan period LBL In the LBL column change the display period of the Confirmation la...

Page 50: ...computer screen is skipped 12 7 Users In the Settings window navigate to the Users line and press Enter Note Users is only enabled if the security status is set to On see page 44 The Users settings wi...

Page 51: ...ds for Type of access permission There can only be 1 Administrator password 1 Supervisor password and 6 User passwords To change a user name or password 1 Navigate to the desired line and column 2 Typ...

Page 52: ...of any computer screen from the Select Computer window To adjust the screen image 1 Navigate to the computer you wish to adjust 2 Press F5 The screen image of the selected computer appears together w...

Page 53: ...12 The OSD 51 2 Press F6 The selected screen image and Identification label will appear 3 Use the arrow keys to move the label to the desired position 4 Press Esc to save and exit...

Page 54: ...er than on Target Server Video and mouse synchronization Both auto and manual modes Security 128 bit SSL encryption Connections Ethernet RJ45 10 100 Mbit sec autosensing Serial RJ45 Local KVM connecti...

Page 55: ...ideo resolution and refresh rates Hz 56 60 65 66 70 72 73 75 76 85 86 640x480 x x x x x x 720x400 x x 800x600 x x x x x x 1024x768 x x x x x x x 1152x864 x 1152x900 x x 1280x720 x 1280x768 x x 1280x96...

Page 56: ...scription including The nature and duration of the problem When the problem occurs The components involved in the problem Any particular application that when used appears to create the problem or mak...

Page 57: ...07 09 11 33 820 05 07 09 tech blackbox fr Germany www black box de 49 811 5541 110 49 811 5541 499 techsupp black box de Ireland www blackbox co uk 353 1 662 2466 353 1 662 2477 techhelp blackbox co...

Page 58: ...SERVSWITCH PANTHER 56 56...

Page 59: ...Copyright 2007 Black Box Corporation All rights reserved 1000 Park Drive Lawrence PA 15055 1018 724 746 5500 Fax 724 746 0746...

Reviews: