BIO RAD Gel Doc 2000ChemiDocChemiDoc XRS Hardware Instruction Manual Download Page 17

4.2.7 Installing the Optional 17 mm or 25 mm wide-angle Lenses (ChemiDoc XRS only): 


This installation guide covers installation of the optional lenses to the ChemiDoc XRS system 
(only).  The following catalog numbers are covered under this category: 


i.      1708072 Lens f 0.95, 25 mm, Wide angle  
ii.  1708073 Lens f 0.95, 17 mm, Wide angle 


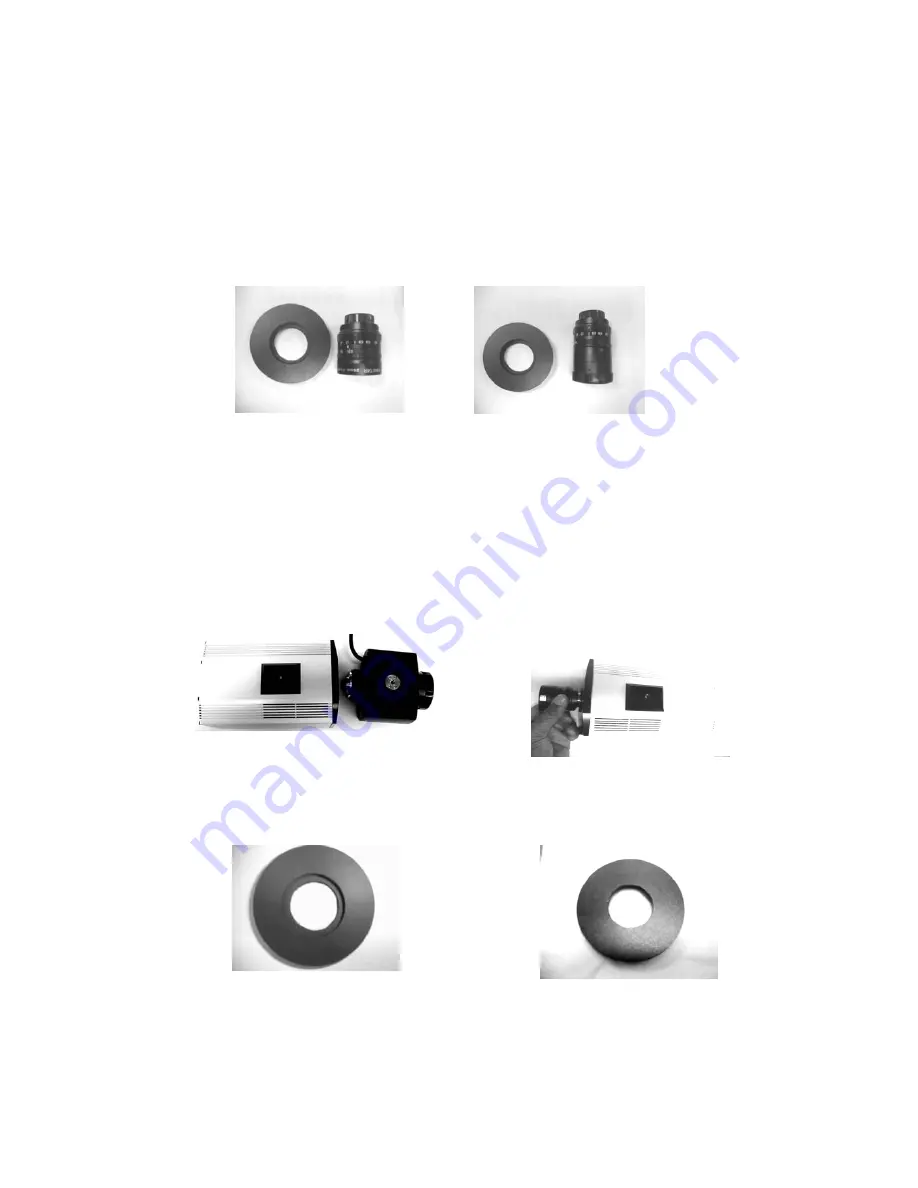
The lens kit includes a lens and the Light Seal adapter ring.  See pictures below: 


25 mm Wide Angle Lens with 

Light Seal Adapter ring 

17 mm Wide Angle Lens with      
     Light Seal Adapter ring 


Setting Up the Lens: 


1.  Turn off the power to universal hood and camera 
2.  Disconnect the camera and lens cables 
3.  Remove the ChemiDoc XRS camera from the bracket. 
4. Remove the existing Motorized Zoom Lens from the camera by turning the lens 

counterclockwise and Install the 25 mm or 17 mm Wide angle lens as the case may be to the 
camera as shown below: 


Remove existing Motorized Zoom Lens 

Install the Wide Angle Lens 


5.  The Wide-angle lens comes with a Light Seal that is donut shaped one side of which is soft 

and the other is hard.  See picture below 


Light Seal Soft side 

Light Seal Hard side 

  
6.  Insert the Light Seal (donut) in the round slot located at the bottom side of the black adapter 

plate on the bracket assembly.  Make sure that the hard side light seal is facing outward.  See 
picture for details 


Page 17 of 42 

Summary of Contents for Gel Doc 2000ChemiDocChemiDoc XRS

Page 1: ...Gel Doc 2000 ChemiDoc ChemiDoc XRS Hardware Instruction Manual Includes Universal Hood Catalog Number 170 8126 P N MI1708126AA Rev C...

Page 2: ...versal Hood is warranted against defects in materials and workmanship for 1 year If any defect occurs in the instrument during this warranty period Bio Rad laboratories will repair or replace the defe...

Page 3: ...strument not performed by Bio Rad Laboratories or an authorized agent Richtlinien WICHTIG Dieses Geraet von Bio Rad Laboratories konstruiert besitzt das Zertifikat ENC1010 anerkannt von dem internatio...

Page 4: ...ights immediately after use Clean the transilluminator platen after use Generelle Vorsichtsmassnahmen Bitte die Bedienungsanleitung aufmerksam lesen Das Geraet darf nur fuer die vorgesehenen Applikati...

Page 5: ...3 DESCRIPTION OF FUNCTIONS AND SYSTEM INITIALIZATION 19 4 3 1 Control panel 19 4 3 2 Initial test 22 4 3 3 Aligning the camera and bracket This applies to all systems 24 SECTION 5 OPERATION OF THE UNI...

Page 6: ...for using the program is mainly determined by the size of the images you will scan and analyze Images scanned at high resolution can be quite large For this reason we recommend that you archive image...

Page 7: ...gszwecke geeignet Ausserdem ist die Benutzung nur fuer spezialisiertes Personal gedacht das mit den Gesundheitsrisiken vertraut ist die an die UV Strahlung gebunden sind und den Reagentien die normale...

Page 8: ...an optional UV White light conversion screen 170 7940 or White light transilluminator 170 7950 are available 3 3 PCI Digitizing Card The systems require a PCI Digitizing Card to convert the video sig...

Page 9: ...ual Power cable 170 7541 7540 PCI Digitizing card RS170 CCIR 170 7546 Integrating Cable 170 8120 Gel Chemi Accessory Kit includes Focusing Target UV Ruler Gel Cutter Amber filter and filter adapter ri...

Page 10: ...female end of power cable to the cabinet The power entry module is on the left side back of the cabinet Note Please do not connect the other end of power cable to a power source until all connections...

Page 11: ...ck gasket and fix the bracket with the four washers and knobs e A completely assembled camera will look like the photo shown below Gel Doc CCD Camera assembled on the bracket Black plastic screw requi...

Page 12: ...s of a Cable Power supply Camera Assembly with Motorized Zoom lens and 1 diopter assembled to it and a PCI digitizing card c Hold the camera so that the tripod mount is facing away from your hand see...

Page 13: ...mbscrew and tightly secure the black adapter plate to the bracket i The lens body should be completely flush against the rubber gasket ii The lens should appear centered in the black adapter plate as...

Page 14: ...een from inside the hood Center the lens in the opening of the hood as viewed from inside of the hood l Secure the bracket to the hood at to the four studs located on top of the hood by using four bla...

Page 15: ...ng the PCI Card into the PC The drivers for this card need to be installed during the software installation Please refer to Appendix D regarding driver installation a Make sure that your computer is t...

Page 16: ...iversal Hood Serial port DB25 on the back left side to the COM1 of the PC The PC MAC cable is included NOTE In case when a MAC has a USB port instead of the Serial Port use a USB to Serial Adapter 170...

Page 17: ...hood and camera 2 Disconnect the camera and lens cables 3 Remove the ChemiDoc XRS camera from the bracket 4 Remove the existing Motorized Zoom Lens from the camera by turning the lens counterclockwise...

Page 18: ...washer Make sure that the lens is seated properly in round slot in the soft side of the foam 8 Tighten the screw so that the camera is secured properly to the bracket Now place the Bracket Camera asse...

Page 19: ...following section to become familiarized with each function Imaging Indicator LED Power Indicator LED Prep UV LED and button Trans UV LED and button Hold LED and button Trans White LED and button Epi...

Page 20: ...ully open The UV shield has to be used but glass or mask and gloves are recommended to block the UV radiations This option is not applicable to the door Wichtig Wer die Absicht hat Banden aus dem Gel...

Page 21: ...the aperture button on Close decreases the amount of light coming into the sensor thereby making the image darker Pushing the aperture button on Open increases the amount of light coming into the sen...

Page 22: ...the door Epi lights are on Tran UV LED blinks Press the Epi White key again Close the door Epi lights and LED are turned off Trans UV LED turns off Press the Trans UV key Trans UV LED turns on Open t...

Page 23: ...d to close the iris and increase the integration time Test Procedure For ChemiDoc XRS systems Only NOTE The Operation Test for the ChemiDoc XRS system is different from the Gel Doc 2000 or ChemiDoc sy...

Page 24: ...tails on Dark Reference Subtraction refer to the Software Manual 4 3 3 Aligning the camera and bracket This applies to all systems Centering the CCD camera on the lens hole of the Universal Hood shoul...

Page 25: ...stay in the center of the image throughout the zoom range 9 Select Fast on the universal hood Click on or press Focus button to check that the lens is responding If not adjust the position of the lens...

Page 26: ...version screen or white light transillumiator focusing is easily achieved if the Iris is slightly closed 5 1 3 Acquire an image 1 Press the appropriate light source for your sample 2 Select an integra...

Page 27: ...urn ON the UV Transilluminator after removing the Sample To achieve good focus you may need to close the aperture till proper focus is achieved 11 Remove the sample from the Transilluminator Clean the...

Page 28: ...V Trans LED stops blinking 2 Place the clear acrylic UV protection screen upright in the metal brackets on the front edge of the transilluminator CAUTION VORSICHT WARNING EXPOSURE TO UV RADIATION IS H...

Page 29: ...just contrast brightness and gamma on the thermal printer Light leakage into the darkroom he rear hole on the MZL not closed with the screw The Lens body is not properly centered and against the light...

Page 30: ...possible exposure Close the IRIS using the IRIS control until Auto expose is possible Unable to focus on the sample using White Light Transilluminator or conversion screen Aperture is open too wide c...

Page 31: ...subishi P 91W Printer 100 240 Volts 170 7540 Card PCI Digitizing Gel Doc 2000 ChemiDoc CCIR 170 7541 Card PCI Digitizing Gel Doc 2000 ChemiDoc RS170 170 7546 Cable Integration controller Gel Doc 2000...

Page 32: ...093 Upgrade kit CCIR MZL PC Gel Doc 2000 to ChemiDoc 170 8094 Upgrade kit RS170 MZL MAC Gel Doc 2000 to ChemiDoc 170 8095 Upgrade kit CCIR MZL MAC Gel Doc 2000 to ChemiDoc 170 8096 Lens Motorized 8 85...

Page 33: ...old each lamp housing to the internal side of the hood Remove these nuts The cover screen with a plastic piece will come loose and the lamp will become visible To remove the lamp hold it from the rece...

Page 34: ...hemical agents used as gel dyes Please use protective gloves when touching the UV transilluminator cover The lamps must be replaced after every 500 hours of use Turn off the power Remove the power cab...

Page 35: ...trument Remove the lid Place it down on its backside on a non abrasive surface Caution Do not put the UV filter directly on the bench To replace the starter rotate it counter clockwise and remove To r...

Page 36: ...r cable should be already plugged into the CCD camera 12 V AC DC connector e Connect each end of the CCD Camera cable following the instruction below Label Color Instrument Connection 9 pin connector...

Page 37: ...d and attach it with the four washers and knobs d Connect each end of the CCD Camera cable following the instruction below Label Color Instrument Connection 9 pin connector Black PCI board Back of com...

Page 38: ...Com1 port This option permits to b Connect the camera power cable to the connector on the camera labeled POWER See picture below Camera Power Supply Connector on the cable Power connector on the came...

Page 39: ...the Universal Hood e In case of a MAC with a USB connect the optional 170 7959 USB to Serial adapter not included with a USB cable to the MAC and then connect the 8 pin round connector of the MAC ser...

Page 40: ...the PC The following procedure describes how to install the drivers that are provided with your TDS Quantity CD ROM a Insert TDS Quantity One CD into the CD ROM drive of the PC It will go into AUTO RU...

Page 41: ...is self installing utility will install the appropriate drivers on your PC f Next install the PCI Card into the PC The operating system will automatically find the card and appropriate driver and inst...

Page 42: ...752 x 582 CCIR 768 H x 494 V RS170 752 x 585 CCIR 1300 x 1030 Pixel Size in Microns 8 4 H X 9 8 V 8 4 H X 9 8 V 6 7 H X 6 7 V Cooling System No 2 stage Peltier Peltier cooled Camera Cooling Temp NA 4...

Reviews: