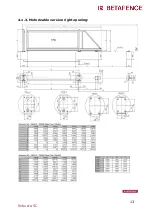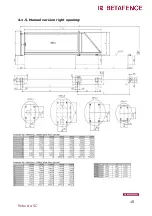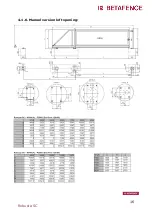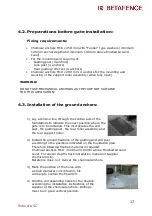
23
Robusta SC
4.7.
Installation of the lock post onto the ground
anchors:
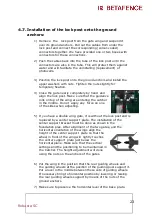
1)
Remove the lock post from the gate wing and suspend it
over its ground anchors. Pull out the cables from under the
lock post and connect the corresponding (colour-coded)
connectors together. We have provided one or two boxes with
connectors for these connections.
2)
Push the cables back into the tube of the lock post until the
connectors are also in the tube. This will protect them against
water and will facilitate the uninstalling (replacement) of
photocells.
3)
Position the lock post onto the ground anchors and install the
upper washers with nuts. Tighten the nuts slightly for
temporary fixation.
4)
Close the gate nearly completely by hand and
align the lock post. Make sure that the guidance
rolls on top of the wing are entering the catcher
in the middle. Do not apply any force on one
of the sides when adjusting.
5)
If you have a double wing gate, it is without the lock post and is
replaced by a center support plate. The installation of the
center support bracket must be done as shown in the
foundation plan. After alignment of the two gates, and the
horizontal orientation of the wings align the
height of the center support plate so that the
wheel in front of the wing will lightly touches
the center support plate just below the
horizontal plane. Make sure that the vertical
settings and the positioning to be maintained in
the Catcher. The height adjustment will done
using the nuts on the anchors of the gates.
6)
Put the wing in the position that the rear guiding wheels and
the guiding wheels at the position of the guiding post support it.
Put a level in the middle between these sets of guiding wheels.
If necessary bring to horizontal position by lowering or raising
the rear guiding wheels support by means of the nuts of the
ground anchors.
7)
Make sure to preserve the horizontal level of the base plate.
Summary of Contents for R2000
Page 1: ...1 Robusta SC Cantilever sliding gates Robusta SC Installation Manual ...
Page 11: ...11 Robusta SC 4 1 1 Automatic version right opening ...
Page 12: ...12 Robusta SC 4 1 2 Automatic version left opening ...
Page 13: ...13 Robusta SC 4 1 3 Motorizable version right opening ...
Page 14: ...14 Robusta SC 4 1 4 Motorizable version left opening ...
Page 15: ...15 Robusta SC 4 1 5 Manuel version right opening ...
Page 16: ...16 Robusta SC 4 1 6 Manuel version left opening ...


