


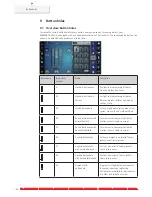


Buttonholes
133
> Sew the buttonhole in the usual manner.
> Pull the cord through the buttonhole until the loop disappears in the bartack.
> Pull the ends of the cord through to the wrong side of the fabric using a hand stitching-needle and knot
or secure with stitches.
9.6 Sewing a test sample
Always sew a test sample of the buttonhole on the same fabric: It is recommended to use the same stabilizer
and to select the same buttonhole. The test sample should also be sewn in the respective direction. By
sewing a test sample the settings can be adjusted until the sewing result is satisfying.
When working with soft loosely woven materials or for buttonholes which are highly stressed, it is worth
underlaying the buttonholes with the Straight stitch buttonhole No. 59. This is also recommended to
reinforce buttonholes in leather, vinyl or felt.
Alterations of the balance when sewing a manual standard buttonhole as well as the keyhole and the round
buttonhole affect both beads in the same way. With the manual keyhole or round buttonhole the alterations
affect both sides differently.
If the stitch counter function is used and alterations are made concerning the balance, the alterations affect
both buttonhole beads differently.
> Touch the icon «Buttonholes».
> Select the buttonhole.
> Select and attach the desired presser foot.
> Place the fabric under the presser foot and lower the presser foot.
> Press the foot control carefully and start sewing. Guide the fabric slightly.
> Check the balance while sewing and adjust if necessary.
> Check the test sample and make further amendments if necessary.
9.7 Determining the buttonhole slit width
The width of the buttonhole slit can be adjusted between 0.1 – 2.0 mm before sewing.
> Touch the icon «Buttonholes».
> Select the buttonhole.
> Touch the icon «i»-Dialog.


