page 53
page 53
page 53
page 53
page 53
160B&C TM
800-00140
NOTE:
NOTE:
NOTE:
NOTE:
NOTE: If stripper bolt (3) was not removed from spool, proceed to Step 6.
1. Place spool in a soft-jawed vise, threaded end up.
2. Spray the threads of the new stripper bolt (3) and hex nut (9) with LOCQUIC Primer Grade NF and let dry. Apply
Loctite 262 Red to threads.
3. Slide one of the spring retainers (7) on to the end of the stripper bolt (3) with the longest threads. Screw the stripper
bolt into the valve spool as far as it will go. BE SURE THE SPRING GUIDE SLIDES FREELY.
4. Slide the springs (4 & 5) over the stripper bolt. Install the other spring retainer and compress the springs so that the
hex nut (9) can be screwed onto the stripper bolt. BE SURE THE SPRING RETAINER SLIDES FREELY.
5. Torque the hex nut (9) to 175 in. lbs. ( 25 in. lbs.) and set the spool assembly aside to cure for a minimum of
8-hours. After curing, test the hex nut to be sure it withstands 125 in. lbs. of breakaway torque.
6. Apply light grease to seals. Assemble o-ring (10) on OD of seal retainer (2) and o-ring (1) in the end of the seal
retainer.
CAUTION
CAUTION
CAUTION
CAUTION
CAUTION
Seals are similar in size. Be sure to insert seals
Seals are similar in size. Be sure to insert seals
Seals are similar in size. Be sure to insert seals
Seals are similar in size. Be sure to insert seals
Seals are similar in size. Be sure to insert seals
1 & 10 in their proper position. They are not
1 & 10 in their proper position. They are not
1 & 10 in their proper position. They are not
1 & 10 in their proper position. They are not
1 & 10 in their proper position. They are not
interchangeable.
interchangeable.
interchangeable.
interchangeable.
interchangeable.
7. Install one seal retainer with o-rings on spool. Then slide the spool into the housing.
8. Lightly grease o-ring (10) and install it on the valve cap (6).
9. Install end cap tube (11) on seal retainer (2). Then slip end cap (6) on the end cap tube (11).
10. Spray threads of the cap screws (8) and the cap screw holes in the housing with LOCQUIC Primer Grade NF and let
dry.
11. Apply Loctite 262 Red to threads of the two cap screws (8). Insert them through valve cap (6) and screw them into
the valve housing. Tighten cap screws evenly and torque to 175 in. lbs. ( 17 in. lbs.).
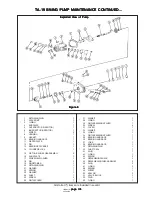
12. Install seal retainer (2) with seals on clevis end of spool. Install end cap tube (11) and valve cap (6) as in Figure 8.
13. Install two cap screws (8), tighten evenly and torque to 175 in. lbs. ( 17 in. lbs.) to complete assembly.
TROUBLESHOOTING ON NEXT PAGE.
TROUBLESHOOTING ON NEXT PAGE.
TROUBLESHOOTING ON NEXT PAGE.
TROUBLESHOOTING ON NEXT PAGE.
TROUBLESHOOTING ON NEXT PAGE.
A20 CONTROL VALVE MAINTENANCE CONTINUED...
A20 CONTROL VALVE MAINTENANCE CONTINUED...
A20 CONTROL VALVE MAINTENANCE CONTINUED...
A20 CONTROL VALVE MAINTENANCE CONTINUED...
A20 CONTROL VALVE MAINTENANCE CONTINUED...

