background image

K5902079 /11

Coronis Uniti

64

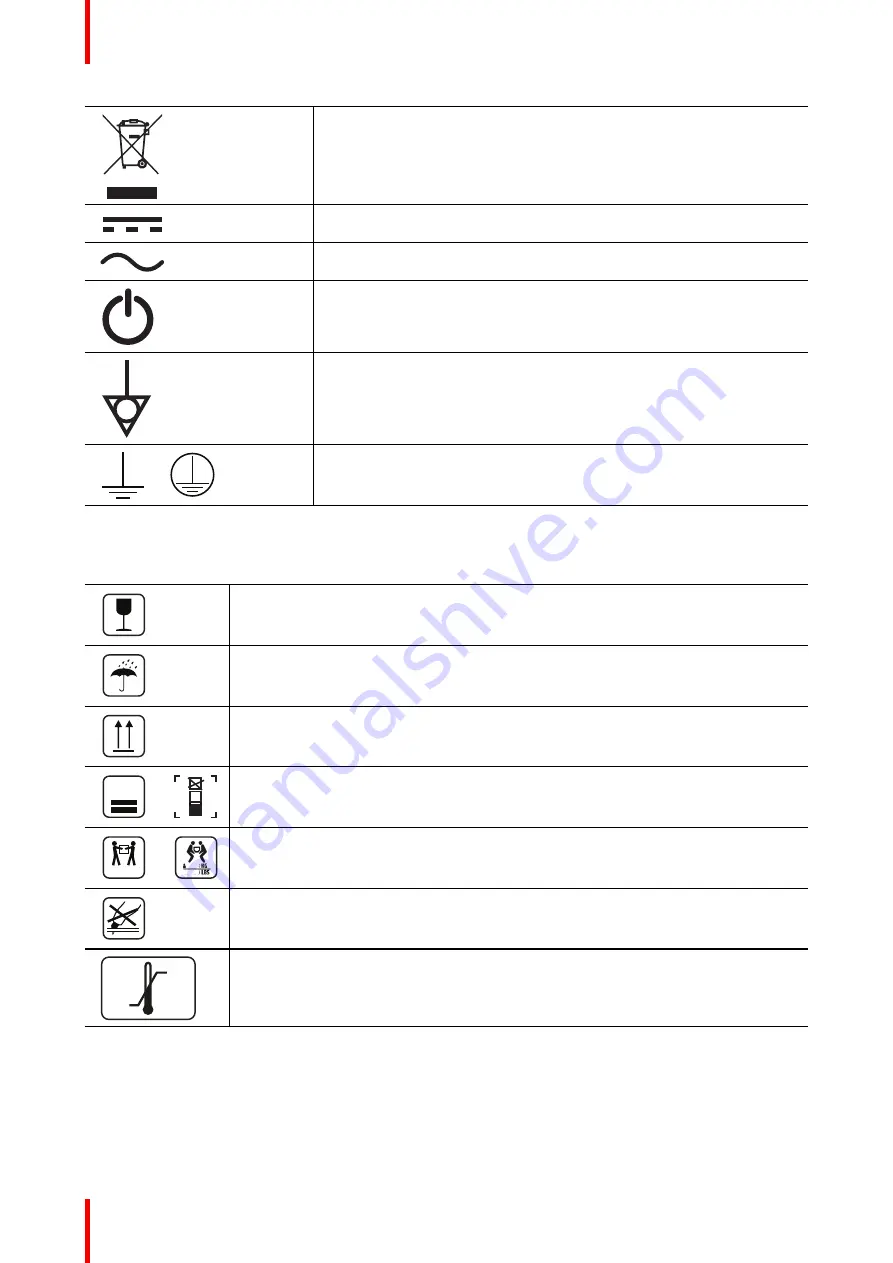
Indicates this device must not be thrown in the trash but must be
recycled, according to the European WEEE (Waste Electrical and
Electronic Equipment) directive.

Indicates Direct Current (DC).

Indicates Alternating Current (AC).

Stand-by

Equipotentiality

or

Protective earth (ground)

Symbols on the box

On the box of the device, you may find the following symbols (nonrestrictive list):

Indicates a device that can be broken or damaged if not handled carefully when being
stored.

Indicates a device that needs to be protected from moisture when being stored.

Indicates the storage direction of the box. The box must be transported, handled and
stored in such a way that the arrows always point upwards.

15

n

or

n

Indicates the maximum number of identical boxes which may be stacked on each
other, where “n” is the limiting number.

xx-yy Kg

or

xx-yy

xx-yy

Indicates the weight of the box and that it should be carried with two persons.

Indicates that the box should not be cut with a knife, a cutter or any other sharp object.

-20 °C

+60 °C

xx

yy

Indicates the temperature limits

4

to which the device can be safely exposed when

being stored.

Important information

Summary of Contents for Coronis Uniti

Page 1: ...ENABLING BRIGHT OUTCOMES MDMC 12133 User Guide Coronis Uniti...

Page 2: ...Registered office Barco NV President Kennedypark 35 8500 Kortrijk Belgium www barco com en support www barco com Barco NV Beneluxpark 21 8500 Kortrijk Belgium www barco com en support www barco com...

Page 3: ...ESA mount installation 18 3 Daily operation 21 3 1 Recommendations for daily operation 22 3 2 Shortcut bar 22 3 3 Standby switching 23 3 4 SoftGlow lights 23 3 5 OSD menu 24 3 6 I Luminate 24 3 7 View...

Page 4: ...on 38 4 22 6 DICOM error threshold 38 4 23 Image scaling 38 4 24 Image source selection modes 39 4 25 Grayscale conversion modes 39 4 26 DisplayPort standard version 40 4 27 EDID timings 40 4 28 Displ...

Page 5: ...5 K5902079 11 Coronis Uniti Welcome 1...

Page 6: ...lso in the box together with its accessories A dedicated user guide is available on the documentation disc Keep your original packaging It is designed for this display and is the ideal protection duri...

Page 7: ...Foot lock pin only for transportation 6 SoftGlow Task light 7 SoftGlow Wall light Store the foot lock pin and tilt lock pin for possible future transportation of the display Connectors To access the...

Page 8: ...llowing connectors are available Image 1 3 1 Power input 2 DisplayPort input 3 DisplayPort input 4 Not used 5 USB A upstream connector 6 USB B downstream connector 7 USB B downstream connector 8 USB B...

Page 9: ...s and allows you to control diagnostic imaging and other viewing applications with configurable multi touch gestures and touchpad function activation buttons Using and configuring the Barco Touchpad r...

Page 10: ...K5902079 11 Coronis Uniti 10 Welcome...

Page 11: ...11 K5902079 11 Coronis Uniti Installation and setup 2...

Page 12: ...on the included documentation CD or at www barco com support 2 2 Display position adjustment About In the factory the tilt and height mechanism in the display stand are locked to prevent damage durin...

Page 13: ...pushed down pull out the red pin in the display stand Tip To retain the pin for possible future transportation insert the short red end of the pin back into the stand of your display To adjust the dis...

Page 14: ...mal use of QAWeb and the Barco Intuitive Workflow Tools and to use the Barco Touchpad 4 Connect the Barco Touchpad with one of the USB downstream connectors Other peripherals like a keyboard mouse etc...

Page 15: ...e connector compartment allow you to fix the cables for better shielding of the cables 7 Re install the connector cover 8 Plug the external DC power supply into a grounded power outlet by means of the...

Page 16: ...splay will automatically detect the connected video input signal s and apply the correct video mode and refresh rate 2 5 QAWeb registration About QAWeb Enterprise helps you manage quality and assure c...

Page 17: ...f the clip 2 7 Fixation of the foot on the desk Overview If you would like to attach the Coronis Uniti to a desk the tilt swivel foot has 4 screw holes 4x M4 to mount the foot on a desk 1 Drill four h...

Page 18: ...the technical specifications of this display for the applicable weight CAUTION You should mount the panel in landscape position Portrait position is possible but not supported WARNING To avoid muscle...

Page 19: ...e the 9 screws fixing the foot while supporting the foot 6 Attach the arm stand firmly to the panel using 6 screws M4 x 6 mm for a 200 x 100 mm VESA solution or 4 screws M4 x 6 mm for a 100 x 100 mm V...

Page 20: ...K5902079 11 Coronis Uniti 20 Installation and setup...

Page 21: ...21 K5902079 11 Coronis Uniti Daily operation 3...

Page 22: ...Barco recommends setting screen saver activation after 10 minutes of non usage A good screen saver displays moving content Avoid objects on the Barco Touchpad When cables and other objects are left o...

Page 23: ...front key under the standby icon 3 Press the front key again to confirm In case of a power outage recovery your display will always start up in the power mode it was in before the power interruption...

Page 24: ...st key which would activate I Luminate 2 Press the front key under the Menu icon The OSD main menu comes up To navigate through the OSD menus Navigating through the OSD menus can be done by Use the le...

Page 25: ...tched on see I Luminate default mode page 32 To set the position of the white rectangular overlay in Small Film and Large Film mode see I Luminate film position page 32 I Luminate switches off automat...

Page 26: ...K5902079 11 Coronis Uniti 26 Daily operation...

Page 27: ...ow to change and configure them Certain OSD menu settings affecting calibration can be managed by QAWeb Manually changing these settings in the OSD menu is still possible but the changes will be overw...

Page 28: ...firm 4 3 Power LED About the power LED To prevent distractions the power LED is off by default when the display is switched on and used in normal operation This behavior can be changed so that the pow...

Page 29: ...Bring up the OSD main menu 2 Navigate to the Configuration User Interface Controls menu 3 Enter the Power Lock submenu 4 Select Enabled Disabled as desired and confirm 4 6 SoftGlow Task light About th...

Page 30: ...ools user guide on the included documentation CD or at www barco com support To adjust the SoftGlow Wall light brightness 1 Bring up the OSD main menu 2 Navigate to the Configuration Lights menu 3 Ent...

Page 31: ...o adjust the hibernate time out 1 Bring up the OSD main menu 2 Navigate to the Configuration Power Management menu 3 Enter the Hibernate Timeout submenu 4 Set the time out value as desired and confirm...

Page 32: ...nd configured in the Intuitive Workflow Tools See the Barco Display Controller and Intuitive Workflow Tools user guide on the included documentation CD or at www barco com support 4 12 I Luminate film...

Page 33: ...emperature User When selecting the User color temperature setting you will be able to manually define the X and Y coordinates or the display color temperature in separate submenus Native White The nat...

Page 34: ...tely half of the luminance This is intended for using the display with office applications such as word processing Please note that text mode is not persistent Once powered off the display will restar...

Page 35: ...gamma of 1 8 or 2 2 respectively The settings of the display must be adapted to suit the requirements of the visualization software In case of doubt please contact the vendor of the visualization soft...

Page 36: ...ating Room Corresponds to light conditions in operating rooms This setting has the highest maximum ambient light To select a reading room 1 Bring up the OSD main menu 2 Navigate to the Configuration C...

Page 37: ...t compliance check Shows the backlight runtime since last compliance check Display Function Shows the current display function Ambient light compensation Shows the ambient light compensation status Re...

Page 38: ...iguration Calibration Embedded QA menu 3 Enter the DICOM Preferences submenu 4 Select Reset DICOM Calibration to restore the original not corrected DICOM curve 4 22 6 DICOM error threshold About DICOM...

Page 39: ...mode is intended for displaying and manually configuring two connected video input signals one on each display side When selecting this mode the video settings become available for the selected video...

Page 40: ...t EDID timings Following EDID timings are available Refresh Rate Allows to manually select the refresh rate of the image source video input signal depending on the maximum refresh rate of the display...

Page 41: ...s temperatures etc the status of the connected image sources video encoding mode timings etc and the current calibration status of your display display function luminance ALC etc To retrieve the statu...

Page 42: ...K5902079 11 Coronis Uniti 42 Advanced operation...

Page 43: ...43 K5902079 11 Coronis Uniti Cleaning the display 5...

Page 44: ...t a certain cleaning product use plain water Do not use any of the following products Alcohol in concentrations 70 Strong alkalis lye strong solvents Acetone Toluene Acids Detergents containing fluori...

Page 45: ...45 K5902079 11 Coronis Uniti Repackaging instructions 6...

Page 46: ...age 6 1 2 Lock the height mechanism at the lowest display position by inserting the hook pin in the back of the stand Caution Make sure that the hook pin is inserted deep enough until only the red par...

Page 47: ...Uniti Image 6 3 4 Tilt the display in the most upwards position Image 6 4 5 Slide the small buffer between the display and the stand Image 6 5 6 Tilt the display back to the most downward position Re...

Page 48: ...e at the back of the display Caution Make sure that the tilt lock pin is inserted deep enough until only the red part of the pin is visible Image 6 7 Image 6 8 8 Place the display in the bottom box so...

Page 49: ...cardboard compartments in the bottom buffers Image 6 10 10 Position the 2 top buffers on the display and cardboard compartments Image 6 11 11 Slide the accessory box and the display controller box in...

Page 50: ...dicated cutout Image 6 13 13 Slide the top box over the display in the bottom box Caution Make sure that the position of the lock cutouts in the bottom box and top box fit together Image 6 14 14 Inser...

Page 51: ...51 K5902079 11 Coronis Uniti Image 6 15 15 Turn each lock a quarter turn to the right Image 6 16 16 The Coronis Uniti system is ready to be shipped Image 6 17 Repackaging instructions...

Page 52: ...K5902079 11 Coronis Uniti 52 Repackaging instructions...

Page 53: ...53 K5902079 11 Coronis Uniti Important information 7...

Page 54: ...applied part The equipment shall not be used with life support equipment The user should not touch the equipment nor its signal input ports SIP signal output ports SOP and the patient at the same tim...

Page 55: ...he device Malfunctions Disconnect the equipment s power cord from the AC inlet and refer servicing to qualified service technicians under the following conditions If the power cord or plug is damaged...

Page 56: ...details please visit the Barco website at http www barco com AboutBarco weee Turkey RoHS compliance T rkiye Cumhuriyeti AEEE Y netmeli ine Uygundur Republic of Turkey In conformity with the WEEE Regul...

Page 57: ...dly Use Period EFUP logo The number inside the EFUP logo that Barco uses please refer to the photo is based on the General guidelines of environment friendly use period of electronic information produ...

Page 58: ...device complies with Part 15 of the FCC Rules Operation is subject to the following two conditions 1 this device may not cause harmful interference and 2 this device must accept any interference recei...

Page 59: ...ectromagnetic emissions The Coronis Uniti is intended for use in the electromagnetic environment specified below The customer or the user of the Coronis Uniti should assure that it is used in such an...

Page 60: ...e 0 5 kV 1 kV Line to ground 0 5 kV 1 kV 2 kV Mains power quality should be that of a typical commercial or hospital environment Voltage dips short interruptions and voltage variations on power supply...

Page 61: ...30 1720 1700 1990 GSM 1800 CDMA 1900 GSM 1900 DECT LTE Band 1 3 4 25 UMTS Pulse modulation 217 Hz 2 0 3 28 1845 1970 2450 2400 2570 Bluetooth WLAN 802 11 b g n RFID 2450 LTE Band 7 Pulse modulation 21...

Page 62: ...according to the KC regulations Indicates the device is approved according to the BSMI regulations Indicates the device is approved according to the PSE regulations Indicates the device is approved ac...

Page 63: ...evice is a Medical Device SN Indicates the device Serial Number REF Indicates the device part number or catalogue number UDI Indicates the Unique Device Identifier REP EC Indicates the Authorised Repr...

Page 64: ...being stored Indicates a device that needs to be protected from moisture when being stored Indicates the storage direction of the box The box must be transported handled and stored in such a way that...

Page 65: ...s document nor any part of it may be reproduced or copied in any form or by any means graphical electronic or mechanical including photocopying taping or information storage and retrieval systems with...

Page 66: ...Open Source Software license You are responsible for your own additions changes or modifications without any recourse or claim towards Barco whatsoever You further acknowledge that any such additions...

Page 67: ...oal Electronics type RHPS390 Ratings marked on the medical approved power supply Input rating 100 240 VAC 5 5 A 50 60 Hz Output rating 24 VDC 16 25 A 5 VDC 0 1 A Power consumption 190 W nominal 0 5 W...

Page 68: ...s B ICES 001 Level B VCCI Japan Environmental China Energy Label EU RoHS China RoHS REACH Canada Health WEEE Packaging Directive Supplied accessories User Guide Quick Installation Sheet System Sheet V...

Page 69: ......

Page 70: ...www barco com K5902079 11 2022 06 03 Barco NV President Kennedypark 35 8500 Kortrijk Belgium...

Reviews: