


8
Set Up the Warning and Alarm Settings Using
the DXM Controller Display
This Occupancy Solution Kit is designed to provide visual indication of capacity levels for monitored areas. The Occupancy
Limit indicates that the area has exceeded the capacity for people.
The indicator light alerts people attempting to enter that they need to wait until people have left the area before entering.
The Occupancy Warning setting is user-defined and indicates when the occupancy level is getting close to the Occupancy
Limit. The Occupancy Warning displays as a yellow flashing LED on the Operator interface and enables change of state
reporting, which updates the Total Count after every person enters instead of every minute (the default update rate).
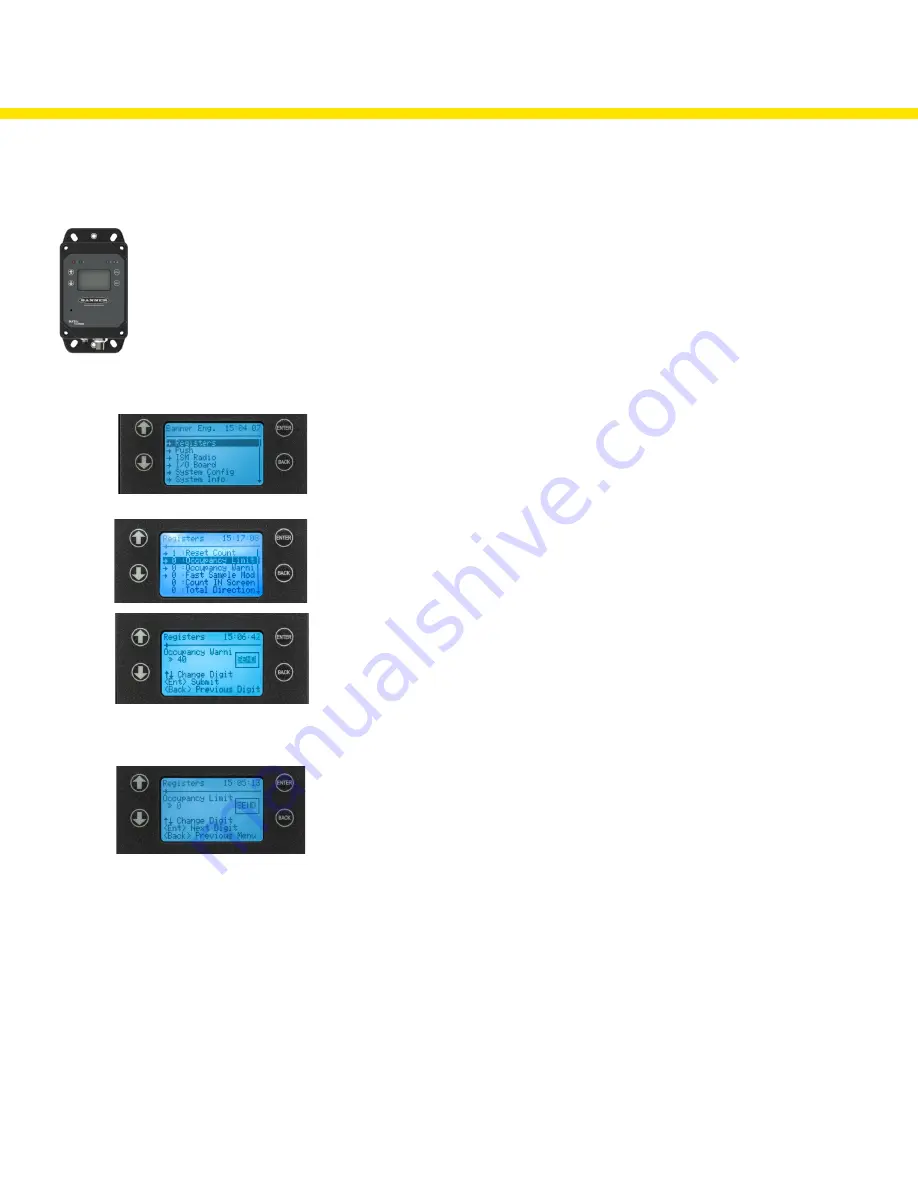
Use the Controller’s LCD, button keys, and menu system to configure the warnings and alarms.
On the DXM Controller, use the arrow keys to select the
Registers
menu and press
ENTER
.
Highlight
Occupancy Limit
and press
ENTER
.
Enter your desired
Occupancy Limit
.
1. Using the up and down arrow buttons, select the first digit for the limit and press
ENTER
to set the first digit.
2. Use the up and down arrows to set the second digit and press
ENTER
.
3. Repeat if you are adding a third digit.
4. Press
ENTER
once more to highlight
SEND
and press
ENTER
to confirm.
The screen should now display the entered
Occupancy Limit
.
Enter your desired
Occupancy Warning
.
1. Using the up and down arrows, select the first digit for the warning and press
ENTER
to set the first digit.
2. Use the up and down arrows to set the second digit and press
ENTER
.
3. Repeat if you are adding a third digit.
4. Press
ENTER
once more to highlight
SEND
and press
ENTER
to confirm. Note: The
Occupancy Warning
level must be set below the
Occupancy Limit
.
The screen should now display the entered
Occupancy Warning
.
Define Your Alert Levels
Additional system information is available on the DXM Controller’s display.
The installation and configuration of your Solution Kit is complete.


