background image

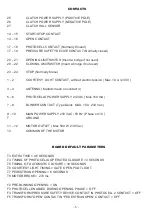
CONTACTS

25

CLUTCH POWER SUPPLY (POSITIVE POLE)

26

CLUTCH POWER SUPPLY (NEGATIVE POLE)

27

CLUTCH HALL SENSOR

14 – 15

START/STOP CONTACT

14 – 16

OPEN CONTACT

17 – 18

PHOTOCELL CONTACT (Normally Closed )

17 – 19

PRESSURE SAFETY DEVICE CONTACT (Normally closed)

20 – 21

OPENING LIMITSWITCH (Insert a bridge if not used)

20 – 22

CLOSING LIMITSWITCH (Insert a bridge if not used)

23 – 24

STOP (Normally Close)

1 – 2

COURTESY  LIGHT CONTACT, without electric tension ( Max. 10 A / 230 V )

3 – 4

ANTENNA ( Metallic mesh on contact 4 )

5 – 6

PHOTOCELLS POWER SUPPLY 24 VAC ( Max 150 mA )

7 – 8

BLINKER CONTACT ( Type Quick  MAX. 10 A  230 Vac )

9 – 10

MAIN POWER SUPPLY 230 VAC / 50 Hz ( Phase on 10 )

T

GROUND

11 – 12

MOTOR OUTLET ( Max 500 W  230 Vac )

13

COMMON OF THE MOTOR

BOARD DEFAULT PARAMETERS

T3 EXTRA TIME = 4,5 SECONDS
T4 TIMING OF PHOTOCELLS OPERATED CLOSURE = 3 SECONDS
T5 TIMING  OF AUTOMATIC CLOSURE = 30 SECONDS
T6 COURTESY LIGHT TIMING = GATE OPEN PILOT LIGHT
T7 PEDESTRIAN OPENING = 6 SECONDS
T8 MOTOR BRAKE =  270 ms

F2 PRE-BLINKING OPENING  = ON
F3 PHOTOCELL ENABLED DURING OPENING PHASE =  OFF
F4 TRANSFORM PRESSURE SAFETY DEVICE CONTACT IN PHOTOCELL 2 CONTACT = OFF
F5 TRANSFORM “OPEN” CONTACT IN “PEDESTRIAN OPEN” CONTACT = OFF

-  5  -

Summary of Contents for Delma POLARIS 4

Page 1: ...POLARIS 4 MANUAL ELECTRONIC CONTROL BOARD FOR SLIDING GATES ...

Page 2: ...ed anymore by BAME s r l for safety and normative reasons If one more of these contacts will not be utilised for any reason the installer must insert a bridge on the contacts to assure a correct operation of the control board Always follow the european standard specifications for garage doors and gates EN12453 and EN12445 ...

Page 3: ...non step by step logic code 16 Parameter C3 pedestrian gate code 17 Parameter C4 on off courtesy light code 17 Parameter C5 erasing all codes 18 Programming of additional features Parameter F1 display clutch status 19 Parameter F2 pre blinking 20 Parameter F3 enable photocells during opening operations 20 Parameter F4 transform pressure safety device contact in photocell 2 contact 21 Parameter F5 ...

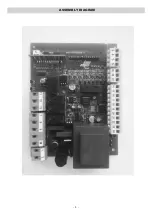
Page 4: ...Jp1 Jp2 4 ASSEMBLY DIAGRAM ...

Page 5: ...n contact 4 5 6 PHOTOCELLS POWER SUPPLY 24 VAC Max 150 mA 7 8 BLINKER CONTACT Type Quick MAX 10 A 230 Vac 9 10 MAIN POWER SUPPLY 230 VAC 50 Hz Phase on 10 T GROUND 11 12 MOTOR OUTLET Max 500 W 230 Vac 13 COMMON OF THE MOTOR BOARD DEFAULT PARAMETERS T3 EXTRA TIME 4 5 SECONDS T4 TIMING OF PHOTOCELLS OPERATED CLOSURE 3 SECONDS T5 TIMING OF AUTOMATIC CLOSURE 30 SECONDS T6 COURTESY LIGHT TIMING GATE OP...

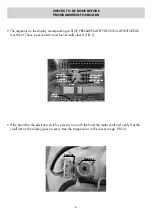
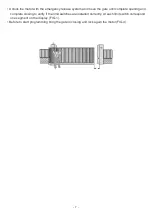
Page 6: ...OGRAMMING THE BOARD The segments on the display corresponding to STOP PRESSURE SAFETY DEVICE and PHOTOCELLS must be lit These input contacts must be normally closed FIG 1 If the board for the electronic clutch is present turn with the hand the motor shaft and verify that the small dot on the display goes on every time the magnet pass in the sensor range FIG 2 ...

Page 7: ... the gate until complete opening and complete closing to verify if the limit switches are installed correctly At each limit switch correspond one segment on the display FIG 1 Before to start programming bring the gate in closing and lock again the motor FIG 4 7 ...

Page 8: ...tton of the remote memorized to start opening gate 9 Please wait that the gate opens completely The reclosing is automatic 10 The gate start for the reclosing Push the button of the remote memorized when you want start the slowing down Programming the work time 8 8 Push the button of the remote memorized when you want start the slowing down 11 Please wait the complete closing of the gate Please wa...

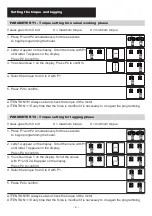
Page 9: ...cessary to do again the programming PARAMETER T1 Torque setting for normal working phase Values goes from 0 to 9 0 maximum torque 9 minimum torque 1 Press P1 and P2 simultaneously for three seconds to begin programming the board 2 Letter A appear on the display Scroll the menu with P1 until letter T appears on the display Press P2 to confirm 3 You should see 1 on the display Scroll the values with...

Page 10: ...with P1 until letter T appears on the display Press P2 to confirm 3 You should see 1 on the display Scroll the values with P1 until 3 will appear on the display Press P2 to confirm 4 Select the value from 0 to 9 with P1 SEE THE CHART 5 Press P2 to confirm ATTENTION The board has a factory setting 4 5 seconds of extra time PARAMETER T3 Extra time Display Seconds 0 1 2 3 4 5 6 7 8 9 1 1 5 2 2 5 3 3 ...

Page 11: ... the values with P1 until 4 will appear on the display Press P2 to confirm 4 Select the value from 0 to 9 with P1 SEE THE CHART 5 Press P2 to confirm ATTENTION The control board has a default setting of 1 3 seconds ATTENTION If the automatic closure option T5 is turned off the parameter T4 will be automatically disabled PARAMETER T4 Automatic closure of the gate from photocell impulse Display Seco...

Page 12: ...s P2 to confirm 3 You should see 1 on the display Scroll the values with P1 until 5 will appear on the display Press P2 to confirm 4 Select the value from 0 to 9 with P1 SEE THE CHART 5 Press P2 to confirm ATTENTION The control board has a default setting of 3 30 seconds ATTENTION This timing is valid also for the pedestrian opening PARAMETER T5 Timing for automatic closure Display Seconds 0 1 2 3...

Page 13: ...t the value from 0 to 9 with P1 SEE THE CHART 5 Press P2 to confirm ATTENTION The control board has a default setting of 0 open gate pilot light ATTENTION If the courtesy light will be operated with a remote control it will remain On until the next impulse from the remote control or until the gate will be closed or opened again ATTENTION If the value open gate pilot light will be selected it will ...

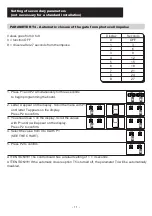
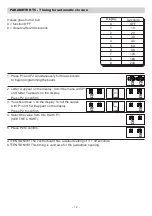
Page 14: ...ter T appears on the display Press P2 to confirm 3 You should see 1 on the display Scroll the values with P1 until 7 will appear on the display Press P2 to confirm 4 Select the value from 0 to 9 with P1 SEE THE CHART 5 Press P2 to confirm ATTENTION The control board has a default setting of 3 6 seconds PARAMETER T7 Timing for pedestrian opening Display Seconds 0 1 2 3 4 5 6 7 8 9 OFF 2 4 6 8 10 12...

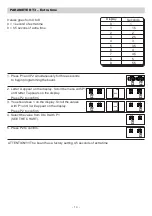
Page 15: ...2 Letter A appear on the display Scroll the menu with P1 until letter T appears on the display Press P2 to confirm 3 You should see 1 on the display Scroll the values with P1 until 8 will appear on the display Press P2 to confirm 4 Select the value from 0 to 9 with P1 SEE THE CHART 5 Press P2 to confirm ATTENTION The control board has a default setting of 1 50 milliseconds PARAMETER T8 Motor brake...

Page 16: ...e 1 on the display Scroll the values with P1 until 2 will appear on the display Press P2 to confirm 4 You should see 0 on the display Push the button on the remote to be learned ATTENTION When entering a code already stored the code will be deleted from the memory of the board Parameter C2 non step by step logic code open 16 If using dipswitches remote controls before learning them on the control ...

Page 17: ...rd Parameter C3 pedestrian opening code 1 Press P1 and P2 simultaneously for three seconds to begin programming the board 2 Letter A appear on the display Scroll the menu with P1 until letter C appears on the display Press P2 to confirm 3 You should see 1 on the display Scroll the values with P1 until 4 will appear on the display Press P2 to confirm 4 You should see 0 on the display Push the butto...

Page 18: ... 3 You should see 1 on the display Scroll the values with P1 until 5 will appear on the display Press P2 to confirm 4 You should see 0 on the display Push the button P1 and P2 simultaneously until the exit from programming mode 5 All codes are now deleted ATTENTION This operation will delete all remote control codes stored in the control board memory Parameter C5 erasing of all remote control code...

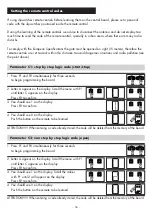
Page 19: ...usly for three seconds to begin programming the board 2 Letter A appear on the display Scroll the menu with P1 until letter F appears on the display Press P2 to confirm 3 You should see 1 on the display Press P2 to confirm 4 If on display appear the number 0 the clutch is not enabled If on display appears one 1 the encoder is activated 5 Press P2 to get out Parameter F1 display clutch status ON OF...

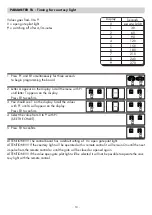
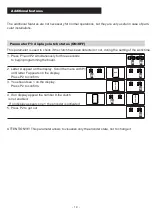
Page 20: ...xcluded only for the opening phase and not for the closing phase The control board has a default setting of 0 pre blinking OFF Parameter F2 pre blinking Values goes from 0 to 1 0 photocells enabled during the closing phase 1 photocells enabled during the closing and the opening phase 1 Press P1 and P2 simultaneously for three seconds to begin programming the board 2 Letter A appear on the display ...

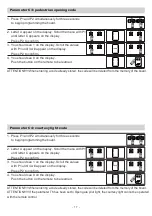
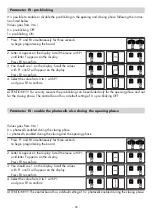
Page 21: ... the values with P1 until 4 will appear on the display Press P2 to confirm 4 Select the value from 0 to 1 with P1 and press P2 to confirm ATTENTION The control board has a default setting of 0 function OFF Parameter F4 transform pressure safety device contact in second photocell contact If there is the need of a pushbutton for the pedestrian opening set this option to ON and connect the push butto...

Page 22: ...tter A appear on the display Scroll the menu with P1 until letter F appears on the display Press P2 to confirm 3 You should see 1 on the display Scroll the values with P1 until 6 will appear on the display Press P2 to confirm 4 Select the value 1 with P1 and press P2 to confirm the reset ATTENTION This operation will not delete the remote control codes Parameter F6 reset of the control board ...

Page 23: ...ch item Our company will replace or repair its devices provided that they are returned to our plant In order to check the actual functioning of the returned pieces they will remain the property of the manufacturer The warranty does not include demages due to any incorrect use such as non fulfilment of the instruction detailed for each device maintenance and repairing carried out without the previo...

Page 24: ...COMO SEGNATE MN ITALY Tel 39 0376 616 638 Fax 39 0376 629 456 http www bame it http www delma it Unità locale Via Enrico Berlinguer 6 63844 GROTTAZZOLINA FM ITALY Tel 39 0734 633 533 Fax 39 0734 636 895 e mail delma bame it venditedelma bame it ...

Reviews: