www.balluff.com
7
english
4.1
Installing the transducer
NOTICE!
Improper installation
Improper installation can compromise the function of the
transducer and result in damage.
f
For this reason, ensure that no strong electrical or
magnetic fields are present in the immediate vicinity
of the transducer.
f
The recommended spacing for the installation must
be strictly observed.
The following must be observed when installing the
magnet:
– To ensure the accuracy of the position measuring
system, the magnet is attached to the moving member
of the machine using non-magnetizable screws
(stainless steel, brass, aluminum).
– The moving member must guide the magnet on a track
parallel to the transducer.
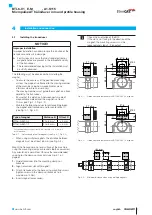
– Ensure that the distance A between parts made of
magnetizable material and the magnet is at least
10 mm (see Fig. 4-1, Fig. 4-2).
– Maintain the following values for distance B between
the magnet and transducer and for center offset C
(see Fig. 4-1, Fig. 4-2):
Type of magnet
Distance B
Offset C
BTL6-A-3800-2
4 to 8 mm
1)
± 5 mm
BTL6-A-3801-2
4 to 8 mm
1)
± 5 mm
1)
For optimum measurement results, a distance B of 6 to 8 mm is
recommended.
Tab. 4-1: Distance and offset for magnets (see Fig. 4-1, Fig. 4-2)
– When using multiple magnets, the distance between
magnets must be at least 65 mm (see Fig. 4-3).
Mount the transducer on a level surface of the machine
using the mounting clamps or brackets (both accessories).
Any orientation is permitted. Observe the recommended
spacing for the clamps or brackets (see Fig. 3-1 on
page 6).
1.
Guide transducer into the mounting clamps or
brackets.
2.
Align transducer slot with magnet!
3.
Attach transducer to the base using mounting screws
(tighten screws in the clamps or brackets to a
maximum of 4 Nm).
4.
Insert magnet (accessories).
Check the orientation of the BTL.
If the slot is not facing in the direction of the
magnet, the mounting screws must be
loosened and steps 2-3 repeated.
Fig. 4-1:
C
55-4
10.8
21 A
28
16
37.6
Ø 4.2
B
5
28.2
Dimensions and distances with BTL6-A-3800-2 magnet
Fig. 4-2:
C
55-4
5
21 A
B1
8
28
16
37.6
Ø 4.2
Dimensions and distances with BTL6-A-3801-2 magnet
Fig. 4-3: Minimum distance when using multiple magnets
≥
65 mm
4
Installation and connection
BTL6-V1 _ E-M _ _ _ _ -A1-S115
Micropulse AT transducer in round profile housing
Summary of Contents for BTL6-V1 E-M Series
Page 1: ...BTL6 V11E M0500 A1 S115 BTL1035 BTL6 V1 _ E M _ _ _ _ A1 S115 Betriebsanleitung deutsch...
Page 2: ...www balluff com...
Page 18: ...BTL6 V11E M0500 A1 S115 BTL1035 BTL6 V1_E M_ _ _ _ A1 S115 User s Guide english...
Page 19: ...www balluff com...
Page 35: ...BTL6 V11E M0500 A1 S115 BTL1035 BTL6 V1_E M_ _ _ _ A1 S115 Manual de instrucciones espa ol...
Page 36: ...www balluff com...
Page 52: ...BTL6 V11E M0500 A1 S115 BTL1035 BTL6 V1_E M_ _ _ _ A1 S115 Notice d utilisation fran ais...
Page 53: ...www balluff com...
Page 69: ...BTL6 V11E M0500 A1 S115 BTL1035 BTL6 V1_E M_ _ _ _ A1 S115 Manuale d uso italiano...
Page 70: ...www balluff com...


