9
10
ASSEMBLY MONTAJE
ASSEMBLY MONTAJE
Copyright © 2022, Baby Trend Inc., All Rights Reserved. Todos los derechos reservados.
Copyright © 2022, Baby Trend Inc., All Rights Reserved. Todos los derechos reservados.
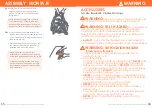
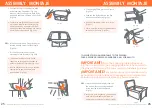
2)
• Top rails must be fully erected before
lowering center. Pull up one rail at a time,
hold one hand on each side of the rail
and pull up sharply, do not pull from the
middle where the center latch release is
located, make sure both tubes latch in
place and each rail is rigid (Fig. 2).
IMPORTANT: The center must be raised
while locking the rails. If one rail will lock
but the other side will not then, unlock the
rail by squeezing the release in the center
and try again.
• Las barandillas superiores deben estar
completamente erguidas antes de bajar
el centro. Levante una barandilla por
vez, coloque una mano a cada lado de la
barandilla y levante fuertemente. No jale
del medio, donde se ubica el mecanismo
de liberación del sujetador central.
Asegúrese de que ambos tubos estén
asegurados en su lugar y que todas las
barandillas estén rígidas (Fig. 2).
IMPORTANTE: El centro debe estar
elevado mientras se aseguran las
barandillas. Si una barandillaqueda
asegurada, pero la otra no, destrabe la
barandilla presionando el mecanismo de
liberación ubicado en el centro e intente
nuevamente.
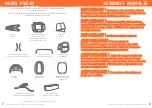
TO ASSEMBLE PLAYARD
ARMADO DEL CORRALITO
Playard
Corralito
Mattress
Colchón
Fig. 1
Fig. 2
ATTENTION:
Playard must be fully
assembled and securely locked before
installing or using other accessories.
ATENCIÓN:
El corralito debe estar
totalmente armado y trabado de manera
segura antes de instalar o usar otros
accesorios.
1)
• Unzip bag and remove Playard frame
(Fig. 1). Undo the Fasten straps and set
the Mattress aside.
DO NOT push center down yet.
• Abra la bolsa y saque el armazón del
corralito (Fig. 1). Desabroche las correas
de sujeción y ponga el colchón a un lado.
Todavía NO empuje el centro hacia abajo.


