THROUGH DOVETAILS
13
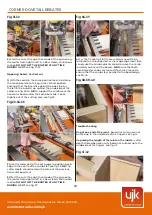
Fig 23-24
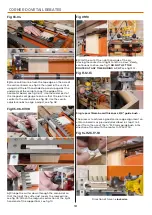
Fig 21-22
Fig 19-20
Fig 15-16-17-18
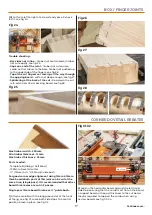
Fig 10-11
Fig 12-13-14
6)
Slide or reattach the extraction, see fig 12 on
the right & begin the cut working from left to right
ensuring that the router stays flat on the comb at all
time, see fig 13. Use the guide lines to help find the
fingers, see fig 14
DO NOT LIFT THE ROUTER WHILST IT
IS RUNNING!
Cutting pins - 10.79mm straight cutter, ⅝" guide bush
used
1)
Undo the 4 countersunk hex screws & turn the comb
around so that the V shape fingers are at the front of
the jig (pins), see fig 15-16-17-18. Load in vertically the pin
board against the left hand side stop & up against the
underside of the comb, see fig 19-20. Undo the comb lock
knobs & use the comb adjuster knob to align the finger
line to the edge of the board, see fig 21-22.
2)
Use the opposing board to mark a cutter depth set
line on the material, see fig 23 then plunge the straight
cutter down through the fingers in front of the board so
that the tip of the cutter just meets the marked line, see
fig 24.
3)
Reposition the magnetic extraction, see fig 25 on the
left & begin the cut working from left to right, see fig 26-
27.
DO NOT LIFT THE ROUTER WHILST IT IS RUNNING!
Continues over...
Guide line


