BOX / FINGER JOINTS
16
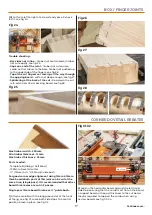
Fig 11-12-13
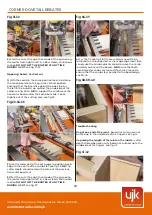
Fig 21-22
Fig 23
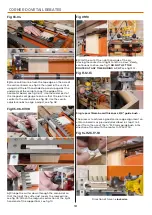
Fig 14-15
Fig 16-17-18-19-20
6)
Slide or reattach the extraction & begin the cut
working from left to right ensuring that the router stays
flat on the comb at all times, see fig 14. Use the guide
comb lines to help find the fingers, see fig 15.
DO NOT
LIFT THE ROUTER WHILST IT IS RUNNING!
NB If working in very hard wood a half depth cut may
be required.
7)
The opposing cut is done on the right hand side of
the jig & uses the fingers just cut to set up. Firstly undo
the side stop & slide it to the right. Then push the precut
fingers fully up through the comb & centralise using the
smaller part of the set gauge (H) provided and lock in
place, see fig 16-17-18-19-20.
8)
Slide side stop to the left to make contact with the
board & lock in place. Remove the set up board & replace
with the board to be cut, sliding it in against the side
stop & up against the underside of the fingers, see fig
21-22.
9)
As before, use the opposing board to mark a cutter
depth set line on the material then plunge the cutter
down through the fingers in front of the material so
that the tip of the cutter just meets the marked line,
see fig 23.
NB
If using different thickness boards the
cutter depth will need to be reset, if the board thickness
is the same then the cutter depth remains the same as
the previous cut board.
H


