


(Optional) Adding an Overview Camera
You can install an overview camera in the LPR enclosure to record the wider surveillance area, which is useful for
identifying a vehicle model or driver, or capturing video before and after an incident.
NOTE:
It is recommended that you use Avigilon HD H.264 IP Camera models H3-B2 or H3-B3 as overview
cameras.
Complete the following steps to install an overview camera:
1. Loosen the four screws at the back of the enclosure and remove the back panel.
2. Remove the network cables from the terminals labeled J8 (CAT5) and J9 (CAT5) .
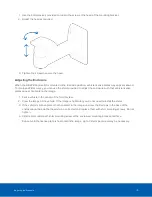
3. Slide out the metal mounting plate below the LPR camera.
Be careful not to touch the LPR camera or lens.
4. Use the provided UNC 20 bolt and camera adapter to attach the overview camera to the mounting plate.
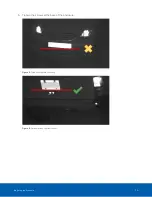
5. Slide the mounting plate and overview camera into the enclosure. Ensure that the bolt has sufficient
clearance from the LPR camera.
Be careful not to damage the circuit board below.
6. Connect the terminal labeled J9 (CAT5) to the Ethernet port of the overview camera using the network
cable provided.
(Optional) Adding an Overview Camera
12