


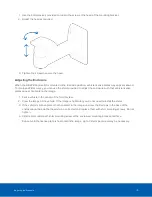


Installation
After you have selected a mounting location, you can install the HD LPR Capture Kit.
Package Contents
Ensure the package contains the following:
l
Avigilon™ HD LPR Camera
l
Avigilon™ HD LPR Enclosure
l
Power Supply Unit (PSU)
l
3 mm Hex key for enclosure
l
2 x Network Cables (inside enclosure)
l
Camera Power Connector Block
l
Overview camera adapter
l
UNC 20 bolt and washers
l
Mounting assembly kit
l
Mounting bracket
l
Mounting bracket pad
l
4 mm Hex key
l
10 x Shims (Single Lane only)
l
4 x Shim screws
Installation Steps
Complete the following steps to install the device:
Connecting Cables to the Camera
Important:
Do not adjust the LPR camera inside the enclosure. It is calibrated for a specific target distance.
CAUTION —
Do not tilt the enclosure backwards when the back panel is removed. The camera may
slide out.
1. Loosen the four screws at the back of the enclosure and remove the back panel.
2. To add an overview camera, see
(Optional) Adding an Overview Camera
on the next page
3. Connect the terminal labeled J8 (CAT5) to the Ethernet port of the LPR camera using the network cable
provided.
4. If Power over Ethernet (PoE) is not available, proceed to
Connecting External Power
on page 13
5. Reinstall the back panel of the enclosure.
Installation
11