Avaya 3740 User Manual Download Page 26


26

     Avaya 374x DECT Telephones - User Guide

02/2016

Note:

Note:

Use of the functions Central phonebook, SMS, Voice mail access, Call list, and 
Centralized Management are system dependent.

Easy 

replacement of 

battery

X

X

-

Clear lists in 

charger

X

X

X

Centralized 

Management

2

X

X

X

Personalized 

menus

X

X

X

Dynamic 

Output Power

X

X

X

Site Survey tool

X

X

X

Bluetooth

-

X

X

Keypad 

backlight

X

X

-

1. This function/feature requires PDM or AIWS2.

2. This function/feature is system dependent.

3. Base Station Location must be enabled to use this feature.

4. This function/feature requires PDM/WSM3.

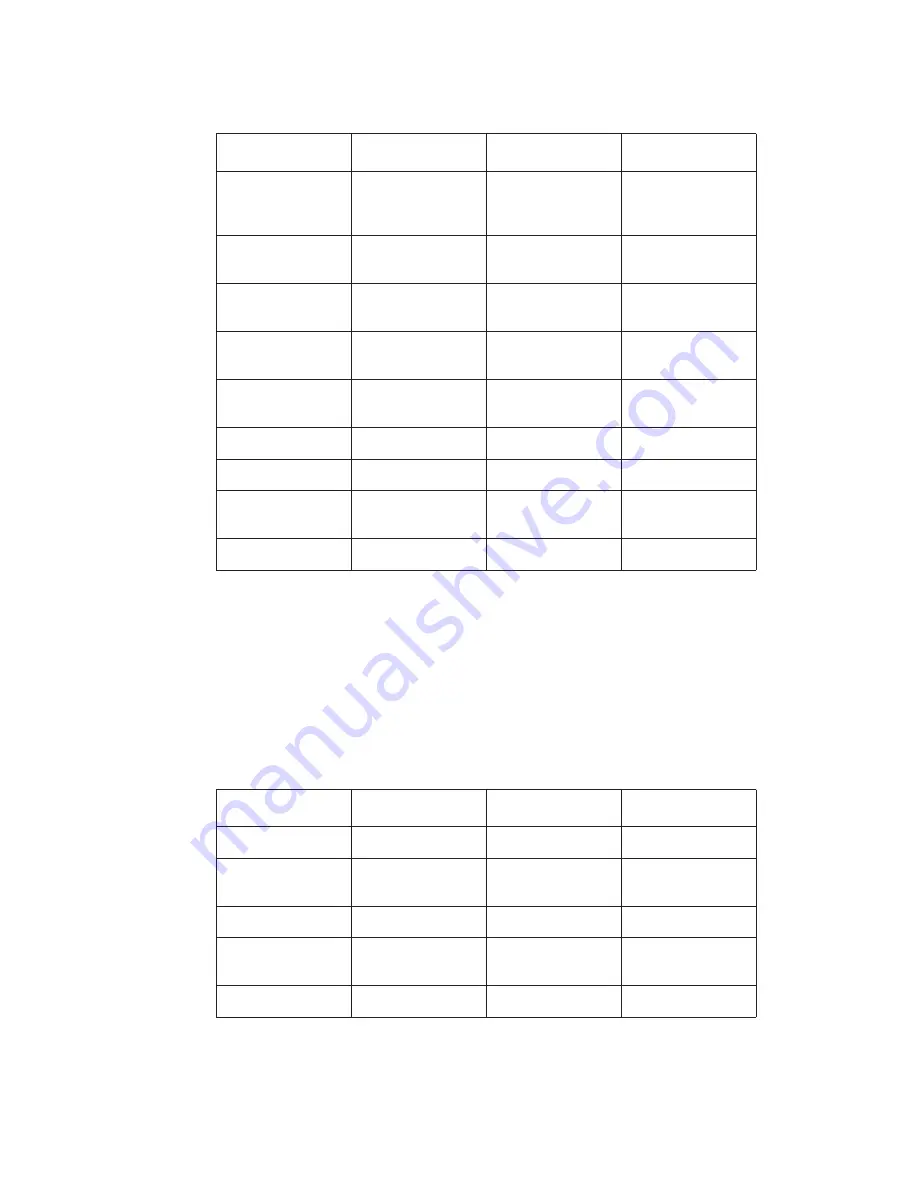
Table 2: Accessories of 37xx telephones

Accessories

3740

3745

3749

Basic Charger

X

X

X

Advanced 

Charger

X

X

X

Charging rack

X

X

X

Battery Pack 

Charger

X

X

-

Table 1: Functions of 37xx telephones

Functions

3740

3745

3749

Summary of Contents for 3740

Page 1: ...Avaya 3740 3745 3749 DECT Telephones connected to Avaya Aura Communication Manager and IP Office User Guide 21 603690 02 2016 Issue 5 0 ...

Page 2: ...E LINK AVAYA SOFTWARE LICENSE TERMS Avaya Products OR SUCH SUCCESSOR SITE AS DESIGNATED BY AVAYA ARE APPLICABLE TO ANYONE WHO DOWNLOADS USES AND OR INSTALLS AVAYA SOFTWARE PURCHASED FROM AVAYA INC ANY AVAYA AFFILIATE OR AN AVAYA CHANNEL PARTNER AS APPLICABLE UNDER A COMMERCIAL AGREEMENT WITH AVAYA OR AN AVAYA CHANNEL PARTNER UNLESS OTHERWISE AGREED TO BY AVAYA IN WRITING AVAYA DOES NOT EXTEND THIS...

Page 3: ...duct is used Preventing Toll Fraud Toll Fraud is the unauthorized use of your telecommunications system by an unauthorized party for example a person who is not a corporate employee agent subcontractor or is not working on your company s behalf Be aware that there can be a risk of Toll Fraud associated with your system and that if Toll Fraud occurs it can result in substantial additional charges f...

Page 4: ......

Page 5: ...e 19 Environmental requirements 20 Introduction 23 Functions and accessories 24 Descriptions 28 The Avaya 3740 3745 3749 DECT Telephone 30 Chargers 31 Desktop charger 31 Charging the telephone in desktop charger 32 Rackmount Charger 32 Multiple Battery Charger 32 Icons and text in the display 33 Keys and buttons 37 Hot keys 37 Multifunction Alarm Button 37 Volume button 37 Sound off button 37 Alph...

Page 6: ...ding a call 55 Outgoing call 55 Dialing a number Pre Dial 55 Dialing a number directly Post Dial 55 Dialing a number from the call list 55 Dialing the sender of a message 56 Dialing a number from the local phonebook 56 Dialing a name from the company phonebook 56 Dialing a name from the central phonebook 57 During a call 57 Adjusting the volume during a call 57 Opening contacts during the call 57 ...

Page 7: ...il inbox 65 Enabling one key voice mail access 65 Menu operation 66 Calls 66 Call lists 66 Missed Calls 68 Call Time 69 Push to talk Group Call 69 Accepting an invitation 69 Calling a PTT Group 70 Re joining a group 71 Call Services 71 Contacts 73 Opening a personal phonebook 73 Calling a contact 73 Adding a contact 74 Editing a contact 75 Set Ring Signal for a Contact 75 Delete Contact 76 Central...

Page 8: ...nd Alert Settings 90 Keypad Lock Settings 92 Phone Lock Settings 93 Display Settings 95 Time and Date Settings 96 Answering 97 Change Text size for Messages 98 Change the Menu Language 98 Change Owner ID 98 Alarm Settings 98 Alarm Operations for 3749 telephones 100 Push Button Alarm 100 Test Alarm 100 Personal Alarm 100 Man Down and No Movement Alarm 101 Acoustic Location Signal 101 Automatic Call...

Page 9: ...fix 115 System handling 115 Software Upgrade and Additional Features 115 Handset Updates via Charging Rack 115 Troubleshooting 117 Operation Notice 122 Accessibility and voice quality 122 Operating area 122 Out of Range 122 Maintenance 123 Maintenance of Batteries 123 Battery Warnings 123 Charge the Battery 123 Charge Spare Batteries 123 Replace the Battery 124 Easy Replacement of Handset 124 Befo...

Page 10: ... Ending a call 135 Volume Mute Control 135 Adjusting the volume during a call 135 Turning the microphone On Off during a call 135 Messaging 135 Transferring a call 135 Transferring a call to the telephone 135 Transferring a call to the Bluetooth headset 135 Toggling to a headset with cord 136 Menu Tree 136 Operation Notice 136 Accessibility and Voice quality 136 Operation area 136 Out of range 136...

Page 11: ...00500841 DECT 3740 3745 HANDSET BATTERY PACK Avaya 3749 DECT Telephone No 700500842 DECT 3749 HANDSET BATTERY PACK Chargers shall only be connected with power adapters included in the following charger kits Basic Charger No 700479470 DECT 374x HANDSET BASIC CHARGER KIT EU No 700500871 DECT 374x HANDSET BASIC CHARGER KIT UK NAR AU No 700500872 DECT 374x HANDSET BASIC CHARGER KIT MEXICO No 700500873...

Page 12: ...12 Avaya 374x DECT Telephones User Guide 02 2016 ATEX IECEx Safety Instructions for 3749 Cordless Telephone Intrinsically safe use ...

Page 13: ...uire a special tool Battery pack opener for the ATEX IECEx CSA battery The opener is delivered together with the handset and can also be ordered as a spare part To remove the battery pack use the opener and untighten the screws Remove the battery pack by pulling the screws To fasten the battery pack use the opener and tighten the screws See also Replace the Battery on page 124 Important Important ...

Page 14: ...29 Any radio based equipment can potentially cause interference with other equipment and can be interfered from other equipment This also applies for DECT equipment However due to the very low transmission power level the changes for interference are very small Research proves that operational DECT telephones normally don t influence electronic equipment however some precautions must be taken into...

Page 15: ...at the following Internet address http www avaya com gcm emea de includedcontent conformity htm or search the index using the key term Conformity Disposal of old equipment EU EFTA only Always dispose of old equipment correctly keep our environment tidy Old electrical and electronic equipment marked with this symbol can contain substances hazardous to human beings and the environment Never dispose ...

Page 16: ...interference by one or more of the following measures Reorient or relocate the receiving antenna Increase the separation between the equipment and receiver Connect the equipment into an outlet on a circuit different from that to which the receiver is connected Consult the dealer or an experienced radio TV technician for help Privacy of communications may not be ensured when using this cordless tel...

Page 17: ...e could void the user s authority to operate the equipment Hearing aid compatibility This equipment is hearing aid compatible HAC IC requirements for canada This Class B digital apparatus complies with Canadian ICES 003 Cet appareil numérique de la Classe B conforme á la norme NMB 003 du Canada Frequency range The telephone is a radio transmitter and receiver When it is on it receives and sends ou...

Page 18: ... It includes important safety information and operating instructions Save all instructions for future reference Position the electrical cord to the AC power supply where it is least likely to be subjected to damage or stress Remove the electrical cord from an outlet by pulling gently on the AC adapter not by pulling the cord Unplug the battery charger from a power source before cleaning the teleph...

Page 19: ... Like all other cordless telephones this cordless telephone uses radio signals which do not guarantee a connection set up under all circumstances Generally you should therefore not rely exclusively on cordless telephones when making indispensable calls for example medical emergencies ...

Page 20: ...before re inserting the battery Keep the telephone away from strong electromagnetic fields Do not place a cold telephone in a charger Battery Do not immerse the battery into water This could short circuit and damage the battery Do not expose a battery to an open flame This could cause the battery to explode Do not allow the metal contacts on the battery to touch another metal object This could sho...

Page 21: ... have been tested and found resistant to chipping fading or wearing off when the telephone is treated with common cleaners and disinfectants or perspiration The following chemicals have shown no harmful effect 3 Hydrochloric Acid M alcohol 85 Methylated Ethanol 60 Chlorhexidin 0 5 mg ml Acetone can be damaging to the plastic casing of the telephone and should not be used ...

Page 22: ...22 Avaya 374x DECT Telephones User Guide 02 2016 ...

Page 23: ...features which makes it ideal for applications where the user needs either one way messaging or to be able to interact with other users The display enhances and simplifies the use of the handset There are three versions of the handset 3740 Handset with messaging functions 3745 Handset with messaging and alarm functions 3749 Handset EX classified handset with additional alarm functions for personal...

Page 24: ...7xx telephones Functions 3740 3745 3749 Local phonebook X X X Company phonebook1 X X X Procedure call X X X Phone restrictions X X X Central phonebook2 X X X Call list with the 25 last calls X X X 2 programmable soft keys X X X 9 programmable hot keys X X X Programmable navigation key X X X Acoustic Location Signal ALS X X Poll Location3 X X Man down and No movement alarm X Push button alarm X X ...

Page 25: ...ssage acknowledgme nt X X X Interactive messaging X X Colored messaging X X Message templates X X Voice mail access2 X X X Enhanced DECT Security X X X Headset connector X X X Loudspeaking function X X X Microphone on off during a call X X X Vibrator X X X Profiles X X X Easy replacement of handset X X X Table 1 Functions of 37xx telephones Functions 3740 3745 3749 ...

Page 26: ...X Dynamic Output Power X X X Site Survey tool X X X Bluetooth X X Keypad backlight X X 1 This function feature requires PDM or AIWS2 2 This function feature is system dependent 3 Base Station Location must be enabled to use this feature 4 This function feature requires PDM WSM3 Table 2 Accessories of 37xx telephones Accessories 3740 3745 3749 Basic Charger X X X Advanced Charger X X X Charging rac...

Page 27: ...X X Swivel type Clip X X X Cover for no clip X X X Headset with Microphone on Boom1 X X X Peltor Hearing Protection Headset X X X Headset adapter for Mic on Boom X X X EX classified headset adapter for standard and EX classified Peltor headset X X X 1 Requires the headset adapter for Mic on Boom Table 2 Accessories of 37xx telephones Accessories 3740 3745 3749 ...

Page 28: ...s placed on the top side of the handset Can be used as a shortcut to a certain function 3745 3749 Alarm button The button is placed on the top side of the handset and can be used for sending alarms or dial a predefined number Note 3745 phones do not support man down and no movement 2 Earpiece speaker 1 2 3 4 5 6 7 8 9 10 11 12 13 14 15 16 17 18 001 ...

Page 29: ... to idle mode and to switch the handset on off by long press 6 Tactile indicators There are two tactile indicators to indicate the centre of the key pad 7 15 Sound off key Mute PTT button To turn on off audible signals in idle mode silencing the ring signal at incoming call and to mute in call During a call a long press on the button changes between microphone on off 8 Space To add space between t...

Page 30: ...of the three options you can use the cordless telephone without any clip on See Attach the Hinge type Clip on page 128 or Attach the Swivel type Clip on page 128 Use the clip to attach the telephone to a belt or similar 14 Soft keys The three Soft keys are located just beneath the display and the function of each Soft key is indicated by text in the display just above the keys In idle mode the mid...

Page 31: ...o charge the EX battery pack by itself Chargers Desktop charger Figure 2 Desktop chargers You can use one of the two desktop chargers available one Basic charger that will only charge the cordless telephone and one Advanced Charger with advanced functionality to download new software and synchronize parameters The cordless telephone is fully operational while placed in the charger The Basic Charge...

Page 32: ... is done as follows Telephone charging 1 Place a cordless telephone in the charging slot to start charging Telephone disconnection 1 Tilt the telephone forwards you 2 Then lift the telephone upwards Note Note Do not try to lift the telephone upwards before tilting it forwards Rackmount Charger The Rackmount Charger is used for charging several telephones to synchronize parameters and for software ...

Page 33: ...and system connection The next rows Active area are used for information such as profiles the name of the system to which the cordless telephone is connected to A user identity provided from the system and or an Owner ID can also be displayed if configured in the Settings menu This is also the area for pop up text for example missed calls or to confirm an action The bottom row Soft key bar is used...

Page 34: ...soft key for Loudspeaking icon has been pressed Pressing this icon turns off the loudspeaker New message icon or interactive message icon in the status bar indicates that one or more new text messages have been received The icon remains in the status bar until all new messages in the inbox are read Voice mail message icon is displayed in the status bar when there are voice mails The icon remains u...

Page 35: ...ooth headset is connected to the handset Headset icon indicates that a corded headset is connected to the handset Outgoing call icon is added to all outgoing calls in the call list Incoming call icon is added to all answered calls in the call list Missed call icon is added to all missed calls in the call list and in the status bar PDM AIWS2 communication icon is visible when handset is communicati...

Page 36: ...ervices is configured in the PDM AIWS2 The Connections menu contains Bluetooth connection 3745 3749 only headset selection System selection and In charger selection The Settings menu contains personal handset settings such as changing the ring volume selecting language etc The shortcuts menu contains shortcuts for the Soft keys Hot keys and Navigation keys The Profiles menu allows up to four diffe...

Page 37: ...default not used but you can define the use On 3749 the Multifunction Alarm button is used as an alarm button The 3745 phones do not support man down and no movement functions Volume button The two buttons placed on the upper left side of the cordless telephone are used for increasing decreasing the ear piece headset and the loudspeaker volume Sound off button The button is placed on the left side...

Page 38: ...ed To change between upper and lower case press before entering the character The can also be used to display only the digits To add space in the text make a short press on key 0 The first character entered in a message or when adding or editing a name in the Contacts menu is an upper level character followed by lower level characters unless is pressed before entering the character To switch betwe...

Page 39: ...ne Important Important In hazardous areas you are permitted to use only the headset adapter for Peltor headset in combination with an ATEX IECEx classified Peltor headset In order to achieve optimal audio quality with different headset types you must select the corresponding headset profile The default setting is microphone on a boom that is the audio is optimized for using a headset with micropho...

Page 40: ...DECT Telephones User Guide 02 2016 Menu tree Note Note In order to continuously improve the comprehensibility of menu terms some of them in your telephone may differ from those used in the following menu trees Calls ...

Page 41: ...ters before calling the number See Admin menu on page 109 for more information Call contact Add contact Edit contact Central phonebook Ring signal Name Work number Mobile number Other number New Contact list Ring signal Name Work number Mobile number Other number Search by name Search by number Last result Search Contact list Search Contact list View contact Add to contacts Send message Delete con...

Page 42: ... profile does not contain all applicable settings Answering behaviour Name Volume Ring signal Message alert Vibrating alert Key sound Automatic Loudspeaker Meeting example Silent Click Tone On Off On if silent Internal call Extrernal call Call back Normal default Add new ...

Page 43: ...matic Place the handset in the charger and configure call priority through Win PDM Edit parameters Settings Messaging Call priority 0 Overrides all messages and ongoing call is never disconnected 1 9 Comparison with message priority highest priority will be shown and call setup priority higher or equal causes disconnection Delete Forward Call sender Call no in text Save number Enter text Sent Repl...

Page 44: ... can be added to the Enter number field This allows the user to enter additional numerical characters before calling the number See Admin menu on page 109 for more information Short cuts Only applicable for 3740 Tip When configuring the Phone Call function a variable or character U can be added to the Enter number field This allows the user to enter additional digits before calling the number See ...

Page 45: ...ossible to unsubscribe a protected system via the handset Unsubscribtion must be performed via PDM AIWS2 Bluetooth Enable Disable Headset Add new Headset Mic on boom Hearing protecton System In charger Change system Subscribe Unsubscribe Rename system Priority Call behavior Other actions User specified headset No action Loudspeaking End call No action Switch off Redirect Sound off ...

Page 46: ...IN code Time format Automatic key lock Phone lock Dansk Nederlands English etc Sound Alerts Ring signals Vibrator alert Language Locks Display Time Date Answering Owner ID Answering behaviour Volume Message alert Key sound Power saver Brightness Date format Automatically Loudspeaking Messages Text Size Any key Answering key Device info Hardware Software IPEI User ID Contrast Alarm Man down No move...

Page 47: ... NOTE When calling from a locked handset there are limitations to what items in the In Call menu are shown However the entire menu is accessible when calling from a handset with locked NOTE If the handset is configured via PDM Device Manager one of the predefined emergency numbers can be called while the handset or keypad is locked If calling from a locked handset only the Microphone on off functi...

Page 48: ...y hiding some of the functions that are available but for example not in use Which functions that can be hidden are defined in the PDM Device Manager See the handset s Configuration Manual Encryption mode General purpose 1 name2 General purpose 10 name2 1 Visible if a Bluetooth headset is connected 3745 3749 only 2 Visible if defined in handset via PDM AIWS2 3 Visible if the parameters New call an...

Page 49: ... applicable in IP DECT systems only Shared Phone functionality is not applicable for 3740 The feature shared phone allows more than one user to use a handset When a handset is configured to be a shared phone it can be used by any shared phone user in the system The message and call lists are deleted when a user logs off a handset If the handset is configured in the PDM Device Manager an emergency ...

Page 50: ...handset is switched on See Turning the telephone On Off on page 49 for more information 1 A Login dialog window appears Press Yes 2 Enter User ID and password 3 Press Login Note The user will be automatically logged out from a previously used handset When the handset is placed in a charger it is logged off unless the user through the phone or admin through winPDM configures it to not log off autom...

Page 51: ... The icon indicates a silenced telephone Locking Unlocking the keypad Locking Unlocking the keypad in idle mode To prevent accidentally pressing keys and making a call the keys can be locked Locking the keypad 1 Press the key 2 Press the Soft key Lock Unlocking the keypad 1 Press the key 2 Press the Soft key Yes Note Note You can answer close an incoming call while the keypad is locked Note Note Y...

Page 52: ... Yes Locking Unlocking the telephone The handset can be protected for unauthorized use If this function is activated a PIN code has to be entered for example to switch on the handset to answer an incoming call etc The default phone lock code 0000 can be changed to any 4 8 digit personalized code NOTE If a phone is shared and one of the users logs off the shared phone the lock that prevents the han...

Page 53: ... text Turn off phone lock 1 Press Soft key Yes 2 Enter PIN code 3 Press Soft key OK Muting the ringtone for incoming call or message You can mute the handset ringtone on an incoming call or message The call is not hung up when the ringtone is muted If the call is unanswered it will revert to voicemail if the handset has been configured for voicemail To mute an incoming call or message 1 Long press...

Page 54: ... to answer the call or press to answer the call in loudspeaking mode1 The name or number of the calling party is displayed if calling line information is available Tip Tip When a headset is connected to the handset the headset button can be used to answer the call I A call may also be answered in the following ways Automatically and Loudspeaking When Automatically is enabled all incoming calls are...

Page 55: ...possible to step and add or delete a digit in a number The tone sender in a pre dialed number can be turned on by long pressing An international number can be dialed from the handset by entering a character followed by the country code and local number To enter the character long press the 0 key until the character is shown in the display NOTE The character cannot be entered and international numb...

Page 56: ...nbox 4 Select message in the message list 5 Press View 6 Press More 7 Select Call sender Dialing a number from the local phonebook 1 Open the menu by pressing the Menu soft key 2 Select 3 Select Call contact 4 Select contact from list or search name number by entering characters and select search 5 Press Call or to make the call Dialing a name from the company phonebook 1 Open the menu by pressing...

Page 57: ...e handset is configured via PDM Device Manager one of the predefined emergency numbers can be called while the handset or keypad is locked When calling from a locked handset only the Microphone on off function can be accessed by pressing the soft key More However the entire In Call menu is accessible when calling from a handset with locked keypad Adjusting the volume during a call Note Note Press ...

Page 58: ...ng Turning the microphone on off during a call 1 Press More during the call 2 Select Microphone off 3 Press Select The icon indicates a silenced microphone This means that the other part in an ongoing call cannot hear you To turn the microphone back on do as follows 4 Press More during the call 5 Select Microphone on 6 Press Select The microphone can be turned on and off by long pressing or When l...

Page 59: ...re Switch Ending a call You have started a new call during a call and the first call is on hold 1 Press the On Hook key This action ends the current call The held call rings again as priority call Note Note You can also end the call via the Soft key More End Call You can end a call by putting the telephone in a charger according to the In Charger Call behavior End call setting Note that all ongoin...

Page 60: ... 4 Dial the number to the person you want to transfer the call to 5 Press Off hook key to transfer the call Starting a conference Call A new call is started during conversation the first call is on hold 1 Press Soft key More 2 Select Conference call 3 Press Soft key Select The person initiating the conference call is the conference leader and the other are participant members of the conference cal...

Page 61: ...ng call appears do as follows 1 Press the soft key More during the call 2 Select Answer Call waiting 3 Press Select The new call is now connected and the first call is on hold When the line is free the call on hold is automatically dialled again This is a system dependent feature Method 2 If a second caller calls during a phone call the handset beeps and displays the text Internal call for interna...

Page 62: ...y During a call press the soft key During a call put the handset in a charger Requires that the parameter Call behaviour is set to Put on Loudspeaker in PDM Device Manager See the handset s Configuration Manual This function can also be activated by selecting another answering method that is Automatically and or Loudspeaking See Answering a call on page 54 Call diversion Internal calls external ca...

Page 63: ... prompt press the Yes soft key to send a message to the caller A list of predefined messages is displayed in the Templates menu 2 Select and if required edit the message as described in The Templates Menu on page 114 3 Click the soft key Send The calling party number is displayed in the handset display 4 Click the soft key Send A Message sent confirmation is displayed and the message is sent to th...

Page 64: ...eys 0 9 or can be used Key 0 and 1 contains special characters see Alphanumeric keys on page 37 to see all characters The maximum message length is 160 characters Note Note Some characters require 2 bytes in the final message therefore you might not be able to enter 160 characters sometimes For basic rules of text input see Alphanumeric keys on page 37 Writing and sending a message 1 Enter Messagi...

Page 65: ...ll be displayed first in the inbox list 3 Select the icon Voice Mail 4 Press the Soft key View and then Call Only one voice mail at the time will be displayed even if there are more voice mail messages in the message list Enabling one key voice mail access To enable one key Voice Mail Access you must download your mailbox extension number to the telephone see Installation and Administration Manual...

Page 66: ... occurs more than once the last time stamp together with the total number of occurrences is shown 1 Select Call list 2 Step with the and to scroll in the list Dialing a number from call list 1 Enter the menu by pressing the Menu soft key 2 Select in the menu Figure notes 1 Messaging 5 Profiles 2 Shortcuts 6 My Favourites 3 Settings 7 Connections 4 Contacts 8 Calls 12 00 Messaging Menu Back 2 1 3 4...

Page 67: ...n of the last call is displayed under Call time see Call Time on page 69 Editing a number from call list 1 Enter the menu by pressing the Menu soft key 2 Select in the menu 3 Select Call list 4 Step with the and to select number in the list 5 Press More 6 Select Edit number Saving a number NOTE Saving a number in the call list creates a new contact However existing items in the call list are not u...

Page 68: ...he entry from the list Deleting all entries from the call list 1 Enter the menu by pressing the Menu soft key 2 Select in the menu 3 Select Call list 4 Step with the and to select number in the list 5 Press More 6 Select Delete all Missed Calls A missed call is by default indicated by a Missed call window and the icon A time delay can also be set in the PDM AIWS2 to determine when a call is to be ...

Page 69: ... PTT functionality is not applicable for 3740 The push to talk PTT function can be described as a group conference call to a predefined group of members If one of the group members wants to get in contact with the others he she simply presses and holds to open the microphone To participate in the conference the group members must first accept an invitation received as an incoming call See Acceptin...

Page 70: ...t is not possible to accept or decline the invitation by pressing or respectively If the user presses Accept the ongoing call is disconnected and the PTT call is connected Alternatively the ongoing call can also be disconnected and the PTT call connected if the following is fulfilled The handset is configured to answer invitations automatically The user does not respond to the invitation within 10...

Page 71: ...nstallation and Administration Manual IP DECT Absence Handling The reason for being absent and the return time can be specified here 1 Enter the menu by pressing the Menu soft key 2 Select in the menu 3 Select Call services 4 Select Absence 5 Select the applicable absence reason in the list The number of absence reasons for example Lunch Meeting Trip etc are configured in the PDM 6 Press Select 7 ...

Page 72: ... calls 5 Select No reply 6 Select Activate 7 Enter number maximum 24 digits to divert to or press the soft key to enter the call contact list 8 Press OK The handset sends a diversion reason code to the system by establishing a call The call is automatically disconnected after a few seconds To stop diversion select Deactivate and press the soft key OK Diverting calls when busy 1 Enter the menu by p...

Page 73: ...company phonebook through the PDM Contacts from the Company phonebook appears in the contacts list menu with a lock symbol next to the name number which means that it is not editable The contact will only include work number Note Note You can import personal contacts or a local company phonebook by using WinPDM or DM Refer the handset configuration manual in the Installation and Administration Man...

Page 74: ...ther number 9 Press Add 10 Enter number A tone T or pause P can be included in phone numbers by pressing 5 times or 7 times respectively 11 TIP A variable or character U can be added to the Work Mobile Other number field to allow the user to enter additional numerical characters before calling the number See Admin menu on page 109 for more information 12 Press OK 13 Press Save A specific ring sign...

Page 75: ...dicated by a icon in front of the name 1 Enter the menu by pressing Menu 2 Select in the menu 3 Select Edit contact 4 Select contact 5 Press Edit 6 Select Name Work number Mobile number Other number or Ring signal 7 Press Edit 8 Enter new name number and or select new ring signal Tip Tip A variable or character U can be added to the Work Mobile Other number field to allow the user to enter additio...

Page 76: ...ch result can be displayed When the search result is displayed it is possible to view contact information add the number to new contact and to send a message by pressing More It is also possible to call the number by pressing Call Search by Name 1 Enter the menu by pressing Menu 2 Select in the menu 3 Select Central phonebook 4 Select Search by name 5 Enter First name and or Last name 6 Press Sear...

Page 77: ...ging settings is not possible on a telephone which is set to a profile You have to leave the profile before 1 Enter the menu by pressing the Menu Soft key or the confirmation button on the Navigation key 2 Select Profiles icon 3 Press the confirmation button or the Soft key Select Adding a new profile 1 Enter the menu by pressing Menu 2 Select in the menu 3 Select Add new 4 Enter name of the profi...

Page 78: ...Press Yes to confirm Editing a profile 1 Enter the menu by pressing Menu 2 Select in the menu 3 Select profile from list 4 Press More 5 Select Edit from menu 6 Select what to edit 7 Make the changes 8 Press Save to confirm Messaging This applies to 3740 When a text message is received the LED starts flashing and the message alert signal sounds The New message icon and a New Message pop up are disp...

Page 79: ...l new messages quickly press The messages are indicated as unread messages in the Messaging inbox The thirty last received messages are stored in the inbox Time and date information is included in the message Tip Tip New messages and information about incoming calls can be displayed upside down This can be useful if you wear the handset in a belt and want to read the message call information witho...

Page 80: ...ey 5 Press More 6 Select Delete 7 Press Yes to delete the message Forwarding a message 1 Enter the menu by pressing Menu 2 Select in the menu 3 Select Inbox to view the message list 4 Select a message by using the and on the navigation key 5 Press View 6 Press More 7 Select Forward 8 Enter additional text if needed See Alphanumeric keys on page 37 9 Press Send 10 Enter number or press to access co...

Page 81: ... message list 4 Select a message by using the and on the navigation key 5 Press View 6 Do one of the following Press More and select Call no in text Press 7 If the message contains several numbers select the number to be called from the list 8 Press Call or Saving a number Note If the user returns to the inbox immediately after having created a new contact existing inbox items from that contact ar...

Page 82: ...he display The keys 0 9 or can be used Keys 0 and 1 contains special characters See Alphanumeric keys on page 37 to see all characters For example to enter the character E press key 3 twice E appears in the display and is selected after a timeout or when another key is pressed Tip Tip If the system supports UTF 8 character encoding the input language can be changed temporarily by long pressing Thi...

Page 83: ...and or just select Send Deleting a message or deleting all messages 1 Enter the menu by pressing Menu 2 Select in the menu 3 Select Unsent 4 Select message in the list 5 Select More 6 Select Delete or Delete all 7 Select Yes if the unsent messages are deleted Sent messages 1 Enter the menu by pressing Menu 2 Select in the menu 3 Select Sent to view the list 4 Select message in the list 5 Press Vie...

Page 84: ...y The called party may be either The message sender that is the same party that sent the text message A different party The user can activate the loudspeaker function during the call to make it easier to read the received text message while talking to the called party Calling the Message Sender To call the message sender while reading and reviewing a received text message perform the following ste...

Page 85: ...age and Terminate the Call on page 85 Redisplay the Message and Continue with the Call 1 To redisplay the message while the call is ongoing select the More soft key 2 From the pop up menu select Messaging 3 From the Messaging menu select Inbox The received message summary is displayed 4 Press the View soft key to display the message in full If required use the four way navigation key to scroll up ...

Page 86: ...e mail If the extension number is not available a dialog window Voice mail number not defined is displayed Some systems require that the mailbox extension number is downloaded to the handset see the handset s Configuration Manual My favourites With this menu it is possible to customize your own menu with services functions that are used often A list of predefined services functions are available f...

Page 87: ...key 4 Press More 5 Select Delete using the and on the navigation key and press Select 6 Press Yes to delete the service 7 Press Back Short cuts Predefined functions can be set as shortcuts for the Soft Keys Hot keys Navigation keys and Multifunction button It is for example possible to define the Soft Key to make a call or as a shortcut to send a message NOTE The Multifunction button is not applic...

Page 88: ...d when pressing the defined Soft key Press Yes to proceed 11 Press Save Defining hot keys 1 Enter the menu by pressing Menu 2 Select in the menu 3 Select Hot keys 4 Select 0 2 to 9 5 Select Function 6 Select function from list and press Back 7 Select Value only for some of the functions and press Select Enter a value for example a number Press Back 8 Select Control question and press Select It is ...

Page 89: ...d with two different functions a long press activates one function and a double press activates another function 1 Enter the menu by pressing Menu 2 Select in the menu 3 Select Multifunction button 4 Select Long press or Multi press 5 Select Function 6 Select function from list and press Back 7 Select Value only for some of the functions Enter a value for example a number Press Back 8 Select Contr...

Page 90: ...et different Ring Signals for Calls NOTE If the parameter Force stimuli ringing is enabled the handset uses the system provided ring signals instead of the local ring signals See the Configuration Manual for the Avaya 374x Handsets This function is applicable in legacy systems only stimuli 1 Enter the menu by pressing Menu 2 Select in the menu 3 Select Sound Alerts 4 Select Ring signals 5 Differen...

Page 91: ...Tip Tip The handset vibrator can also be activated when receiving a message during a call via PDM Device Manager See the handset s Configuration Manual NOTE When the vibrator is enabled on an intrinsically safe handset the handset alternates between vibration and sound That is vibration and sound are not activated simultaneously 1 Enter the menu by pressing Menu 2 Select in the menu 3 Select Sound...

Page 92: ...ad is automatically locked if it is not used for the specified lock time If the user is in call when the lock time elapses the keypad remains unlocked until the user has completed the call Off the keypad is never automatically locked Auto lock time specifies the time that elapses before the keypad is automatically locked The shortest time that may be specified before the key lock is applied is 5 s...

Page 93: ...ndset can be protected for unauthorized use by activating the phone lock The phone lock may be set to On The handset is automatically locked if not used for the specified automatic lock time or when it is first turned on On in charger The handset is locked immediately when placed in the charger When removed from the charger and unlocked by the PIN the handset remains unlocked Off The handset is ne...

Page 94: ... If the PIN code is forgotten it can be removed by your distributor Deactivate the Phone Lock 1 Enter the menu by pressing Menu 2 Select in the menu 3 Select Locks 4 Select Auto phone lock 5 Select Off 6 Enter PIN code 7 Press OK If the PIN code is forgotten it can be removed by your distributor Change PIN Code 1 Enter the menu by pressing Menu 2 Select in the menu 3 Select Locks 4 Select Phone lo...

Page 95: ...in a CR3 charging rack the owner ID and the variant of the handset are displayed This simplifies identification when many handsets are charged together Brightness NOTE An intrinsically safe handset s display brightness is lower than a non intrinsically safe handset s display brightness due to current limitations 1 Enter the menu by pressing Menu 2 Select in the menu 3 Select Display 4 Select Brigh...

Page 96: ... system time every 24 hours from the time it was last turned on The time and date formats displayed in the handset can be changed by the user as described in the following sections Set Time Format 1 Enter the menu by pressing Menu 2 Select in the menu 3 Select Time Date 4 Press Select 5 Select Time format The actual time format is displayed Selectable time format 12 00 AM PM 24 00 6 Press Select t...

Page 97: ...rent limitations in the intrinsically safe handset The answering behaviour can also be set to any key If Any key is selected any key except and can be used to answer a call Answering Key The answering key is by default set to Hook off 1 Enter the menu by pressing Menu 2 Select in the menu 3 Select Answering 4 Select Answering key 5 Select Hook off or Any key 6 Press Back to save the settings Answe...

Page 98: ...nu 3 Select Language 4 Select the language to be used 5 Press Back Tip Tip It is also possible to download an additional language to the handset see Software Upgrade and Additional Features on page 115 Change Owner ID The Owner ID is set to identify the handset 1 Enter the menu by pressing Menu 2 Select in the menu 3 Select Owner ID 4 Enter name identity See Alphanumeric keys on page 37 5 Press Sa...

Page 99: ...menu 3 Select Alarm 4 Select Edit alarm data 5 Enter alarm data 6 Press Save Activate alarm NOTE This menu is applicable for 3749 only 1 Enter the menu by pressing Menu 2 Select in the menu 3 Select Alarm 4 Select Activate alarm 5 Select Man down and or No movement 6 Press Select to change the setting The check box is marked 7 Press Back to save the setting To remove the setting press Select The c...

Page 100: ...heard The orange LED flashes twice The vibrator stirs The telephone receives a notification that the alarm has been received by the system This is a system dependent feature An acoustic location signal ALS is played See Acoustic Location Signal on page 101 A call to a predefined number is established See Automatic Call after Alarm on page 102 Note When the vibrator is enabled the telephone will al...

Page 101: ...rning Cancel or No movement warning Cancel is shown in the display and a warning tone is also played for a period default 7 seconds before the alarm is sent To prevent the alarm from being sent and to silence the warning tone do one of the following Press any key or button The alarm is reset Put the telephone in a charger The alarm is temporarily disabled and the corresponding alarm icon is hidden...

Page 102: ...nabled the loudspeaker audio is lowered due to current limitations in the intrinsically safe 3749 telephone Connections Bluetooth NOTE Bluetooth is not applicable for 3740 Enable Bluetooth Connection 1 Enter the menu by pressing Menu 2 Select in the menu 3 Select Bluetooth 4 Select Enable A Bluetooth connection icon is displayed in the header bar NOTE When enabling Bluetooth on an intrinsically sa...

Page 103: ...ded enter PIN code see user manual for the Bluetooth headset Press OK The dialog Successful pairing appears if the pairing process was successful The Bluetooth headset is also connected as indicated by the icon in front of the headset Headset To achieve optimal audio quality with the different headset types it is recommended to select the corresponding headset type The default setting is microphon...

Page 104: ...tor for more information NOTE The PARK code may not be needed if there is no alien DECT system within the coverage area 1 Enter the menu by pressing Menu 2 Select in the menu 3 Select System 4 Select Subscribe 5 The handset s IPDI is displayed The IPDI is a unique code that has been assigned to the handset Press Next 6 Enter System name optional If no system name is entered the default name is use...

Page 105: ...e handset 1 Enter the menu by pressing the Menu soft key 2 Select in the menu 3 Select System 4 Select Rename System 5 Select system to rename 6 Enter new name 7 Select Save Priority The default order of priority is the order of entered subscriptions This means that the first subscribed system has the highest priority This list can be edited by the user It is possible to set the systems in priorit...

Page 106: ...arger actions can also be configured see the handset s Configuration Manual 2 Enter the menu by pressing Menu 3 Select in the menu 4 Select In charger 5 Select Other actions 6 Select one of the following No action no action is performed when handset is not in call and placed in charger Switch off When the handset is placed in the charger it will switch off When it is removed from the charger it wi...

Page 107: ...s is static When entering the data for the function to be used it is possible to add a variable character U that allows the user to enter additional numerical characters before calling the number sending the data to a system See the following example for more information Example of configuration A user wants to create a service with the Phone call function The PBX requires that a prefix must be ad...

Page 108: ...User Guide 02 2016 Figure 8 Enter number dialog Note Using a shortcut to make a procedure call is not supported while the handset is locked 12 00 My favourites OK Back Enter number 123 12 00 00 My Favourites OK Back Enter number 123 ...

Page 109: ...in Menu enter Settings Device info Software and press the buttons containing CRAFT that is 27238 For quick access to the Device Information DI menu in idle mode press the keys containing DI that is 34 For quick access to IPEI IPDI press 06 in idle mode See the table below Clearing lists in charger You can set a parameter through the PDM or AIWS to clear messaging lists and call lists that has been...

Page 110: ...ly be deleted from the message list Message Queuing and Message Priority To notify about new incoming messages all incoming messages are placed in a message queue The sorting order for the message queue depends on the system settings By default the messages are sorted according to message priority and thereafter according to arrival time The messages in the message queue are automatically displaye...

Page 111: ...essage alert signal sounds It is possible to configure the handset to repeat the alert signal for an unread message every 7th second as long it is displayed See the handset s Configuration Manual for message settings Priority 1 messages with certain system defined properties are handled as extra important and therefore will the alert signal be repeated every 10th second in 5 minutes or until any k...

Page 112: ...t sends the IM can determine the alert signal volume and LED indication When an IM has been read the IM may display several options 1 Press More to open up a list of available options 2 Mark an appropriate option in the list 3 Press Select 4 If the selected option requests input enter the information needed and press Ok A press on the middle Soft key will change to digit or text input mode dependi...

Page 113: ...a message appropriate to the current situation such as I am in a meeting or I am in the operating theatre How to use the PDM Device Manager to create store predefined messages the handset is described in the Message Templates section of the handset configuration manual Before a message is sent the user may edit add or remove text from the message For example the message I am in a meeting could be ...

Page 114: ... handset key pad to add additional text and the Clear soft key to delete unwanted text Answering a Text Message with a Predefined Message To respond to an incoming text message with a predefined message perform the following steps 1 Press the soft key Reply 2 Press the More soft key The Templates option is displayed 3 Press the soft key Select A list of predefined message templates is displayed 4 ...

Page 115: ...rade and Additional Features Software and parameters in the handset can be upgraded by using the PDM Device Manager Examples of additional features that can be downloaded configured via PDM Device Manager Local phonebook Company phonebook Downloadable languages Customizing the Menu Tree Refer to the handset s Configuration Manual To view the handset s software version enter 34 in idle mode Handset...

Page 116: ...d from the charger and used the update is suspended and resumed when it is returned to the charger When the update is complete a Handset is updated message is displayed to indicate that the handset is available for use as shown in figure Select the OK soft key to close the message Update Completed while in Charger 12 00 2013 02 27 OK Updating handset 12 00 00 2013 02 27 OK Updating handset 12 03 2...

Page 117: ...n contains information on how to solve common operational problems and warnings you may receive Go through the following lists if you encounter any problems If this checklist does not solve the problem contact your system administrator If others have similar problems there may be a system error ...

Page 118: ... hours after a change in the system or by turning the handset off and on again Cannot mute handset by long pressing Sound off key Mute button Not possible to set the ring volume to Silent Handset with In Charger Other actions Sound off enabled is not muted when placed in charger A handset restriction preventing the user to silence the handset Enable the parameter Possible to turn off sound see the...

Page 119: ...ication problem between components in the handset Restart the handset If the problem persists send the handset for service SERVICE NEEDED Invalid IPDI Note This display message is only shown in English Easy replacement procedure not followed correctly or failure during easy replacement procedure Send the handset for service SERVICE NEEDED Parameters corrupt Note This display message is only shown ...

Page 120: ...le the Encryption required parameter in handset via PDM Device Manager and or 2 Unsupported base station s 2 Enable the encryption in the base station s and or 3 Use supported base station s Ask your supplier Not allowed 1 The user cannot login to the handset with the shared phone functionality enabled due to another handset currently using the same extension User 1 Logout from the handset that us...

Page 121: ...es User Guide 02 2016 121 2 2 The charger has found that Easy Replacement does not work Change back to the new handset LED is flashing red long flash 800 ms on 100 ms off Error during Easy Replacement Both handsets need to be sent for service ...

Page 122: ...s area you will loose contact with the system The signal strength icon will be low and Searching text will be displayed Out of Range When you leave the system s coverage area a short beep will sound and the text Searching will appear in the display The out of range beep is repeated every minute for 30 minutes The sound can be turned off by long pressing or NOTE If handset restriction is enabled it...

Page 123: ...display indicating charging by starting with its current charge and ending with the full charge A filled battery icon indicates a fully charged battery NOTE Only use the prescribed chargers for charging Charge Spare Batteries Spare batteries can be charged with a separate battery pack charger It can charge six batteries at the same time The Low battery icon is displayed when the battery has 10 or ...

Page 124: ...uch a way that no misalignment of the contact is possible NOTE Use the battery pack opener to untight the screws on the intrinsically safe handset Figure 12 Replaceable battery Unlock the lid loosen the screws and remove the battery according to the illustration Easy Replacement of Handset Easy replacement can be used if a handset needs to be replaced due to for example a broken display The easy r...

Page 125: ...rger follow the same LED indications This means that if the old handset has a broken display the LED indications on the charger and on the handset can be used to follow the replacement procedure Before and after easy replacement the LEDs may have different LED indications For more details see LED Indications during Easy Replacement on page 127 Important Important Never remove a handset from the ch...

Page 126: ... until you are instructed to do so 2 Put the new handset in the charger 3 When the text Start phone replacement is displayed release Press Yes left soft key The text Follow the instructions Each step can take several minutes appears in the display Press OK left soft key 011 New 1 2 3 5 6 4 8 7 New New Old ...

Page 127: ...arger to restore its settings that is the handset s IPDI If this step is not performed the new handset must be sent for service The old handset s settings might be transfered to the new handset by using PDM Device Manager See the handset s Configuration Manual 6 7 When the text Please insert new phone in charger is displayed replace the old handset with the new handset The text Restoring settings ...

Page 128: ...he hinge type belt clip as described in figure 13 Figure 13 Screw the hinge type clip into position Attach the Swivel type Clip Attach the swivel type belt clip as described in figure 14 Red flashing 900 ms on 100 ms off Error during Easy Replacement Service needed for both handsets 012 ...

Page 129: ...ce Avaya 374x DECT Telephones User Guide 02 2016 129 Figure 14 Screw the swivel type clip into position Attach Cover for No Clip Attach the enclosed cover as described in figure 15 when no clip is to be used 013 ...

Page 130: ...130 Avaya 374x DECT Telephones User Guide 02 2016 Figure 15 Screw the cover into position 014 ...

Page 131: ...h it s headset Chose which device to use when making a call Play ring signal in the Bluetooth Headset Answer and connect sound to the Bluetooth Headset when answering with the headset s button End call with the Bluetooth headset s button Transfer audio to from Bluetooth headset during call using the menu in the cordless telephone Increase decrease the volume in the Bluetooth headset with the volum...

Page 132: ...Bluetooth 2 0 standard other headsets may also work although not verified by Avaya Note Note Your Bluetooth headset may have more or less functions than described here refer to the Manual for the Bluetooth headset Operation Step between the menus with the navigation key Confirm each menu selection by pressing the Soft key Select Enabling Bluetooth 1 Enter the menu by pressing the Menu Soft key or ...

Page 133: ...on the telephone to select the headset The pairing starts 6 A PIN code is requested for the Bluetooth headset Enter the PIN code and press Select on the telephone Pairing successful is displayed Note Note For instruction see headset manual 7 The paired headset is displayed in the telephone menu Headset When pairing a new headset it is automatically connected and will be used for calls Adding anoth...

Page 134: ...t is the default name for the headset 1 Select Connections icon in the telephone menu 2 Select Bluetooth Headset 3 Step with the navigation key or select the headset 4 Select More Edit name 5 See Alphanumeric keys on page 37 Calling Making a call 1 Enter the number on the telephone 2 Press the Soft key Call or the Off hook key 3 When Transfer call to phone is displayed press No or ignore the messa...

Page 135: ...e volume in the headset Depending on the Bluetooth headset it might be possible to adjust the volume directly on the headset Turning the microphone On Off during a call Mute the headset and the telephone with the Sound off key on the telephone See Turning the telephone On Off on page 49 Messaging When a text message is received during an ongoing call a beep sounds in the Bluetooth headset Transfer...

Page 136: ... frequency can disturb the use of a Bluetooth headset Operation area Maximum distance between the headset and the telephone is 10 metres The communication distance between the telephone and headset may vary considerably due to the environment and disturbances from other 2 45 GHz equipment Different headsets can also give different communication distances Out of range If a connection cannot be made...

Page 137: ...et is not in pairing mode Turn headset into pairing discoverable mode see headset manual for details Incorrect PIN entered Try again and enter correct PIN see headset manual for details Connecting fails Failed to connect headset Headset is not turned on Turn on headset Headset is out of range Move headset closer to telephone Link key in headset has been deleted Repeat pairing procedure Headset is ...

Page 138: ...le is disabled Enable Bluetooth in Bluetooth menu Another headset is already connected to the telephone Disconnect the connected headset Link key is missing in either headset or telephone Repeat pairing procedure Too close to disturbing devices Disturbing devices can be WLAN equipment microwave etc Problem Reason Solution ...

Page 139: ...Avaya 374x DECT Telephones Quick Reference Guide ...

Page 140: ... key functions Four way navigation key On hook and On Off key Alphanumeric keys Sound off key Space key Multi purpose connector Used for battery charging software download configuration and connection of headsets Microphone Key lock and Upper Lower Case key Tactile key Voice mail key Off hook key Soft keys Mute button Volume down button Volume up button Multifunction Alarm button LED ...

Page 141: ...g volume set to silent Loudspeaker on Loudspeaker off Microphone off Headset connected Bluetooth headset connected only for 3745 and 3749 Bluetooth only for 3745 and 3749 Man down alarm only for 3749 No movement alarm only for 3749 New message Read message Missed call Incoming call Outgoing call System connection Key lock Phone lock ...

Page 142: ...ances and simplifies the use of the cordless telephone Read the safety instructions before use For software download and parameter set up read the Installation and Administration Manual IP DECT System dependent Note Your unit may have more functions than described here see User Guide Avaya 374x DECT Telephones Product presentation Functions 374x Local phonebook 250 contacts X Central phonebook X C...

Page 143: ...k Enter the Contacts menu select Call contact and select the name from the list press Call or the Off hook key Dial a number from the Central phonebook Enter the Contacts menu select Central phonebook search by name number last result and press Search Press Off hook key The alpha numeric keys can be programmed with a telephone number Answer End a call When the ring signal sounds press the Off hook...

Page 144: ...vigation key to adjust the volume Charge the battery Charging is done in a desktop charger or in a charging rack Charging is indicated by orange LED When the battery is fully charged the LED is green and a fully charged Battery icon is displayed While in a desktop charger the telephone is fully operational The telephone does not vibrate in charger The battery can also be charged in a separate batt...

Page 145: ...he Messaging menu and select Write new message Enter text press the soft key Send and then enter a number or press the midle soft key for phonebook look up Press Send Delete a stored message To delete a message select message and press the soft key More select Delete and press the soft key Yes Check voice mail A new voice mail is indicated in the display by the text MW Only one voice mail at the t...

Page 146: ...splay are used for choices in the menu The function of each Soft key is explained by text in the soft key field in the display Use the local phonebook To find and call a name Enter Contacts step to Call contact and press Select Enter the first letter in the name or the whole name will be displayed in Search field while entering text or step in the contact list Select the name and press Call Figure...

Page 147: ...ayed You can step to the next entry in alphabetic order by pressing the Navigation key Press More to add contact or press Call to make the call Use the company phonebook The company phonebook has to be imported via the PDM before it will be visable in the handset See User Manual Cordless Telephone 374x Enter Call list Select name number and press Call only work number is available for the contact ...

Page 148: ...ce Guide Turn the automatic keypad lock on off Enter Settings and step to Locks Select Automatic key lock Off On select On Off and press Back A locked keypad is indicated by the Key lock icon To unlock press the key and then the Soft key Yes ...

Page 149: ... for the Avaya 374x DECT telephone are available Also available Rackmount Charger Multiple Battery Charger for 3740 and 3745 DECT telephones Headset Mic on boom Peltor hearing protection headset Accessories Leather casing incl belt clip Belt clip swivel type Desktop chargers ...

Page 150: ... call 35 outgoing call 35 quick call by a name in the phonebook 56 Calls menu tree 40 Case 30 Central phonebook 73 Charger 31 disconnet telephone 32 Chemical resistance 21 Clip 30 Company phonebook 73 Conference Call 60 Connections menu tree 45 Contacts menu tree 41 D Dialing a name from the central phonebook 56 57 Dialling International number 55 Dispose of old equipment 15 Divert Calls 72 DTMF 6...

Page 151: ...code 53 94 Procedure Call 109 PTT 69 PTT Accepting an invitation 69 PTT rejoining a group 71 PTT Accepting a call 69 PTT calling a group 70 Q Quick Reference Guide 139 R Ring signal muted 34 S Safety Information 11 Screen Saver settings 95 Setting a ring signal for a contact 90 Settings 107 menu tree 46 Shared phone 49 Short cuts menu tree 44 Signal strength 34 Sound off button 37 Special characte...

Reviews: