background image

21

Normal use

During  normal  use  with  the  service  lift  connected  to  the


electric  grid,  the  sliding  door  is  closed  by  pushing 

th

e


actuator  into  the  door  guard  locking  switch.  The 

control is interrupted if the door is not closed correctly.


When the cabin is at a platform, the lift detection switch or


photoelectric  sensor  (optional  features)  is  activated  and


the  sliding  door  can  be  opened.  In  the  cabin  there  is  a


handle  to  assist  with  opening  the  sliding  door.


Inside  the  cabin  there  is  a  position  platform  indicator.


The green light is ON when the lift is at the platform.


Emergency use

During emergency use, for example during a power outage,


where  evacuation  or  rescue  is  necessary,  the  door  guard


locking  switch  can  be  unlocked  by  pushing  the


emergency  red  release  button  from  outside  the  cabin


or  by  turning  the  red  release lever from inside the cabin. 
(See Figure 

in Section 3.2.1.1)


Inside the cabin

Turn the red release lever  to open the sliding door.

Outside the cabin

Press the red release button to open the sliding door.

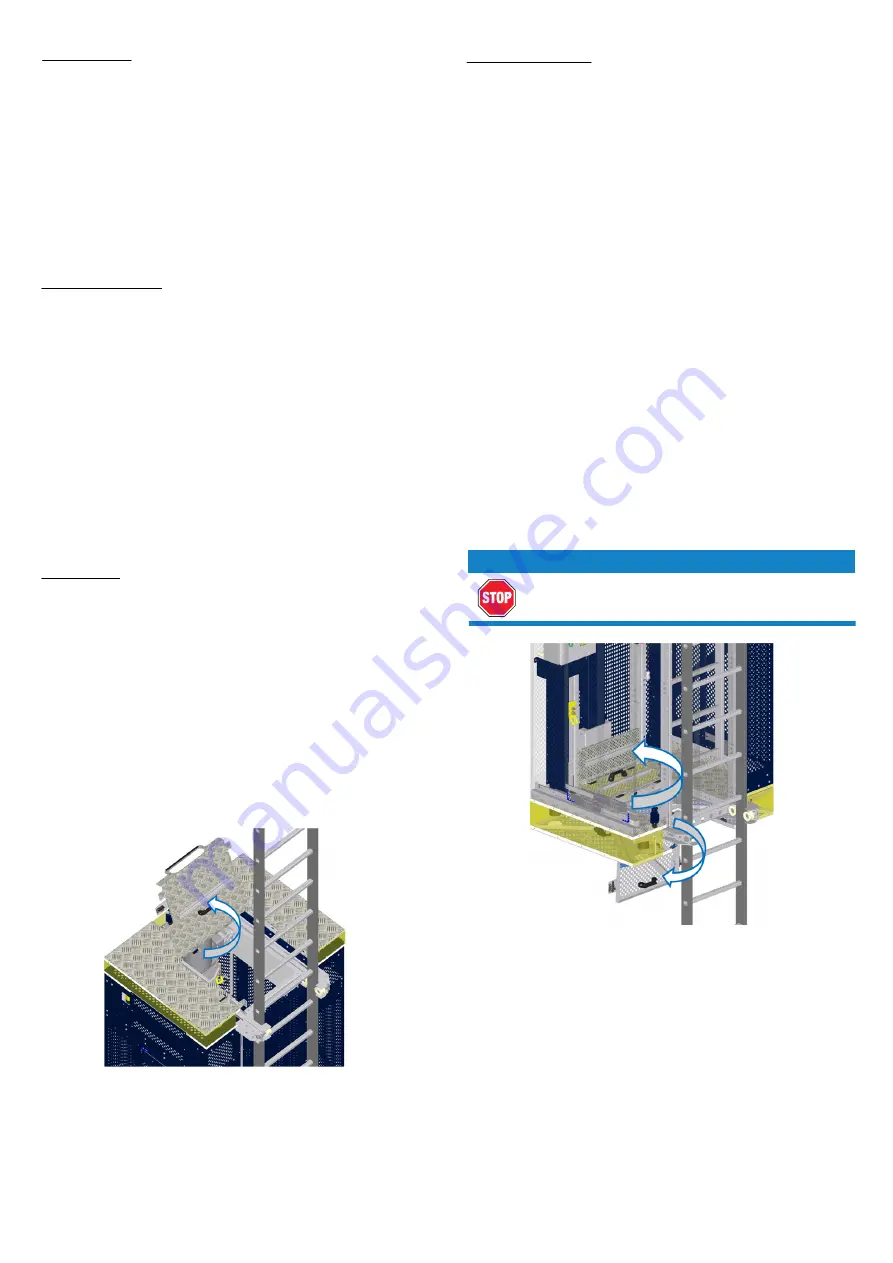
Top hatch can be opened from both sides, thus allowing 
egress to and ingress from above.

4.3.3 Top/Bottom hatches

Inside the cabin

Use the internal emergency ladder to reach the top
hatch.
To open top hatch push it up. Once top hatch is
open, ladder becomes totally accessible.

Outside the cabin

To open top hatch pull it up. Once top hatch is open,
access inside the cabin by means of the internal
emergency ladder.

Figure 2

6

: Top hatch

Top hatch

The service lift has two bottom hatches, one on the floor 
of  the  cabin  and  the  other  on  the  bottom  full  cover 
obstruction  device.  The  bottom  hatches  can  be  opened 
from both sides, the bottom cabin hatch opens inwards, 
and  the  bottom  obstruction  device  hatch  opens 
outwards,  thus  allowing  egress  to  and  ingress  from 
below.

Bottom hatches

Inside the cabin

Before using the bottom hatches, the user must
anchored to the lower additional anchor point inside
the cabin.
To open the bottom cabin hatch pull it up. Once it is
open, push down the bottom obstruction device hatch
to open it.
When both bottom hatches are open, ladder becomes
totally accessible to exit through the bottom of the
service lift.

Outside the cabin

To open the bottom obstruction device hatch pull it
down. Once it is open, push up the bottom cabin
hatch to open it.
When both bottom hatches are open, the user must
be anchored to the lower additional anchor point
inside the cabin before access from the bottom of the
service lift.

  DANGER

The lower anchor point must only be used for 
evacuation/rescue operation.

Figure 2

7

: Bottom hatches

4.3.4 Stop/Emergency stop

a) Release the Up or Down button; the service lift should
stop

If it does not:

b) Push  the  EMERGENCY  STOP  button,  and  all  controls
should be disabled.

Summary of Contents for OCTOPUS XL120

Page 1: ...AVANTI SERVICE LIFT Model OCTOPUS XL120 Service Lift User manual Original instructions AT00015389 English EN User Manual Service Lift Model OCTOPUS XL120 3rd Edition July 2019 Revision 1 30 07 2019...

Page 2: ......

Page 3: ...structions from Avanti iii has been subjected to abuse neglect casualty or negligence iv has been furnished by Avanti to Customer without charge or v has been sold on an AS IS basis Except as specifi...

Page 4: ...Service Lift Doors 10 3 2 2 Wire inspection cover 10 3 2 3 Interior light 11 3 2 4 Anchor points 11 3 3 Traction system 11 3 3 1 Traction hoist M608 11 3 4 Fall arrest device 11 3 4 1 ASL608 Fall arr...

Page 5: ...tomatic send configuration 22 4 3 8 Overload detection device 23 4 3 10 Fall arrest device 24 4 3 9 Manual descent 24 4 5 Troubleshooting 26 4 6 Out of service 29 Appendix User log sheet 30 Appendix S...

Page 6: ...harness shock absorber lanyard and slider at all times and carry 2 way communication systems depending on local regulation The service lift is designed for a useful life of 20 years with an approximat...

Page 7: ...AUTION Avoid injury follow all instructions NOTICE The owner must verify the need for third party service lift inspections with the local authority and comply with specified standards 1 4 Terms and de...

Page 8: ...systems including an interlock system on platform fence doors A rescue pendant control only mandatory if rescue route of service lift can be somehow blocked and in case of an external call control bo...

Page 9: ...x traveling height 160 m Max noise level 80 dB A Power supply type 400V 50 60Hz 3 Phase N PE 690V 50 60Hz 3 Phase PE 1 Optionally depending on WTG configuration cabin could feature 2 full sliding door...

Page 10: ...4 55 M608 400V 50Hz M608 690V 50Hz M608 400V 60Hz M608 690V 60Hz 2 4 3 Fall arrest device Service lift Fall arrest device Lifting capacity Triggering speed Safety wire Approx weight Version Type Kg lb...

Page 11: ...2 5 Dimensions 2 5 1 Octopus XL120 Figure 3 Octopus XL120 dimensions 970 1200 2812 2635 8...

Page 12: ...rollers 10 Hour counter Full sliding door x2 External controls Top obstruction device Safety wire rope Traction wire rope Travelling cable pulley Additional anchor point bottom hatches use Internal em...

Page 13: ...re activated while the second sliding door D2 would be locked The second sliding door D2 only could be opened when Platform level detection switch S18 is activated while the first sliding door D1 woul...

Page 14: ...revent the upward travel of the service lift by interrupting control and a buzzer will sound until overload condition iseliminated 3 4 Fall arrest device 3 4 1 ASL608 Fall arrest device The service li...

Page 15: ...SL light red Platform indicator light green EMERGENCY STOP button internal Hour counter Shunt key for bottom obstruction switch Trapped key switch1 UP button external EMERGENCY STOP button external DO...

Page 16: ...ch must be OFF before the generator is turned on 3 5 2 1 1 Automatic send configuration 3 5 2 1 1a Versions with guard locking 3 5 2 1 1b Versions with trapped key or electrical switch monitoring syst...

Page 17: ...blocking the bottom hatch the rescuer is below service lift and the service lift is stopped halfway through a platform hole blocking rescue route since platform has no extra hatch CAUTION There shall...

Page 18: ...ully covers bottom cabin face The cover is provided with a hatch in case of evacuation When bottom obstruction device is activated service lift will stop descent as a consequence of one of the bottom...

Page 19: ...t ensures smoothness though providing necessary endurance Figure 21 Guiding system Guiding system 1 2 Guiding ladder Top guiding rollers Bottom guiding rollers 3 1 2 3 3 9 Cable management 3 9 1 Trave...

Page 20: ...h monitoring system This interlocking mechanism is comprised of a mechanical locking unit and a switch unit When the switch is opened the power is removed so the service lift cannot move This system a...

Page 21: ...ually check that the WTG installation components are mounted in accordance with the specifications and without any noticeable defects or missing components Platform control boxes Traction and safety w...

Page 22: ...the fall arrest device functionality called the Stomp test The procedure is explained in the Stomp test TYZX IZOUT VVKTJO Top obstruction device 1 Activate the top stop by pressing it down The servic...

Page 23: ...and hold the DOWN button on the bottom platform box 4 2 Prohibited uses DANGER Failure to comply with the prohibited uses is extremely dangerous for the physical integrity of the users When using the...

Page 24: ...dder becomes totally accessible Outside the cabin To open top hatch pull it up Once top hatch is open access inside the cabin by means of the internal emergency ladder Figure 26 Top hatch Top hatch Th...

Page 25: ...service lift do not get close to the hoistway To place the service lift on the floor after the bottom obstruction device has stopped the lift 1 Turn the override bottom obstruction device switch clock...

Page 26: ...feature a guard locking system CAUTION When the UP or DOWN button is pressed on the platform control box the response of the cabin is delayed During this delay an acoustic signal will sound and the wa...

Page 27: ...uction device will not get damaged 10 BMM BSSFTU EFWJDF The service lift is provided with the ASL608 fall arrest device which will be triggered in case of an overspeed condition This device protects t...

Page 28: ...OSED TO DYNAMIC LOADS WHEN A FALL IS PREVENTED 7HEN THE SERVICE LIFT HAS RETURNED TO THE BOTTOM PLATFORM TEST THE fALL ARREST DEVICE FUNCTIONALITY 2EPLACE ANY DEFECTIVE COMPONENTS OF THE FALL ARREST D...

Page 29: ...safety of the service lift Replace immediately Cause Solution THE SERVICE LIFT DOES NOT MOVE UP OR DOWN A1 Emergency stop The fixed EMERGENCY STOP button has been activated In the user control box or...

Page 30: ...otor is not cooling Clean the hood Voltage too high low Measure voltage and power consumption on the loaded motor If the voltage deviates from specifications use a cable with in creased dimensions A8...

Page 31: ...ion switch is defective or not connected properly Test the bottom obstruction switch connection and functionality Replace the bottom obstruction switch if necessary The bottom obstruction switch is ac...

Page 32: ...for advice and potential repair of hoist THE MOTOR HUMS LOUDLY OR THE WIRE ROPES SQUEAK BUT THE LIFT CAN GO BOTH UP AND DOWN G Wire ropes Wire ropes are dirty If possible immediately replace the trac...

Page 33: ...TE HEIGHT OF M FT ABOVE THE BOTTOM LANDING FLOOR PLATFORM 4EST 7ITH THE CABIN PARKED AT AN APPROXIMATE HEIGHT OF M FT ABOVE THE BOTTOM LANDING FLOOR THE USER STARTS DESCENDING USING ELECTRIC CURRENT B...

Page 34: ...del Octopus XL120 01 02 04 2018 Added Traction hoist M608 and ASL608 02 01 03 2019 EC Certificate updated Manufacturer updated to Avanti Wind Systems Technology S L 35 02 02 06 2019 Certification manu...

Page 35: ......

Page 36: ...www avanti online com...

Reviews: