


ADVANCED MENU
~
17
~
4) LS (Level of Sensitivity)
“LS” is to set the sensitivity of comparing two different images. The smaller the value is, the higher sensitivity for
motion detection. The highest sensitivity setting is 00, and the lowest sensitivity setting is 15. The default value is 07.
5) SS (Spatial Sensitivity)
“SS” is to set the sensitivity for detecting the size of one object (the number of the grids) on the screen. The
smaller the value is, the higher sensitivity for motion detection.
The highest sensitivity setting is 00, and the lowest sensitivity setting is 15. The default setting is 03.
Note:
The default setting of SS is 03, which means once an object is detected more than 3 grids, the
system will get triggered. So the value of SS must be less than the number of grids that you set
up for the motion detection area.
6) TS (Time of Sensitivity)
“TS” is to set the sensitivity regarding how long one object stays in the detection area and triggers the recording.
The smaller the value is, the higher sensitivity for motion detection.
The highest sensitivity setting is 00, and the lowest sensitivity setting is 15. The default setting is 02.
7) RE (Reference)
“RE” is to set a reference for detection. The default value is 10, which means the DVR will compare 10 continuous
images at one time according to the sensitivity of LS, SS, TS simultaneously.
The bigger the value is, the higher sensitivity for motion detection. The highest sensitivity is 61.
(2) Detection Timer
Move the cursor to “DETECTION TIMER”, and press ”ENTER”. You will see a similar screen as the following:
DETECTION DETECTION
TIMER
DETECTION SETUP
DATE
START
END
DETECTION TIMER
OFF
00 : 00
- 00 : 00
DAILY
08 : 00
- 18 : 00
SUN
06 : 00
- 23 : 00
MON-FRI 18 : 00
- 23 : 00
OFF
00 : 00
- 00 : 00
OFF
00 : 00
- 00 : 00
OFF
00 : 00
- 00 : 00
Set the date, start time and end time for the detection function. The setting method is similar to “TIMER”.
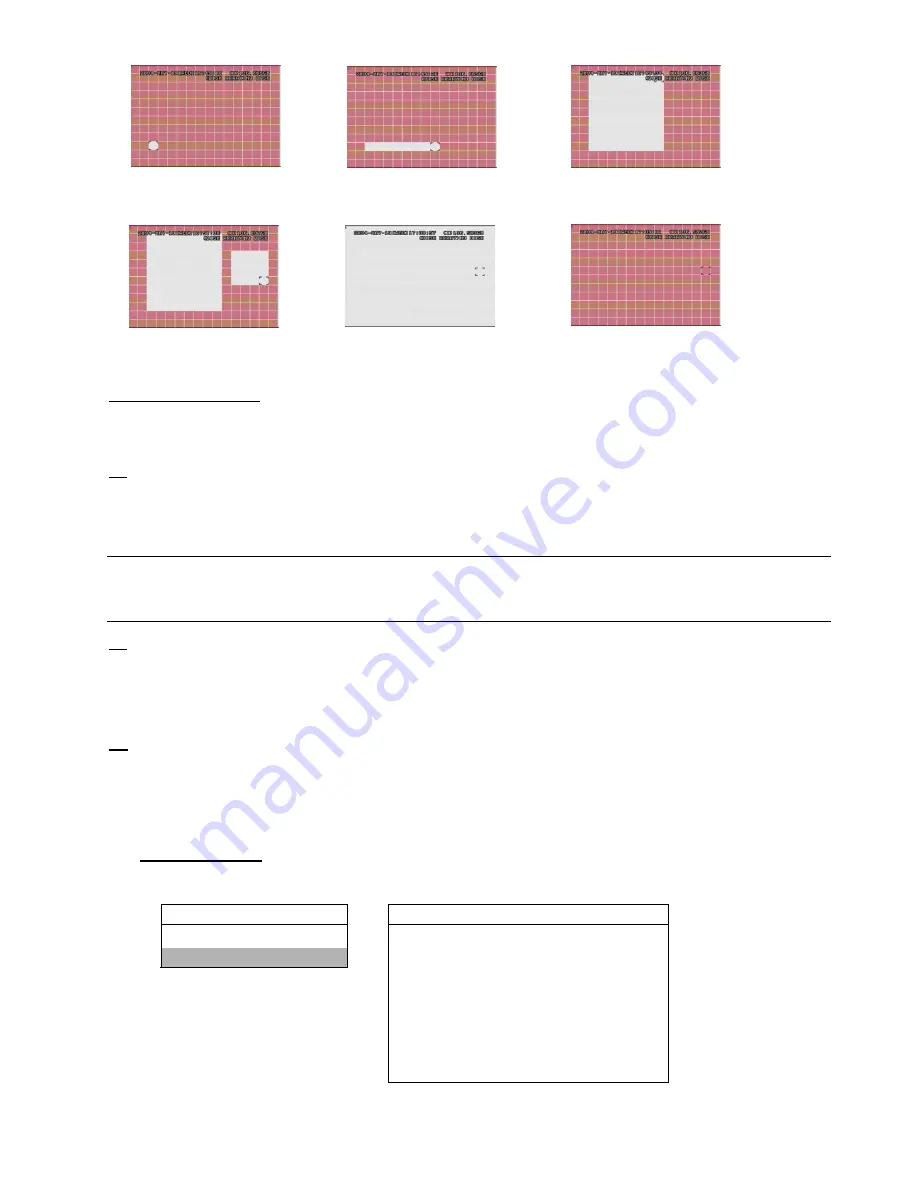
Press “ENTER” to
confirm the start area.
Press “LEFT” or “RIGHT” to
choose the width of the area
Press “UP” or “DOWN” to choose
the height of the area, and press
“ENTER” again to confirm.
You can also up set up
multi-detection areas.
Press “
-
” to set the whole
area under detection
Press “
+
” to set the whole
area undetected