


40
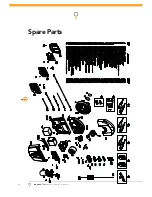
GDO-10V1 Toro
®
Owner Installation Instructions
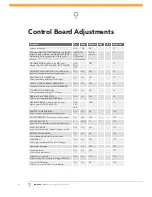
Parameter
Min
Max
Default
Step
Unit
Menu No.
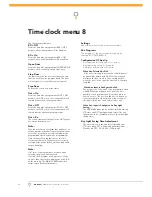
STD AUTO-CLOSE TIME
Sets and enables the standard auto-close time
0.0
60.0
0.0
1.0
Sec
3
P.E AUTO-CLOSE TIME Sets and enables the P.E
triggered auto-close time
0.0
60.0
0.0
1.0
Sec
3
PEDESTRIAN AUTO-CLOSE TIME Sets and
enables the Pedestrian auto-close time
0.0
60.0
0.0
1.0
Sec
3
P.E PEDESTRIAN AUTO-CLOSE TIME Sets and
enables the PE Pedestrian auto-close time
0.0
60.0
0.0
1.0
Sec
3
AUTO-CLOSE AFTER CLOSE OBSTRUCTION
Enables auto-close feature after close
obstructions
Off
On
Off
3
AUTO-CLOSE AFTER OPEN OBSTRUCTION
Enables auto-close feature after open
obstructions
Off
On
Off
3
AUTO-CLOSE AFTER POWER UP
Enables auto-close feature power up
Off
On
Off
3
PE Beams Triggered, Directional Auto-Close
This mode is selected by entering a non-zero time for the “
P.E. Auto-Close
” parameter. Second P.E beam
must be installed and connected to OPN input. Sub menu 5 : OPN I/P 2nd P.E in menu 7 Operating modes
must be selected “ON” and also sub menu 4: OPN I/P N/C operation in menu 7 Operating modes must be
selected “ON”.
This mode is used to auto-close the door only after a vehicle have passed through the doorway to exit the
premises . The 2nd PE (OPN) input must be active when the PE input is activated in order for P.E triggered
auto-close to be activated .
This mode is usefull for fi re brigade ,ambulance stations etc.
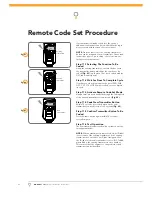
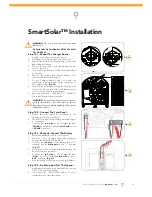
Step 17.1 Installing The Wall Mounted
Transmitter (Optional)
Remove the face plate from the transmitter.
Affi x the base plate at a height of 1.5 meter within
the sight of the door. Make sure that this position
of the transmitter is out of reach of children and
convenient to the customer
(Fig. 63).
Replace the face plate.
To code the transmitter, see on page 21.
a.
b.
c.
d.
63
fi g
Accessories Installation


