26
GDO-10V1 Toro
®
Owner Installation Instructions
Remote Code Set Procedure
PRESS
If a transmitter is already coded into the opener,
additional transmitters can be coded without being in
direct contact with the opener’s control panel.
NOTE:
Only the function of the existing transmitter
button can be assigned to new transmitter. Please read
instructions prior to proceeding - there is a time-out
facility for security reasons.
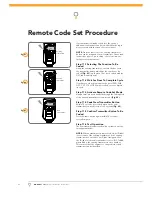
Step 11.1 Selecting The Function To Be
Coded
Using the existing transmitter, operate the door with
the transmitter button which has the function to be
coded
(Fig. 43)
(e.g. Button 1 has been coded with the
OSC function assigned).
Step 11.2 Wait For Door To Complete Cycle
If the button’s function activates the door (PED, SWP,
OSC, CLS, STP or OPN) wait for the door to complete
its cycle.
Step 11.3 Activate Remote Code Set Mode
Using a small pin press and hold through the Coding Hole
of the existing transmitter for two seconds
(Fig. 44).
Step 11.4 Code New Transmitter Button
Within 10 seconds, press the button on the new
transmitter you wish to code for 2 seconds
(Fig. 45)
.
Step 11.5 Confi rm Transmitter Button To Be
Coded
Press the same button again (within 10 seconds)
for confi rmation.
Step 11.6 Test Operation
The new transmitter button should now function as the
existing transmitter.
NOTE:
When a transmitter is remote coded, its ID label
is set to that of the existing transmitter. If the existing
transmitter does not have an ID label assigned, then
the ID label of the new transmitter is set to: R/C Tx ###,
where ### is the existing transmitters store number.
This ensures that the originator of any remote coded
transmitter can be identifi ed.
PRESS
43
fi g
45
fi g
44
fi g
Existing
transmitter
New
transmitter
Existing
transmitter


