background image

Four-Channel Digital Video Recorder 

•  You can change the entire calendar by placing the cursor in the upper left-hand box (above “S” 

and to the left of the time line) and pressing the   button to toggle the entire calendar On and 
Off. 


NOTE:  The Holiday (H) schedule applies to the dates you established as holidays when 
setting Date/Time. 

 
You can save your changes by highlighting 

OK 

and pressing the 

 button.  Selecting 

Cancel

 exits 

the screen without saving the changes. 
 

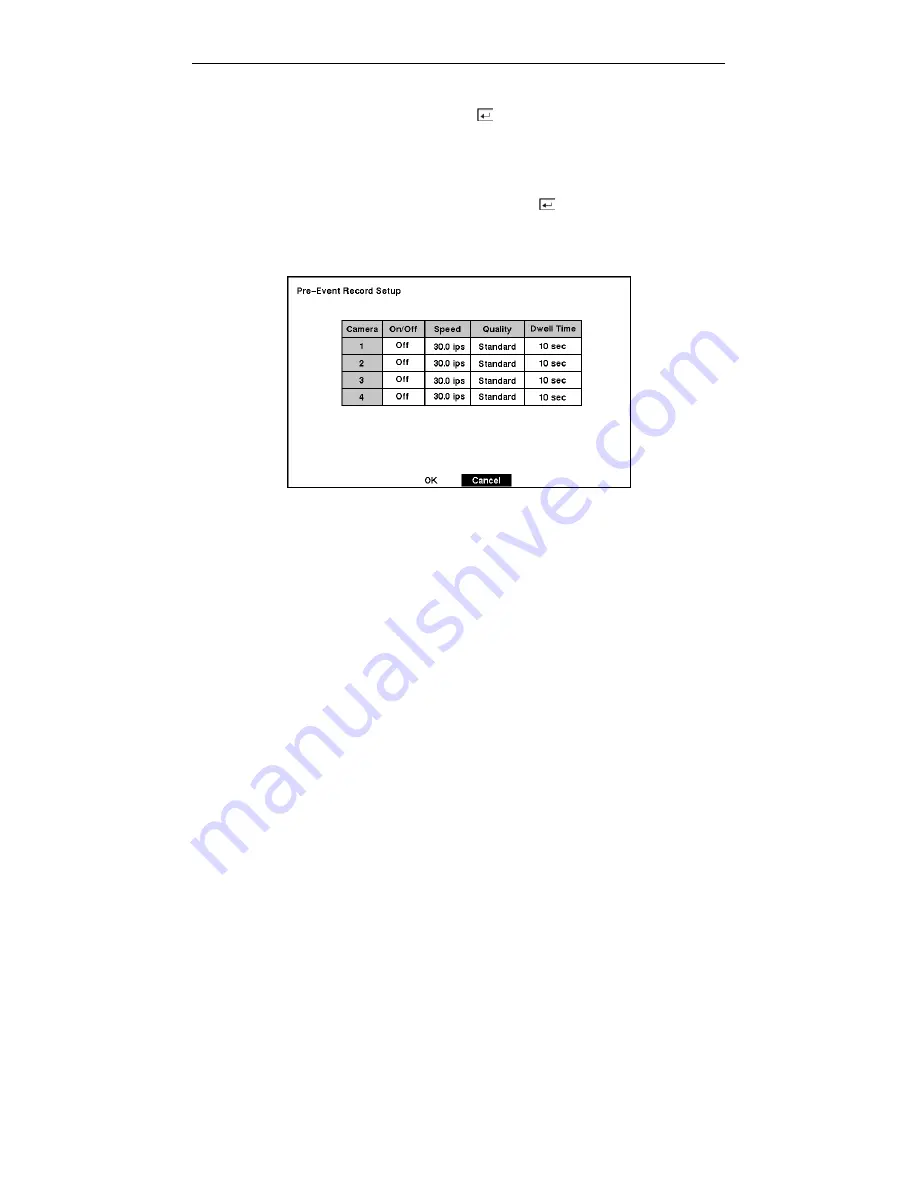
Pre-Event Recording Setup Screen 


Figure 45 — Pre-Event Record Setup screen. 

 
When the DVR is in the Event Record mode, it is possible to have it record images before the event 
occurs.  The 

Pre-Event Record

 screen allows you to define how to handle pre-event recording. 

 
You can turn individual cameras On or Off for pre-event recording.  The image speed can be set 
from 0.5 to 30 ips (25 ips PAL), and image quality can be selectable from 

High

Standard

 and 

Low


NOTE:  The pre-event recording speed is 30 images per second (25 ips for PAL) when the 
resolution is set to 

Standard

.  However, when setting to 

High,

 the recording speed will be 

decreased to 15 images per second (12.5 ips for PAL).


You can set the amount of time to record prior to the event by adjusting the 

Dwell Time

.  You can 

set the 

Dwell Time

 from 1 to 300 seconds. 


NOTE:  When the DVR is in the Time-Lapse mode, it ignores the pre-event settings and follows 
the time-lapse settings. 


35 

Summary of Contents for FA4-120

Page 1: ......

Page 2: ...User s Manual ii...

Page 3: ...NED TO PROVIDE REASONABLE PROTECTION AGAINST HARMFUL INTERFERENCE WHEN THE EQUIPMENT IS OPERATED IN A COMMERCIAL ENVIRONMENT THIS EQUIPMENT GENERATES USES AND CAN RADIATE RADIO FREQUENCY ENERGY AND IF...

Page 4: ...ipment C If the equipment has been exposed to rain or water D If the equipment does not operate normally by following the operating instructions adjust only those controls that are covered by the oper...

Page 5: ...tor 5 Connecting the RGB Monitor 5 Connecting to the Network Port 6 Connecting to the RS 232C Port 6 Factory Reset 6 Connecting Alarms 7 AI 1 to 4 Alarm In 7 GND Ground 7 ARI Alarm Reset In 7 Alarm Ou...

Page 6: ...Event Action Setup 36 Alarm In Event Action Record Setup Screen 36 Alarm In Event Action Alarm Out Setup Screen 37 Alarm In Event Action Notify Setup Screen 37 Motion Detector Event Action Record Set...

Page 7: ...amera Buttons 1 to 4 59 QUAD SEQ Button 59 Shuttle Ring 59 Jog Dial 59 Digital Zoom Playback Mode 60 Searching Video 61 Date Time Search 61 Calendar Search 62 Event Search 62 Appendix A USB Hard Disk...

Page 8: ...ystem Upgrade screen 18 Figure 25 Date Time setup screen 19 Figure 26 Holiday Setup screen 20 Figure 27 System Check screen 21 Figure 28 Storage screen 22 Figure 29 S M A R T Alert setup screen 23 Fig...

Page 9: ...ure 58 OSD Setup screen 44 Figure 59 Main Monitoring Setup screen 45 Figure 60 Network Setup screen 46 Figure 61 LAN Setup screen 47 Figure 62 Modem Setup screen 48 Figure 63 Callback Center Setup scr...

Page 10: ...User s Manual x...

Page 11: ...deo Sources Multiple Search Engines Date Time Calendar Event Records up to 120 NTSC Images per Second 100 PAL Images per Second Loop Through Video Connectors Continuous Recording in Disk Overwrite Mod...

Page 12: ...can freeze frames fast forward fast reverse slow forward and slow reverse without image streaking or tearing Digital video can be indexed by time or events and you can instantly view video after selec...

Page 13: ...s and User s Manual Assembly Screws for Adding Hard Disk Drives Required Installation Tools No special tools are required to install the DVR Refer to the installation manuals for the other items that...

Page 14: ...lations permit recording audio Figure 5 Audio In and Out connectors Your DVR can record audio Connect the audio source to Audio In Connect Audio Out to your amplifier NOTE The audio input is from an a...

Page 15: ...witch to the CVBS SVHS NOTE If your monitor has an SVHS input use it because it will give you better quality video display NOTE The Video Out BNC and the SVHS Out connectors may be connected to indivi...

Page 16: ...nitoring configuration and software upgrades text input and to connect a remote control keyboard Use a modem cable with a DB 9S female connector to connect to the DVR See Chapter 3 Configuration for c...

Page 17: ...certain it is connected To disconnect a wire press and hold the button above the wire and pull out the wire AI 1 to 4 Alarm In You can use external devices to signal the DVR to react to events Mechani...

Page 18: ...o be used to control PTZ pan tilt zoom cameras Connect RX TX and RX TX of the control system to the TX RX and TX RX respectively of the DVR See Chapter 3 Configuration and the PTZ camera or remote con...

Page 19: ...HAZARD MAKE CERTAIN THE POWER CORD WILL NOT BE PINCHED OR ABRADED BY FURNITURE DO NOT INSTALL POWER CORDS UNDER RUGS OR CARPET THE POWER CORD HAS A GROUNDING PIN IF YOUR POWER OUTLET DOES NOT HAVE A G...

Page 20: ...User s Manual 10...

Page 21: ...erations NOTE A separate Alarm button is not provided Pressing any keys on the front panel resets alarm output including the internal buzzer when the alarm is activated However when you are in the men...

Page 22: ...s to the live monitoring mode When the PTZ device is not installed pressing the PTZ button enters the digital zoom mode directly Pressing the PTZ button in the playback mode enters the digital zoom pl...

Page 23: ...ton plays video backward at high speed Pressing the button again toggles the playback speed from and The screen displays and respectively Pressing the Right Arrow button plays video forward at high sp...

Page 24: ...dio remote control record mode network and password Your DVR can be set up using various screens and dialog boxes Press the MENU button to enter the setup screens The Admin Password screen appears Fig...

Page 25: ...n or Off NOTE It is the user s responsibility to determine if local laws and regulations permit recording audio Highlight the box beside Sequence Dwell Time and select from 3 to 60 seconds for the cam...

Page 26: ...u access to all the DVR s setup screens System Information Highlight System Information and press the button The System Information screen appears Figure 21 System Information screen In the System Inf...

Page 27: ...an use up to 20 characters including spaces in your title Once you have entered your title highlight Close and press the button Highlight the box beside Unit ID and adjust the number The Unit ID numbe...

Page 28: ...or FAT32 format format the device using FAT16 or FAT32 format Figure 24 System Upgrade screen Select Start and enter the Admin password to start the upgrade The system restarts automatically after com...

Page 29: ...you can use the arrow buttons or Jog Dial Once you have the correct time press the button NOTE The clock will not start running until you have restarted the unit so you may wish to set the time last...

Page 30: ...ss the button The choices are MM DD YYYY DD MM YYYY YYYY MM DD MM DD YYYY DD MM YYYY YYYY MM DD To change the time format highlight the box beside Time Format and press the button The DVR toggles betw...

Page 31: ...box under the Interval heading and press the button A slide bar appears allowing you to set the check interval from 1 Hour to 30 Days The Status field displays the fault conditions When it is Good the...

Page 32: ...he S M A R T Monitoring Information screen displays replacing the hard disk drive is recommended usually within 24 hours NOTE The S M A R T Monitoring Information screen appears only in the monitoring...

Page 33: ...Weekly or Monthly for the checking period NOTE When selecting Weekly and Monthly the Day of Week and Day of Month field will be activated under the Period field Select the check day or check date High...

Page 34: ...s were cleared The events are listed from the most recent to the oldest You can scroll through the list a page at a time by selecting the Up and Down arrow buttons and pressing the button You can go d...

Page 35: ...amera setup screen appears Figure 32 Camera setup screen You can turn on or off each camera and also hide the video of the camera number by highlighting the camera Setup heading and pressing the butto...

Page 36: ...h camera by highlighting the ID heading and pressing the button Change the number by highlighting it and using the arrow buttons to increase and decrease the number The PTZ ID number can be set from 0...

Page 37: ...settings with 1 being the least sensitive and 5 being the most sensitive You can define the area of the image where you want to detect motion e g a doorway Highlight the icon under the Zone heading a...

Page 38: ...NOTE If networking is configured by the external modem the text in cannot be set up Set the DVR for LAN connections and set up text in for RS 232C port You can set the DVR to display the text in info...

Page 39: ...hen any string among preset character strings in the Delimiter field is reported repeatedly as many times as preset number in the Line Count field it will be considered one complete transaction At thi...

Page 40: ...n by highlighting the empty box in the upper left corner of the screen Press the button from No Arming no block to On blue block to Event yellow block When set to On the Alarm Out is active during the...

Page 41: ...e Administration System Watch application program is connected RS232 RS485 Setup Screen The RS232 RS485 setup screen allows you to set up the RS 232C and RS 485 ports to communicate with external devi...

Page 42: ...de Resolution and press the button This toggles between Standard and High NOTE The maximum recording speed is 30 images per second 25 ips for PAL when the resolution is set to Standard However when se...

Page 43: ...h the recording speed will be decreased to 15 images per second 12 5 ips for PAL NOTE When the DVR is recording video a red dot appears on the screen When the DVR is in the Panic Recording mode a whit...

Page 44: ...rd disk drive NOTE The maximum storage time is only an estimate because the amount of space required to store video varies depending on many factors such as motion and image complexity Time Lapse Reco...

Page 45: ...ave it record images before the event occurs The Pre Event Record screen allows you to define how to handle pre event recording You can turn individual cameras On or Off for pre event recording The im...

Page 46: ...video quality and dwell time Figure 46 Alarm In Event Action Record setup screen Highlight the Sched box and press the button A schedule screen appears Set the schedule as described earlier Highlight...

Page 47: ...press the button A schedule screen appears Set the schedule as described earlier Highlight the Alarm Out box and select either Beep or the alarm output terminal that you want to associate with the sen...

Page 48: ...gure 49 Motion Detector Event Action Record setup screen Highlight the Sched box and press the button A schedule screen appears Set the schedule as described earlier Highlight the Camera box and press...

Page 49: ...press the button A schedule screen appears Set the schedule as described earlier Highlight the Alarm Out box and either Beep or the alarm output terminal that you want to associate with the motion ev...

Page 50: ...text in device can be installed Figure 52 Text In Event Action Record setup screen Highlight the Sched box and press the button A schedule screen appears Set the schedule as described earlier Highlig...

Page 51: ...press the button A schedule screen appears Set the schedule as described earlier Highlight the Alarm Out box and either Beep or the alarm output terminal that you want to associate with the text in de...

Page 52: ...d dwell time Figure 55 Video Loss Event Action Record setup screen Highlight the Sched box and press the button A schedule screen appears Set the schedule as described earlier Highlight the Camera box...

Page 53: ...t setup screen Highlight the Sched box and press the button A schedule screen appears Set the schedule as described earlier Highlight the Alarm Out box and either Beep or the alarm output terminal tha...

Page 54: ...Status on screen Each feature can be turned on or off and you can adjust the margins Figure 58 OSD Setup screen Highlight the box beside Date and press the button to toggle the date display On and Off...

Page 55: ...press the button You can adjust the sequence dwell time from 3 to 60 seconds NOTE The DVR does not sequence the camera having video loss Highlight the box beside Event Monitoring and press the button...

Page 56: ...the new password before it is accepted NOTE These passwords are for network use They are different from the Admin and User passwords for the DVR itself NOTE The passwords are case sensitive The factor...

Page 57: ...NOTE You will need to get the appropriate IP Address Gateway and Subnet Mask from your network administrator Change the numbers by highlighting them and use the arrow buttons or Jog Dial to increase...

Page 58: ...the box beside Data Bit and press the button This toggles between 7 bit and 8 bit formats Highlight the box beside Stop Bit and press the button This toggles between 1 and 2 Stop Bits Highlight the b...

Page 59: ...light the box beside Retry and enter the number of times you would like the DVR to try contacting the computer You can select from 1 to 10 retries Callback Center Setup by Modem connections Highlight...

Page 60: ...k fast forward playback and fast backward playback modes from live monitoring mode and enter the search menu screen in live monitoring mode Highlight Password in the Main menu and press to enter the P...

Page 61: ...The Key Lock password is 4321 The Administrator password also can be used to unlock the keys You can save your changes by highlighting OK and pressing button Selecting Cancel exits the screen without...

Page 62: ...lder name followed by a For example folder filename Once you have given the video a file name highlight the Start button and press the button The DVR will display the drive capacity the backup file si...

Page 63: ...E hard disk drive has been corrupted this error message cannot be dismissed Even after restarting the DVR it may automatically restart while preparing a backup You must recover the file system using t...

Page 64: ...User s Manual 54...

Page 65: ...begin showing live video on the attached monitor and playing live audio through the attached speaker The default mode is to display 4 cameras at once Pressing any camera button will cause that camera...

Page 66: ...e PTZ mode displays the PTZ Menu screen Figure 67 PTZ Menu Set Preset Sets the Presets for PTZ camera Quit Closes the menu Set Preset Once you have the camera at the desired settings you can save came...

Page 67: ...nue recording until the hard disk drive is full The factory default is Stop when the hard disk drive is full The DVR can be set to continue recording Overwrite once the hard disk drive is full It does...

Page 68: ...R will display the text in data if there is any text input The text in information will display on the image NOTE The text in displays only in full screen Figure 70 Playback Text In screen Arrow Butto...

Page 69: ...p from a remote site during Playback mode Shuttle Ring The Shuttle Ring functions in the Playback mode The Shuttle Ring is spring loaded and returns to the center position when released Turning the ri...

Page 70: ...pauses and a bright small box is laid over the image This box indicates the spot to be enlarged Move the position of the box using the arrow buttons and press the button to enlarge that spot The enlar...

Page 71: ...74 Date Time Search screen Move the cursor over the date and press the button Adjust the numbers using arrow buttons or Jog Dial Once you have set the date you want to search for video press the butto...

Page 72: ...ighlight the time bar and select the time using the arrow buttons NOTE The time bar is in one hour segments If a segment is highlighted it means that some video was recorded during that hour However i...

Page 73: ...t playing the event video segment Pressing the ENTER PAUSE button pauses the video and pressing the button again returns to live monitoring You can also narrow your event search by selecting the Query...

Page 74: ...event option search text in events that have the identical value to any specific transaction number entered in the Transaction field Otherwise search all text in events when the Transaction field is e...

Page 75: ...lected for the file system NOTE The partition size should be less than 32GB because of Windows OS limitations After formatting is complete the USB IDE hard disk drive will be added to My Computer 7 Co...

Page 76: ...SC to exit the screen after the USB IDE hard disk drive partition is created 11 Restart your computer and verify the newly created drive is in My Computer 12 Right click the newly created hard disk dr...

Page 77: ...cted to a properly terminated device DVR has stopped recording If hard disk drive is full you will either need to delete video or set the DVR to the Overwrite Mode DVR displays an error message statin...

Page 78: ...n Outs I O Connector Pin Outs Input Output AI 1 to 4 Alarm Inputs 1 to 4 GND Chassis Ground ARI Alarm Reset In NC Normally Closed C Common NO Normally Open RS485 Connector Pin Outs Master Unit Slave U...

Page 79: ...Four Channel Digital Video Recorder Appendix D Map of Screens 69...

Page 80: ...d Alarm Output 2 relay out terminal block NC NO 0 5A 125VAC 1A 30VDC Alarm Reset Input 1 TTL terminal block Internal Buzzer 80db at 10cm Network Connectivity 10 100 Base Ethernet RS 232C for external...

Page 81: ...ERAL Dimensions W x H x D 16 9 x 3 5 x 14 430mm x 88mm x 355mm Unit Weight 17 64 lbs 8 0kg Shipping Weight 22 44 lbs 10 2kg Shipping Dimensions W x H x D 21 3 x 10 2 x 19 7 540mm x 260mm x 500mm Opera...

Reviews: