


MAN - BBR3 - REV: Original | E. Operation
33
NOTE: This only needs done every six months. To skip this step, press the FINISH button without
pressing any of the radio buttons.
a. For this process you will need a strip of white paper 12.7 mm x aprox. 25 mm long, and a strip of carbon paper
of the same or similar dimensions.
b. Place the white paper strip on the non-compliant beam and secure with tape.
c. Remove the load frame from the liquid bath and set it in an upright position on a flat surface.
WARNING: Do not lay the load frame flat with the load nose attached. This will damage the load cell.
d. Place the non-compliant beam on the sample supports, with the white paper facing up.
e. Place a small section of carbon paper over the white paper with the dark side facing the white paper.
f. With the air pressure applied to the air bearing, gently press the shaft downward causing the load nose to make
an imprint through the carbon paper onto the white paper.
g. Remove the carbon paper and measure the distance from the center of the carbon imprint to each sample
support using vernier calipers.
h. If the difference between the two measurements is 1.0mm or less, press the “Verification” button followed by
the “Finish” button.
i. If the difference between the two measurements is more than 1.0mm, press “Standardization Required” and
contact the Applied Test Systems Service Department at +1-724-283-1212.
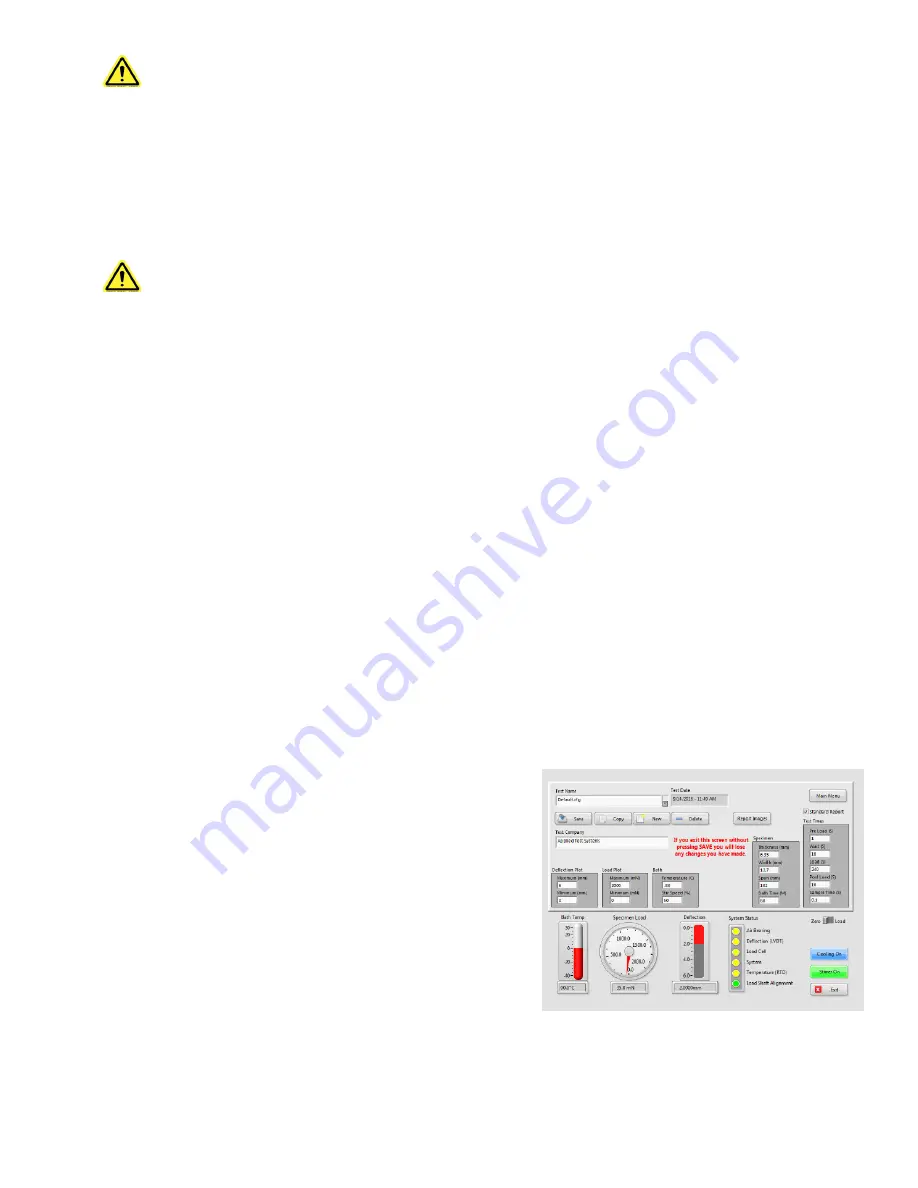
E.7 Test Setup
Test setup is used to define a BBR3 test specification as well as the type of report it will generate. When you press
the SETUP button the screen shown in Figure E.10 will display.
Test Name
The name of the currently selected test specification. The
only limit to the number of tests that can be stored is the size
of the disk drive in the BBR3. Since a test specification takes
about 1K of storage space, it would be nearly impossible to
run out of space on the drive. You can use the “Test Name”
combo to select different test specifications already saved.
Just press the down arrow button to get a list.
Test Date
Shows the last time that the currently selected test was
saved.
Figure E.10 - Test Setup Main Screen


