


CL3800 User Manual
12
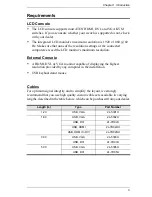
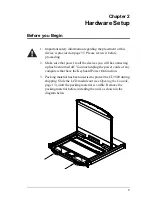
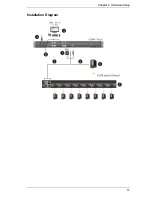
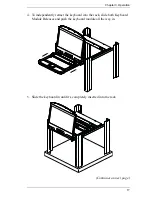
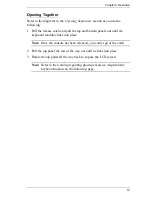
Connecting Up
Refer to the example installation diagram as you perform the following steps:
1. Plug the USB; then HDMI, DVI-D, or VGA and audio connectors of a
KVM cable (either supplied with the unit, or purchased separately, see
Cables
, page 3) into the KVM ports located in the CPU section on the rear
of the CL3800.
Note:
The CL3800 supports speakers only. It does not support a
microphone. Connect the KVM cable’s speaker jack (green) to the
CL3800’s audio port.
2. Plug the keyboard, monitor, mouse and audio connectors of the KVM
cable into their respective ports in the Console Section of a KVM switch
or computer.
3. If you are installing an external console, plug your keyboard, monitor,
mouse and speakers into their respective ports in the Console Section of
the CL3800.
Note:
The CL3800 supports an HDMI, DVI-D, or VGA external console
monitor, but only one video signal (HDMI, VGA, or DVI-D) can be
displayed at a time. The DVI monitor will display a DVI-D signal
only.
4. Plug the CL3800’s power cord into the CL3800's power socket and into a
power source.
5. Power up your KVM installation.
6. Turn on the power to LCD Console.
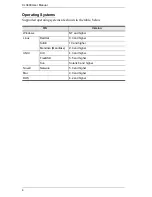
Summary of Contents for CL3800
Page 1: ...Dual Rail USB HDMI DVI VGA LCD Console CL3800 User Manual www aten com ...
Page 10: ...CL3800 User Manual x This Page Intentionally Left Blank ...
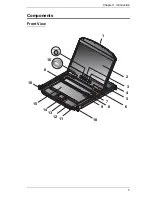
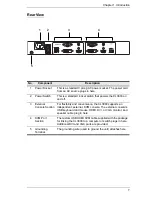
Page 15: ...Chapter 1 Introduction 5 Components Front View 1 2 3 4 5 8 9 6 7 13 14 10 11 16 15 12 8 10 ...
Page 18: ...CL3800 User Manual 8 This Page Intentionally Left Blank ...
Page 23: ...Chapter 2 Hardware Setup 13 Installation Diagram ...
Page 24: ...CL3800 User Manual 14 This Page Intentionally Left Blank ...
Page 36: ...CL3800 User Manual 26 This Page Intentionally Left Blank ...
Page 44: ...CL3800 User Manual 34 This Page Intentionally Left Blank ...


