


2-16
Chapter 2: Hardware information
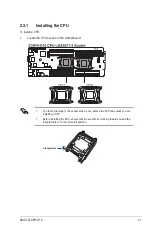
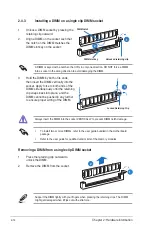
2.5.3
Installing an expansion card
Before installing an expansion card, read the documentation that came with it and ensure to
make the necessary hardware settings.
To install an expansion card:
1.
Remove the system cover if your motherboard is already installed in a chassis.
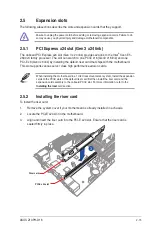
2.
Prepare the riser card and the expansion card.
3.
Align and insert the golden finger connectors of the expansion card to the PCI-E slot on
the riser card ensuring that the notch on the expansion card matches the notch on the
riser card.
The default riser card provides two PCI-E slots . One PCI-E x8 slot and one PCI-E x16 slot.
You can install an expansion card on either of the PCIE slot or both.
Riser card
Expansion card
notch on expansion card
notch on riser card
PCI-E x8 slot
PCI-E x16 slot
Summary of Contents for Z10PH-D16
Page 1: ...Z10PH D16 Server Motherboard User Guide ...
Page 14: ...xiv ...
Page 22: ...2 4 Chapter 2 Hardware information 2 2 3 Z10PH D16 Motherboard layout ...
Page 58: ...2 40 Chapter 2 Hardware information ...
Page 62: ...3 4 Chapter 3 Powering up ...
Page 152: ...5 38 Chapter 5 RAID configuration ...
Page 180: ...A 2 Appendix A Reference information A 1 Z10PH D16 block diagram ...