Mini Desktop PC User Guide
38
Mini Desktop PC User Guide
38
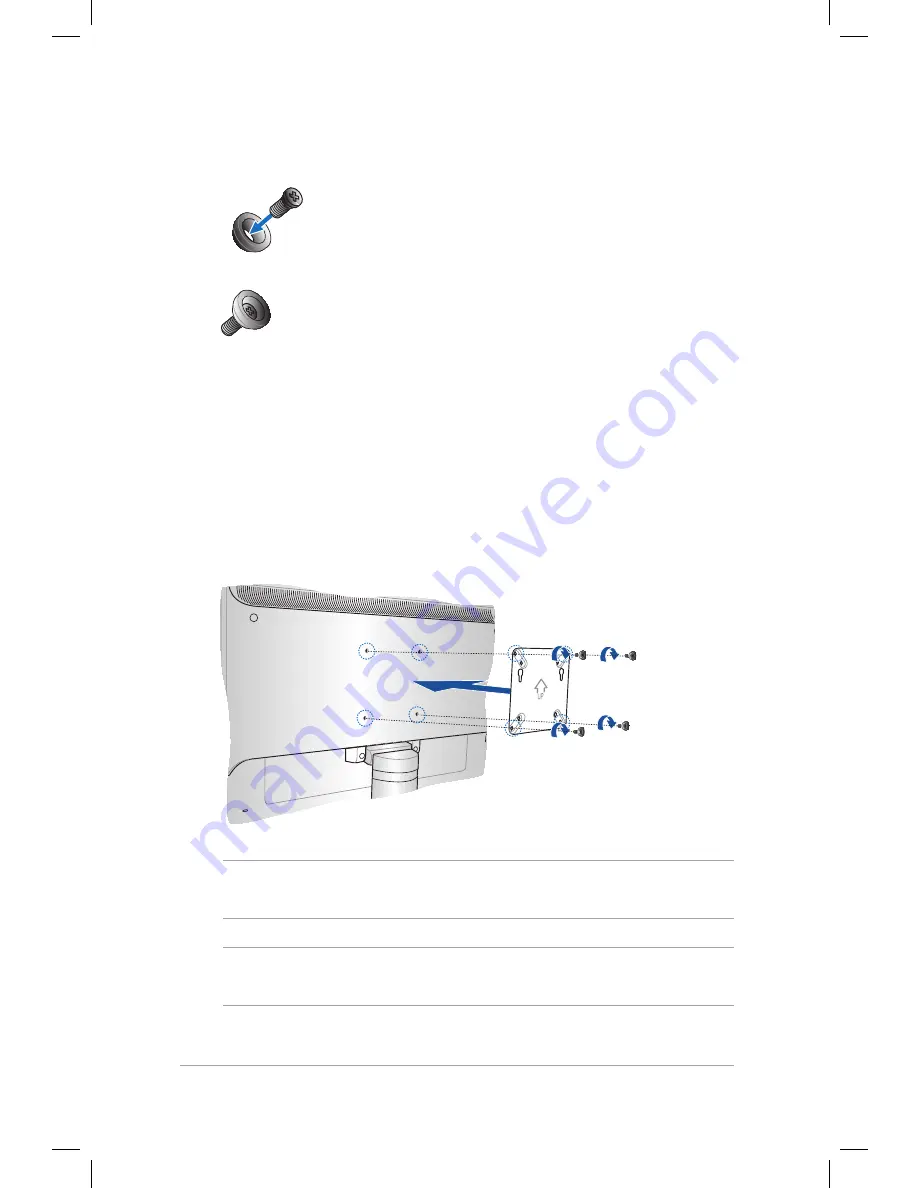
3. Match and insert the four (4) 8mm screws into the four (4)
rubber washers.
4. Remove the screw hole covers at the back of your VESA mount-
compatible device, if any.
5. With the arrow on the VESA mounting plate pointing upward,
align its screw holes to the screw holes of the VESA mount-
compatible device.
6. Secure the VESA mounting plate to the VESA mount-compatible
device using the screws with the rubber washers.
NOTE:
Your Mini Desktop PC can be mounted on an ASUS VS228H
monitor.
WARNING!
Do not overtighten the screws as it may cause damage to
your VESA mount-compatible device.
Summary of Contents for E510 Series
Page 1: ...Mini Desktop PC User Guide E510 Series E10189 First Edition February 2015 ...
Page 13: ...1 Mini Desktop PC parts and features Chapter 1 Mini Desktop PC parts and features ...
Page 26: ...Mini Desktop PC User Guide 26 Mini Desktop PC User Guide 26 ...
Page 27: ...2 Hardware setup Chapter 2 Hardware setup ...
Page 40: ...Mini Desktop PC User Guide 40 Mini Desktop PC User Guide 40 ...
Page 41: ...3 Using your Mini Desktop PC Chapter 3 Using your Mini Desktop PC ...
Page 47: ...4 Supported operating systems Chapter 4 Supported operating systems ...
Page 86: ...Mini Desktop PC User Guide 86 Mini Desktop PC User Guide 86 ...
Page 87: ...5 ASUS Business Manager Chapter 5 ASUS Business Manager ...
Page 104: ...Mini Desktop PC User Guide 104 Mini Desktop PC User Guide 104 ...
Page 105: ...6 BIOS Setup Chapter 6 BIOS Setup ...
Page 117: ...Troubleshooting Troubleshooting ...
Page 129: ...Appendix Appendix ...


