Page 3 of 8 ©
Lyndhurst Touchdown Services Limited updated February 2007
Right
Left
Notch
Hub
Pusher Installation
Method 1 (tractor installation)
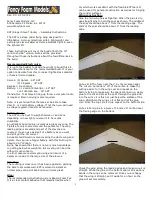
1. Hold the blade in one hand and turn the blade until the alignment bush is closest to you.
2. Turn the blade alignment bush until the gap between it and the blade collar is the smallest.
3. Place the blade in hub sliding the alignment key into the swash plate then rotating the blade
Method 2 ( tractor installation use this only to check above positioning )
The Nylon blocks have a notch taken out of one corner. Place the blades in the swash plate with the
blocks orientated as shown in the drawings
colour pictures at
http://www.avnet.co.uk/lts/pages/Pv50pics.htm
IF IN DOUBT ASK!
Plan of Alignment Bush positioning continued
It will be necessary to turn the counterweights to fit the blades in the hub.
With all three blades placed in the hub carefully and slowly drive the swash plate back into its delivered
position. Rotate the counterweights so the other half of the hub can be installed. ( A
SMALL
amount of
jointing compound example: Hylomar should be used between the two hub halves, this will help reduce
grease loss from the hub and help prevent water entering). Place the other hub half on the swash plate
shaft and gently press the two hub halves together. This does not require much force but it may help to
wiggle the blades until the bearings are aligned. Ensure index marks on hub are aligned.
Fit the short M8 hub bolts and nuts and progressively tighten whilst pulling blades outwards and pushing
counterweights inwards (torque 1.5 m.kg / 11 lbs.ft). If the hub does not tighten easily something is wrong.
Stop disassemble and reassemble.
A small amount of lateral play in the blades is normal.
Smallest
Right
Left
Notch
Hub
Tractor Installation
Summary of Contents for PV-50
Page 1: ......
Page 2: ......
Page 3: ......
Page 4: ......
Page 5: ......
Page 6: ......
Page 7: ......
Page 8: ......
Page 9: ......
Page 10: ......
Page 11: ......
Page 12: ......
Page 13: ......
Page 14: ......
Page 15: ......
Page 16: ......
Page 17: ......
Page 18: ......
Page 19: ......
Page 20: ......
Page 21: ......
Page 22: ......
Page 23: ......
Page 24: ......
Page 25: ......
Page 26: ......
Page 27: ......
Page 28: ......
Page 29: ......
Page 30: ......
Page 31: ......
Page 32: ......
Page 33: ......
Page 34: ......
Page 35: ......
Page 36: ......
Page 37: ......
Page 38: ......
Page 39: ......
Page 40: ......
Page 41: ......
Page 42: ......
Page 43: ......
Page 44: ......
Page 45: ......
Page 46: ......
Page 47: ......
Page 48: ......
Page 49: ......
Page 50: ......
Page 51: ......
Page 52: ......


