E-23
E-22
English
Continual improvement policy
Arcam has a policy of continual
improvement for its products. This
means that designs and specifications
are subject to change without notice.
specifications
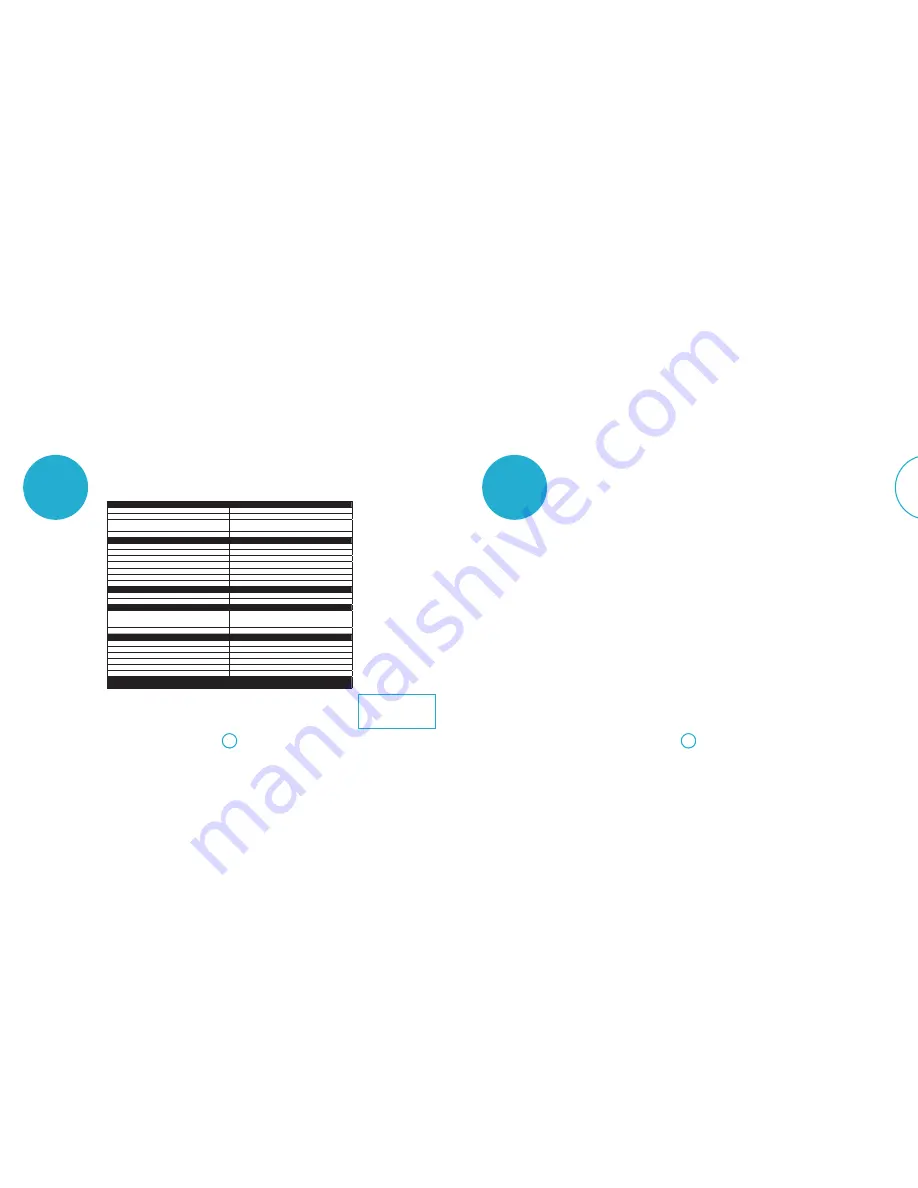
General
Weight (Packed)
10kg
Dimensions (H x W x D)
130mm x 1100mm x 110mm
Power consumption
Operating mode: 150W (max)
Standby mode: <0.5W
Power requirements
100 – 240V, 50/60Hz
Inputs/Outputs
HDMI In
Type A receptacle x 4
HDMI Out
Type A receptacle, with ARC/CEC support
Digital In (Optical)
S/PDIF Optical receptacle
Digital In (Coaxial)
RCA jack
Auxiliary In
3.5mm stereo jack
Bluetooth Audio
Ver. 3.0, Compliant with A2DP standard
Subwoofer Out
RCA LFE jack
Wireless Subwoofer Output
Frequency
2.4GHz
Transmission range
Approx. 20m (without interference)
Amplifier
Rated power output:
Woofer (0.5% THD)
Tweeter (0.5% THD)
40W per channel
10W per channel
Nominal Amplifier Output Level (20Hz-20kHz)
100 W
Speakers
Woofer 1
2 x 4in Cone
Woofer 2
2 x 4in Cone
Tweeter
2 x 1in Cone
Woofer frequency response
170Hz – 20kHz ± 3dB
Tweeter frequency response
3.8kHz – 14kHz ± 3dB
Rated impedance
6Ω
E&OE
NOTE: All specification values are typical unless otherwise stated.
troubleshooting
Here are some simple checks you can do if
you are experiencing problems with your
Solo bar.
Power
<
Check that the power cord is plugged in
and connected properly.
<
Make sure the power and mains
switches are turned on.
Remote control
<
Check the batteries are inserted
correctly.
<
Batteries may need replacing.
<
Are you too far away from the unit or is
there an obstruction?
Sound
<
Make sure the cables are connected
properly.
<
Check that the right input source is
selected.
<
If the sound is noisy or distorted during
playback from a
Bluetooth
device, try
turning the volume down on the device
and up on the Solo bar.
Picture
<
If there is no picture or it is displaying
badly, check the HDMI cables are
connected properly.
<
Check that the right input source is
selected.
Bluetooth
<
Check your
Bluetooth
device is paired
correctly.
<
Is your
Bluetooth
device too far away
from the unit?
FCC Notice
This product contains FCC ID: VNH-IK-
CSRBC05/QEC-GWNO
This equiment has been tested and found to
comply with the limits for a Class B digital
device, pursuant to Part 15 of the FCC
Rules. These limits are designed to provide
reasonable protection against harmful
inteference in a residential installation.
This equipment generates, uses and can
radiate radio energy and, if not installed and
used in accordance with the instructions,
may cause harmful interference to radio
communications. However, there is no
guarantee that interference will not occur in
a praticular installation. If this equipment
does cause harmful interference to radio
or television reception, which can be
determined by turning the equipment off
and on, the user is encouraged to correct the
interference by one or more of the following
measures:
<
Reorient or relocate the receiveng
antenna.
<
Increase the separation between the
equipment and the receiver.
<
Connect the equipment to an outlet on
a circuit different from that to which
the reciver is connected.
<
Consult the dealer or an experienced
radio/TV technician for help.
This device complies with part 15 of the
FCC Rules. Operation is subject to the
following two conditions:
(a) This device may not cause harmful
interference, and
(b) This device must accept any interference
recieved, including interference that may
cause undesired operation.
(FCC Part 15.21) Caution: changes or
modifications not expressly approved by
the party responsible for compliance could
void the user’s authority to operate the
equipment.
Canada ICES-003 statement
This product contains IC
10581A-IKCSRBC05/10581A-GWK5NO
This product complies with RSS-210 of
industry Canada.
Operation is subject to the following two
conditions:
(1) this product may not cause harmful
interence, and (2) this product must
accpet any inteference received, including
interference that may cause undesired
operation.
This Class B digital apparatus complies with
Canadia ICES-003.