background image

E-25

E-24

English

fixing 

instructions

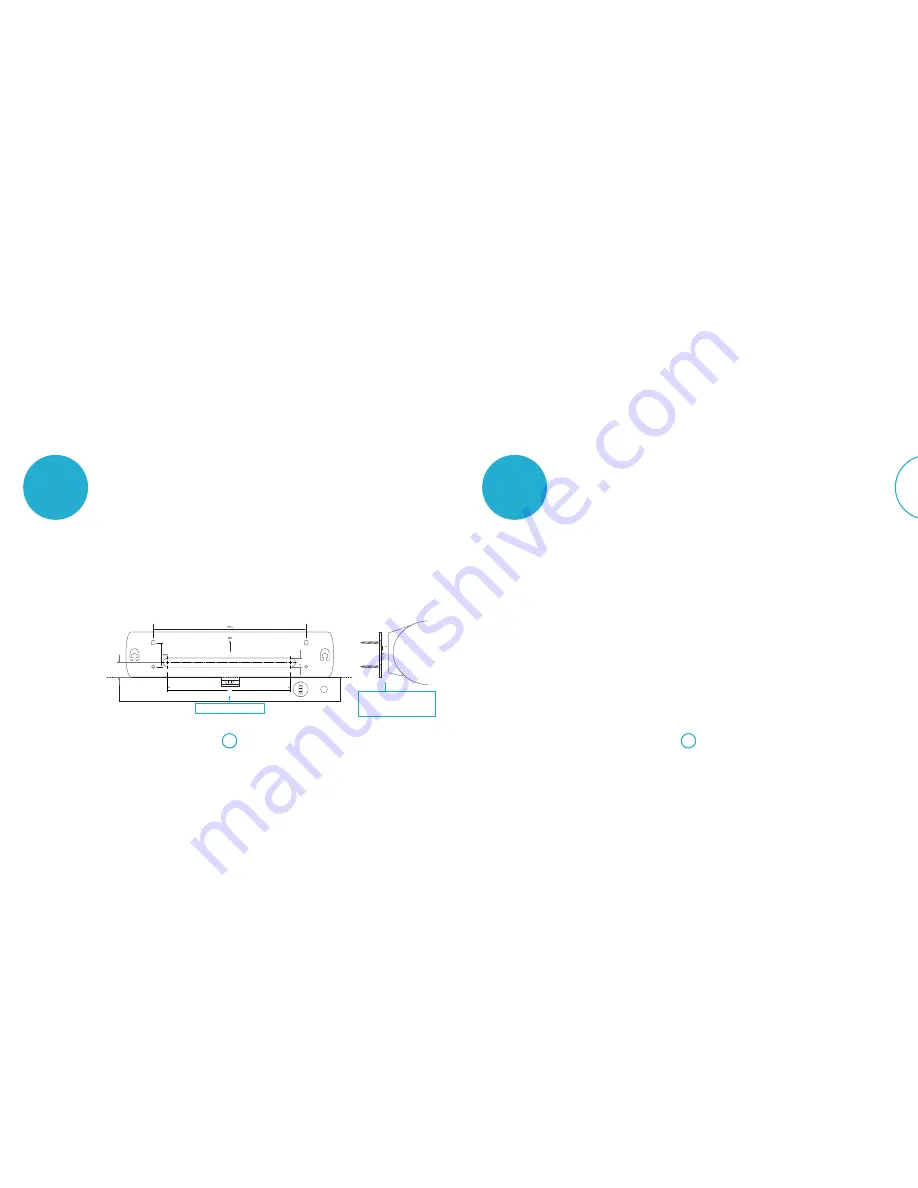
Use the custom-designed wall mount accessory to 

attach the Solo bar safely and securely to a wall.

You will need


<

Power drill


<

Drill bit, wall plugs and fixings suitable 

for the type of wall you are fixing to.


<

Screw driver


<

Spirit level


<

Pencil


<

Tape measure

200.0

24.0

15.0

Fixing procedure

1.  Make sure the wall bracket is horizontal 

by placing a spirit level underneath it.

2.  Mark the holes with a pencil, taking 

care to trace the outlines accurately.

3.  Carefully drill four holes, using a drill 

bit and plugs suitable for the type of 

wall you are fixing to.

4.  Attach the wall mount to the wall using 

four robust screws (the screw should 

have a minimum diameter of 5.5mm), 

making sure they fit the wall plugs 

correctly and are done up tight and 

evenly.

5.  Finally, attach the Solo bar to the wall 

mount by carefully guiding it onto the 

two protruding supports. It should sit 

firmly and securely against the wall.

Make sure the screws are tight and flush 

before guiding the Solo bar down onto the 

two protruding supports. It should sit 

securely against the wall. 

Caution: Do not mount the unit on 

plywood or any soft surface walls. If you 

are uncertain of the wall quality, consult 

a professional for advice.

Make sure the wall mount is horizontal.

product 

guarantee

Copyright

June 2014, © 2014 A&R Cambridge Ltd.

A & R Cambridge Limited (Arcam) 

reserves the right to make changes to the 

specifications of the products detailed in 

this document at any time without notice 

or obligation to notify any person of such 

changes.

All third-party trademarks are 

acknowledged and observed. Mention of 

third-party products does not constitute an 

endorsement or a recommendation.

Arcam takes every precaution to ensure that 

all information contained in this publication 

is factually correct but accepts no liability 

for any error or omission. 

Worldwide guarantee

Arcam warrants that the products 

described in this guide shall conform to 

their published specification in all material 

respects for a period of two years from the 

date of purchase. This entitles you to have 

the unit repaired free of charge, provided 

that it was purchased from an authorised 

Arcam dealer. 

The Arcam dealer is responsible for all 

after-sales service. The manufacturer can 

take no responsibility for defects arising 

from accident, misuse, abuse, wear and tear, 

neglect or through unauthorised adjustment 

and/or repair, neither can they accept 

responsibility for damage or loss occurring 

during transit to or from the person 

claiming under the guarantee.

The warranty covers:

Parts and labour costs for two years from 

the purchase date. After two years you must 

pay for both parts and labour costs. 

The 

warranty does not cover transportation 

costs at any time.

Claims under guarantee

This equipment should be packed in the 

original packaging and returned to the 

dealer 

from whom it was purchased

It should be sent carriage prepaid by a 

reputable carrier – 

not by post

No responsibility can be accepted for 

the unit whilst in transit to the dealer or 

distributor and customers are therefore 

advised to insure the unit against loss or 

damage whilst in transit.

On-line registration

You can register your product on-line at 

www.arcam.co.uk

.

Problems?

If your Arcam dealer is unable to answer 

any query regarding this or any other Arcam 

product please contact Arcam Customer 

Support at the address below and we will do 

our best to help you.

Arcam Customer Support Department, 

Unit 15, Pembroke Avenue, 

Waterbeach, CAMBRIDGE, 

CB25 9QP, England or via 

www.arcam.co.uk

.

200.0

24.0

15.0

Summary of Contents for Solo bar

Page 1: ...Handbook Sound bar English ...

Page 2: ...ns and display E 5 Connections E 6 quick start E 7 What s in the box E 7 Placing the unit E 7 Connecting devices E 7 Connecting a TV E 7 Connecting digital devices via HDMI E 8 Connecting analogue devices E 9 Connecting audio devices via digital input E 9 Connecting a subwoofer E 9 Plug in and turn on E 10 Connecting a Solo sub E 10 Connecting Bluetooth devices E 11 Using headphones E 11 remote co...

Page 3: ...ries specified by the manufacturer 12 Use only with the cart stand tripod bracket or table specified by the manufacturer or sold with the apparatus When a cart is used use caution when moving the cart apparatus combination to avoid injury from tip over 13 Unplug this apparatus during lightning storms or when unused for long periods of time WARNING To reduce the risk of fire or electric shock do no...

Page 4: ...et User manual Registration card Connecting a TV Connect your TV to HDMI OUT using an HDMI cable If your TV supports ARC the audio can be played through the Solo bar for better sound performance see page 20 for setup information If your TV does not support ARC connect an audio cable to OPTICAL or COAX input on the Solo bar Audio cable if not ARC Connections USB Used for service and firmware update...

Page 5: ...n Arcam Solo sub please see the next page Subwoofer Connecting audio devices via digital input Audio devices can also be connected to the Solo bar using the Coaxial and Optical inputs Many digital devices including set top boxes Blu ray players DVD players games consoles and camcorders can be connected using an HDMI connection Note that when using this method of connection the image will be displa...

Page 6: ...ion is activated Now follow the advice supplied with your Bluetooth headphones to put them in pairing mode Make sure that Device Search is still displayed and press The Solo bar will search for available devices for one minute If no devices are found press again to start another search You might want to make sure there are no obstacles in the way When the search is finished available devices will ...

Page 7: ...en on and off Press to enter the set up menu see pages 18 20 Press again to exit the menu Navigate upwards through menu settings Navigate downwards through menu settings Navigate back through menu levels Navigate right through menu levels Press to select menu setting Switches through stereo movie and concert audio output modes Input source selector switches forwards through connected sources Input...

Page 8: ...y the currently selected input source volume setting and audio mode Note If the unit is to be left unused for an extended period disconnect it from the mains supply to save power Selecting a source To select a particular source press the or buttons on the front panel or remote until that source is shown on the front panel display The following sources are available HDMI 1 HDMI 2 HDMI 3 HDMI 4 OPTI...

Page 9: ...nd sounds in the listening room and nearby rooms Close all windows and doors in the listening room Turn off all fans including air conditioning systems If holding the microphone in the hand keep your hand and fingers still to avoid generating any handling noise Position the microphone pointing upwards at roughly head height in the normal listening position with a direct unobstructed view of the sp...

Page 10: ...nd buttons to switch IR repeater on or off See page 16 for more information Press to go back a level or to exit setup System Info Press OK to view the system software version Factory Defaults Press OK to reset the Solo bar to factory defualts Note Paired or connected devices will be lost Press to go back a level or to exit setup Speaker EQ Setup Auto Setup Auto setup configures your Solo bar for o...

Page 11: ...simultaneously for about five seconds The Solo bar will turn on and display the following information ARCAM SB M V024 B 40526 D 30304 Note M Main software version B Bluetooth software version and D DSP software version Press the button to go to the software update screen The display will change to System Update Insert USB Note Pressing IN again will cycle between this and the software version scre...

Page 12: ...ut source is selected Bluetooth Check your Bluetooth device is paired correctly Is your Bluetooth device too far away from the unit FCC Notice This product contains FCC ID VNH IK CSRBC05 QEC GWNO This equiment has been tested and found to comply with the limits for a Class B digital device pursuant to Part 15 of the FCC Rules These limits are designed to provide reasonable protection against harmf...

Page 13: ...ommendation Arcam takes every precaution to ensure that all information contained in this publication is factually correct but accepts no liability for any error or omission Worldwide guarantee Arcam warrants that the products described in this guide shall conform to their published specification in all material respects for a period of two years from the date of purchase This entitles you to have...

Page 14: ...a display iPad 4th generation iPad mini iPad 3rd generation iPad 2 iPod touch 5th generation iPod touch 4th generation Google Play is a trademark of Google Inc Android is a trademark of Google Inc 2013 CSR plc and its group companies The aptX mark and the aptX logo are trade marks of CSR plc or one of its group companies and may be registered in one or more jurisdictions The Bluetooth word mark an...

Reviews: