rev 1C
S10 User Manual 13
2.6
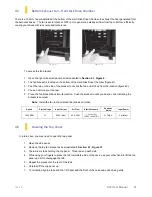
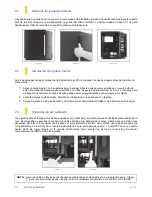
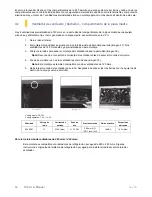
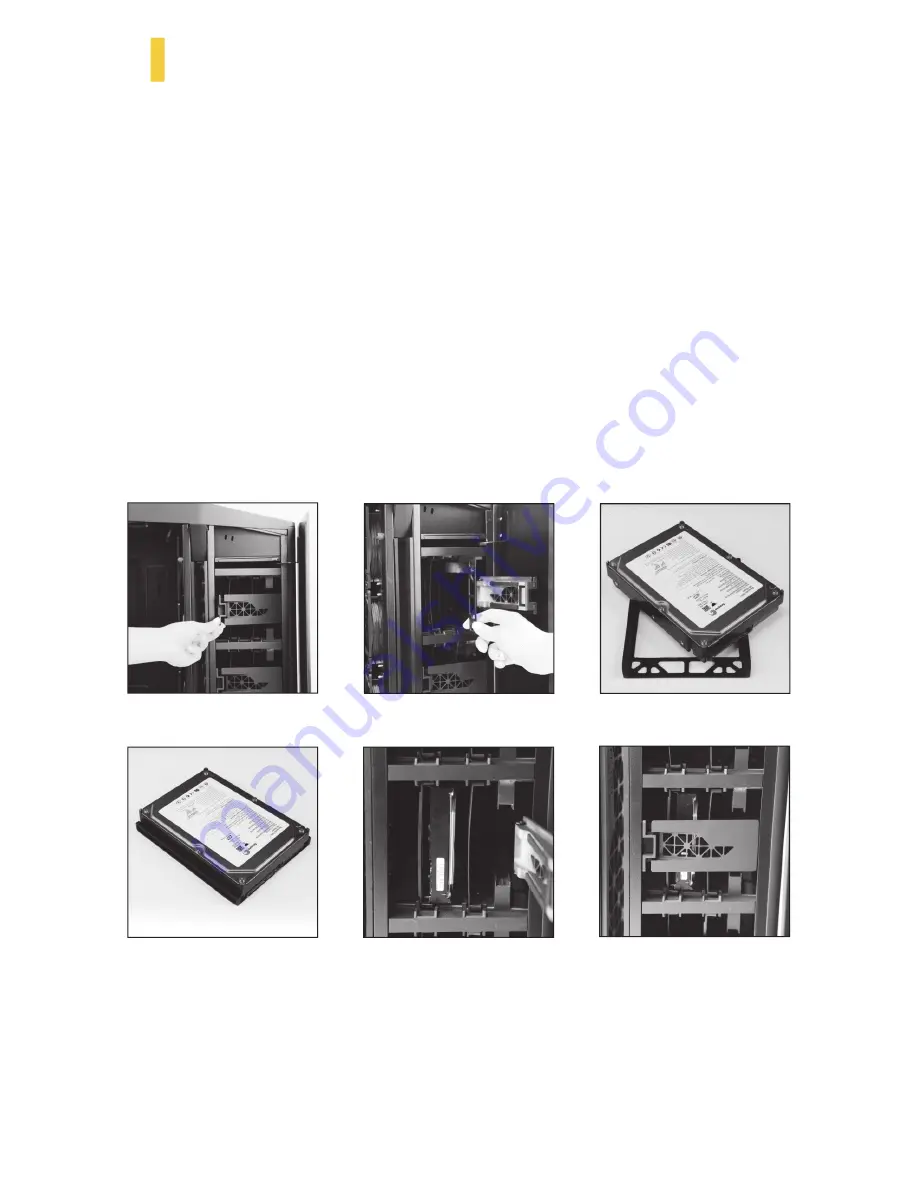
Instalación de la unidad de disco duro 3.5”
Dentro del compartimento de la unidad de disco duro se encuentran seir bahías de disco duro de 3.5”. Estas bahías de
disco están posicionadas para un montaje vertical de dos HDDs por fila, cerradas con una puerta de apertura hacia
fuera. Cada bahía tiene una bandeja que no necesita herramientas y un par de guías de silicona preinstaladas en los
raíles alto y bajo de cada una. Una vez instaladas, la bandeja de ensamblaje del HDD se asienta entre las guías
antivibración de silicona. Vea abajo imágenes 16 a 19.
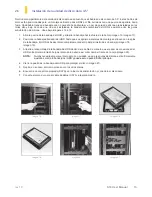
1. Abra la puerta de la bandeja del HDD y arrastre la bandeja hacia afuera de la bahía (imagen 16, imagen 17).
2. Posicione la bandeja alrededor del HDD hasta que sus agujeros laterales de montaje se alineen con los pins
de la bandeja. El HDD debe asentarse completamente dentro del perímetro de su bandeja (imagen 18,
imagen 19).
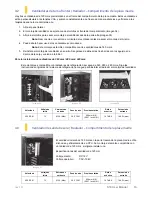
3. Arrastre el ensamblaje de la bandeja de HDD dentro de la bahía de manera que el panel de conexiones del
HDD entre primero. El lado bajo del disco duro debería así mirar hacia el frente de la caja (imagen 20).
NOTA:
Quizás necesite empujar el disco duro con cuidado, ya que las guías de silicona están firmemente
ajustadas contra la bandeja del
HDD y puede ser un poco difícil al principio.
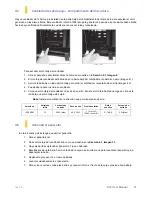
4. Cierre la puerta de la bandeja del HDD para proteger el disco (imagen 21).
5. Repita, en su caso, el mismo proceso con los otros discos.
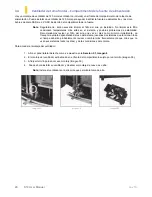
6.
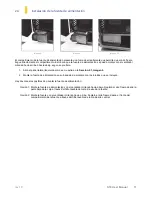
Encuentre un conector apropiado (SATA) en la fuente de alimentación y conéctelo al disco duro.
7.
Conecte el disco duro con el cable de datos (SATA) a la placa madre.
Imagen 16
Imagen 17
Imagen 18
Imagen 19
Imagen 20
Imagen 21
Summary of Contents for Signature S10
Page 1: ...User Manual...
Page 4: ...4 S10 User Manual rev 1C Section 1 Introduction...
Page 9: ...rev 1C S10 User Manual 9 Section 2 Hardware Installation...
Page 15: ...rev 1C S10 User Manual 15 Section 3 Front I O Ports...
Page 17: ...rev 1C S10 User Manual 17 Section 4 Cooling System...
Page 23: ...Manual del Usuario...
Page 26: ...4 S10 User Manual rev 1C Secci n 1 Introducci n...
Page 31: ...rev 1C S10 User Manual 9 Secci n 2 Instalaci n del Hardware...
Page 37: ...rev 1C S10 User Manual 15 Secci n 3 Puertos Frontales I O...
Page 39: ...rev 1C S10 User Manual 17 Secci n 4 Sistema de Refrigeraci n...
Page 45: ...Manuel d utilisation...
Page 48: ...4 S10 User Manual rev 1C Section 1 Introduction...
Page 53: ...rev 1C S10 User Manual 9 Section 2 Installation du mat riel...
Page 59: ...rev 1C S10 User Manual 15 Section 3 Ports entr e sortie en fa ade...
Page 61: ...rev 1C S10 User Manual 17 Section 4 Syst me de refroidissement...
Page 67: ...Benutzer Handbuch...
Page 70: ...4 S10 Benutzer Handbuch rev 1C Bereich 1 Einleitung...
Page 75: ...rev 1C S10 Benutzer Handbuch 9 Bereich 2 Einbau Ihrer Hardware...
Page 81: ...rev 1C S10 Benutzer Handbuch 15 Bereich 3 Frontseitige I O Anschl sse...
Page 83: ...rev 1C S10 Benutzer Handbuch 17 Bereich 4 K hlungssystem...
Page 89: ...Manuale d uso...
Page 92: ...4 S10 Manuale d uso rev 1C Sezione 1 Introduzione...
Page 97: ...rev 1C S10 Manuale d uso 9 Sezione 2 Installazione Hardware...
Page 103: ...rev 1C S10 Manuale d uso 15 Sezione 3 Pannello I O Frontale...
Page 105: ...rev 1C S10 Manuale d uso 17 Sezione 4 Sistema di Raffreddamento...
Page 111: ......
Page 114: ...4 S10 rev 1C...
Page 117: ...rev 1C S10 7 1 3 S10 S10 Antec CPU RAM CPU...
Page 118: ...8 S10 rev 1C 1 4 S10 S10 1 S10 2 1 2...
Page 119: ...rev 1C S10 9...
Page 120: ...10 S10 rev 1C 2 1 4 11 2 2 CPU 1 2 3 2 3 S10 SATA NOTE 6 7 HDD PSU 6 7 5 3 4...
Page 121: ...rev 1C S10 11 2 4 1 Section 2 1 Figure 4 2 1 2 10 9 8...
Page 122: ...12 S10 rev 1C 2 5 1 2 11 12 3 13 4 1 2 14 3 1 2 1 Figure 4 2 15 3 13 12 11 15 14...
Page 125: ...rev 1C S10 15 I O...
Page 126: ...16 S10 rev 1C 3 1 USB 3 0 USB 3 0 3 2 HD Intel 10 HDA 3 3 LED S10 LED LED LED 28 29 30...
Page 127: ...rev 1C S10 17...
Page 130: ...20 S10 rev 1C 4 4 120mm 120mm 5x 2 5 SSD 24 1 2 1 4 2 38 3 39 4 38 39 40...
Page 133: ......
Page 136: ...4 S10 rev 1C...
Page 139: ...rev 1C S10 7 1 3 S10 S10 Antec CPU RAM CPU...
Page 140: ...8 S10 rev 1C 1 4 S10 S10 1 S10 2 1 2...
Page 141: ...rev 1C S10 9...
Page 142: ...10 S10 rev 1C 2 1 4 11 2 2 CPU 1 2 2 3 S10 SATA 6 7 HDD PSU 6 7 5 3 4...
Page 143: ...rev 1C S10 11 2 4 1 2 1 4 2 1 2 10 9 8...
Page 144: ...12 S10 rev 1C 2 5 1 2 11 12 3 13 4 1 2 14 3 1 2 1 4 2 15 3 13 12 11 15 14...
Page 147: ...rev 1C S10 15 I O...
Page 148: ...16 S10 rev 1C 3 1 USB 3 0 USB 3 0 3 2 HD Intel 10 HDA 3 3 LED S10 LED LED LED 28 29 30...
Page 149: ...rev 1C S10 17...
Page 152: ...20 S10 rev 1C 4 4 120mm 120mm 5x 2 5 SSD 24 1 2 1 4 2 38 3 39 4 38 39 40...
Page 155: ......
Page 158: ...4 S10 rev 1C 1...
Page 161: ...rev 1C S10 7 1 3 S10 Antec PC CPU RAM CPU...
Page 162: ...8 S10 rev 1C 1 4 S10 S10 S10 2 1 2...
Page 163: ...rev 1C S10 9 2...
Page 165: ...rev 1C S10 11 2 4 PSU PSU PSU 1 2 1 4 2 PSU PSU 2 1 PSU 2 PSU PSU 10 9 8...
Page 166: ...12 S10 rev 1C 2 5 1 2 11 12 3 13 4 PSU 1 PSU 2 14 3 HDD 1 2 1 4 2 HDD 15 3 13 12 11 15 14...
Page 169: ...rev 1C S10 15 3 I O...
Page 171: ...rev 1C S10 17 4...
Page 174: ...20 S10 rev 1C 4 4 PSU PSU 120 mm 120mm PSU 2 5 SSD 1 7 1 2 1 4 2 38 3 39 4 38 39 40...
Page 177: ......
Page 178: ......
Page 183: ......

