


110
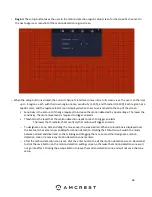
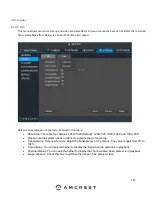
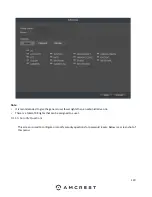
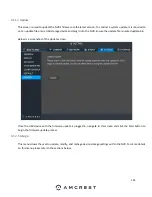
Below is an explanation of the fields on the General settings screen:
•
Device Name: This field allows the user to customize the name of the NVR.
•
Device No: This field
allows the user to customize the device’s number.
•
Language: This dropdown box allows the user to select a language for the NVR. Options include English, Simplified
Chinese, Traditional Chinese, Italian, Japanese, French, and Spanish.
•
Video Standard: This dropdown box allows the user to select a video standard. The options are between PAL and
NTSC.
•
HDD Full: This dropdown box allows the user to specify what to do when the HDD is full. There are two options:
o
Overwrite: This option lets the NVR overwrite the oldest recorded video on the NVR.
o
Stop Record: This option causes the NVR to stop recording once the HDD is full.
•
Pack Duration: This field allows the user to define the recording duration. The default value is 60 minutes.
•
Realtime Play: This field allows the user to set the playback time frame that is viewed in the preview interface. This
value can range from 5 to 60 minutes.
•
Auto Logout: This field allows the user to define in minutes how long the system can stay idle before a user is logged
out. The value can range from 0 to 60 minutes.
•
IPC Time Sync: This field allows the user to define in hours how long a camera can stay idle before it is logged out.
The values can range from 0
–
24 hours.
•
Navigation Bar: This checkbox allows the user to enable the navigation bar that shows on the main screen.
•
Auto Add IPC: This checkbox allows the user to enable the system to automatically add cameras once applied to the
NVR.
•
Startup Wizard: This checkbox allows the user to enable the startup wizard the next time the system is restarted.
Mouse Sensitivity: This sliding scale allows the user to increase the movement and double click speed of the mouse.
To rest to default settings, click the Default button near the bottom left hand corner. To confirm settings, click the
OK button near the bottom right hand corner. To cancel any modifications, click the Cancel button near the bottom
right hand corner. To apply the settings, click the Apply button near the bottom right hand corner.
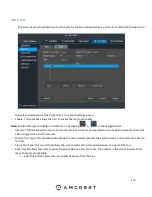
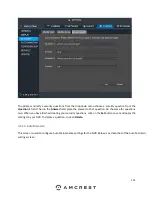
4.9.2 Date and Time
This screen displays date and time settings for the NVR. Below is a screenshot of the Date & Time settings screen:
Summary of Contents for NV21 Series
Page 1: ...Network Video Recorder User Manual Version 1 0 4 Revised November 21st 2018 ...
Page 201: ...201 Figure 5 39 5 9 2 7 Email The email interface is shown as in Figure 5 40 ...
Page 214: ...214 Figure 5 58 ...
Page 227: ...227 Figure 5 77 Figure 5 78 ...
Page 245: ...245 Figure 5 102 5 10 2 Log Here you can view system log See Figure 5 103 Figure 5 103 ...


