LEVIGATO DRIVES (LG SERIES)
|
LEVIGATO ANTRIEBE (SERIE LG)
|
COMMANDES LEVIGATO (SERIE LG)
19
ELECTRICAL INTERfACES
5.
ELECTRICAL INTERfACES
Y
ATTENTION!
Prior to commencing the wiring operation, make sure that the wire is not ‘
live
’.
When using and installing additional electric devices (accessories) follow the manuals supplied.
Incorrect connection can result in the failure of the drive.
Use only additional devices (accessories), offered by ALUTECH (including AN-Motors). ALUTECH
does not bear responsibility for unstable operation of the drive system, if additional devices,
produced by other manufacturers, are used.
If no devices are connected to terminals ‘
PH1
’ and ‘
S
’, crossovers should be installed. If a safety
device is connected to the terminals mentioned, remove the crossover.
Open the lid on the drive to access the additional device connectors, configuration and indication
elements. Press the latch and turn the lid (
fig.
22).
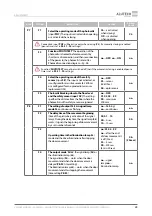
Table 4
describes the contacts of the drive connectors used to connect additional devices. The
connection diagram and symbols are presented in
fig.
23.
Figures 24–28 show examples of connecting additional devices (accessories), manufactured
by ALUTECH:
• figure 24—connection of a signal lamp with built-in antenna.
• figure 25 —photocells connection.
• figure 26—connection of photocells with
PHOTOTEST
function.
• figure 27—connection of optical safety margin.
• figure 28—connection of resistive safety margin.
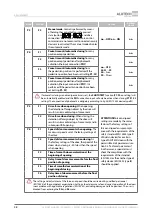
CONTACT
DESCRIPTION
SL / LL
Alarm lamp or illumination lamp connection output (see
fig.
24).
By default, the output is set to work in the
SL
lamp mode (signal lamp).
In settings (section ‘6. Adjustment’
P8
–
f4
) you can select the output operation mode
SBS
Input for
step-by-step
control devices with
NO
contact.
Sequence of commands
OPEN
—
STOP
—
CLOSE
—
STOP
—
OPEN
…
Several control units are connected in parallel
S
Safety devices input
STOP
with
NC
contact.
The activation results in immediate stop of movement or preventing any movement
beginning.
Several safety devices are connected consecutively
+ 12 V
Accessories output. Nominal power voltage 12 V DC / max. 120 mA
+ 24 V
Accessories output. Nominal power voltage 24 V DC / max. 120 mA
GND
General output
SE
Optical sensors connection input or input of resistive margin of safety (8.2 kOhm).
In settings (section ‘6. Adjustment’
P7
–
f4
) the following can be selected, depending on
the connected safety device: resistive sensor (
fig.
28) or optoelectronic sensor (
fig.
27).
The contact of the door with an obstacle during closing (activation of a sensor) causes
the door to stop moving and then fully open
Table 4


