background image

5.1.2 Path measurement 

The whole traverse path (405mm) of the drive gets suspended in 1.687.500 steps. This corresponds to 
an  intern  resolution  of  0,24µm,  the  change  of  the  position  in  single  steps  gets  indicated  with  a 
resolution of 0,01mm. As both the load cell and the machine itself get expanded or compressed under 
load, the absolute traverse deviates from the actual path on the measuring axle. To compensate this 
error,  the  indicated  path  gets  corrected  with  a  force  depending  factor.  Before  the  purchase  of  the 
instrument, the correction factor gets appraised and setted by the manufacturer. The correction factor is 
simple user appraisable and can be saved within the instrument. 
A calibration (adjusting) should be effected after changing the force gauge as only theoratical values get 
get adopted into the control unit during the initiation of the force gauge. The calibration takes place in 
the service menu. (see chapter 6.2). 

5.1.3 Disconnect conditions / Limits 

Indipendent of the mechanical structur of the universal test stand and the force gauge, for which limits 
get deposited before commissioning the instrument, it is possible to deposit universally valid limits for 
path and force, as protection of checking tools and of material, which is to control. When these values 
get achieved, the inspection process gets aborted and an infotext-display takes place in the lower line 
of the display. 
The load cells have an additional electronic overload protection which takes effect,  independently of 
the setted limits, as soon as a damage of the load cell is imminent. The control unit tries automatically 
to take it off into the diametrical direction with a propulsion command. 
Similarly  the  drive  does  not  allow  to  cross  the  mechanical  boarders  which  are  predetermined  by  the 
cursors, as they effect a emergency-stop. 
Whenever an emergency-stop has been effected or the test stand does not allow any manual propulsion 
because of overlapping limits, the test stand has to be turned currentless. In this condition the retention 
force of the motor gets lifted and the load cell can be pushed to any position between the two cursors.  


5.2. Manual mode


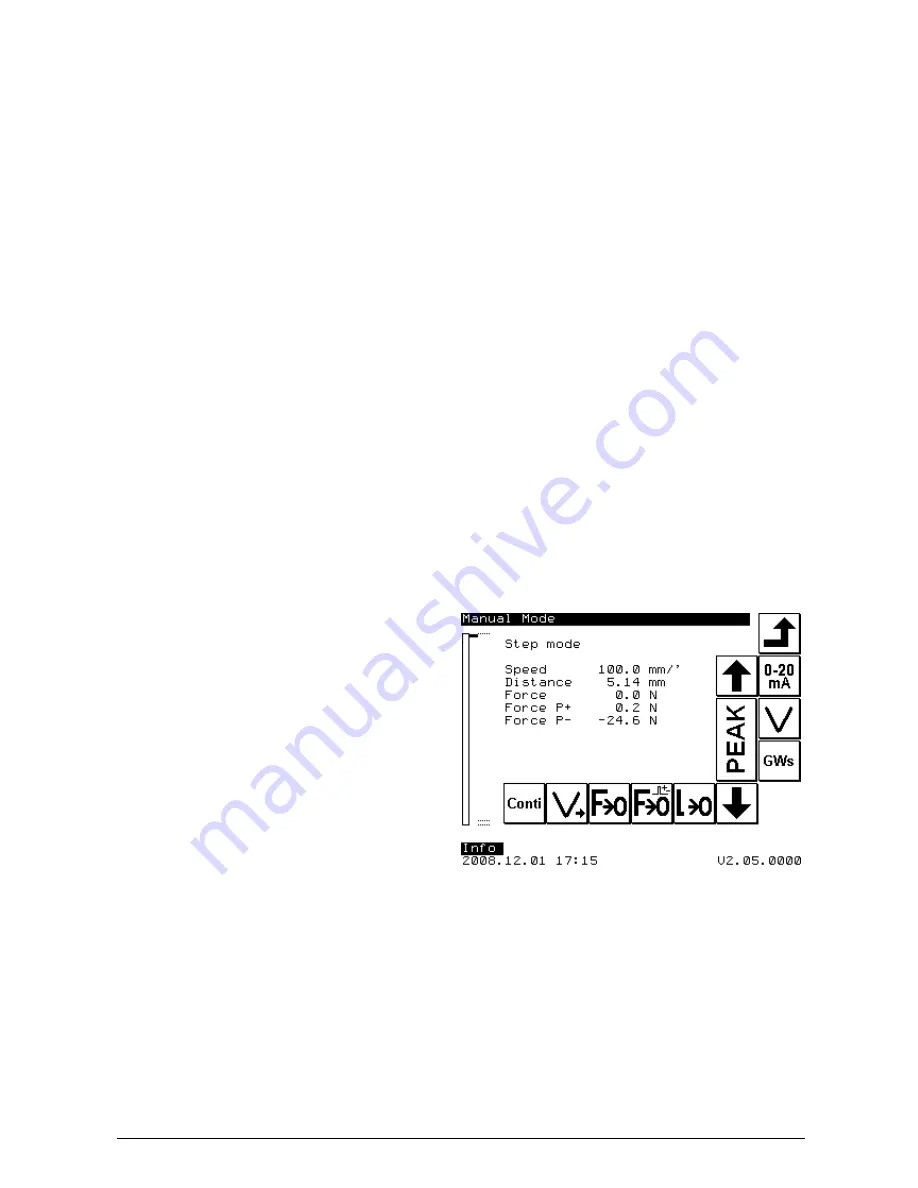
In  the  manual  mode  you  can  move  the  load  cell 
with 

preselected 

speed 

within 

the 

predetermined  limits  upwards  or  downwards  by 
pressing  the  appropriate  buttons.  The  current 
reading  and  the  current  running  speed  are 
indicated on the screen. 


5.2.1 Regulation of the speed levels 

In  the manual  mode  up  to  5  different  speed  levels  can  be  chosen by  pressing  the  key  V

>

.  The  speed 

levels  1  to  5  can  be  regulated  within  the  therefore  intended  submenus.  The  submenu  gets  called  by 
pressing the key V

set

 . Than you can choose the speed level you’d like to edit and enter the approriate 

speed. When you leave the submenu, the speed levels get changed corrispondingly. 

Summary of Contents for FMT-310

Page 1: ...1 Bedienungsanleitung Operation Manual FMT 310 Force Tester BDA Version 1 1 DE ENG ...

Page 2: ...N 10 5 3 3 PREDEFINED FUNCTIONS 10 5 3 3 1 ZERO POINT SEARCH 11 5 3 3 2 BREAKDETECTION 11 5 3 3 3 FORCE REGULATION 11 5 3 3 4 PATH REGULATION 11 5 3 3 6 HARDNESSGRADE 11 5 3 4 PREDEFINED TEST PROGRAMMS 12 5 3 4 1 BREAK TESTING 1 DIAGRAMM 13 5 3 4 2 BREAK TESTING 2 PEAK VALUES 13 5 3 4 3 BEND TESTING PATH DEPENDING 14 5 3 4 4 ENDURANCE TESTING PRESSURE WITH PRESSURE FORCE REGULATION 15 5 3 4 5 TOW ...

Page 3: ... only The instrument is equipped with a temperature compensation for 0 40 C Use the instrument in this temperature range only If you effect a material testing during which the material can break or sliver in a way that people the test stand or other instruments in the near could get damaged you have to install protective equipment If you have no protective equipment at your disposal we would be gl...

Page 4: ...test has been finished succesfully the change to the main menu takes place Press now the button REF it takes place an automatic adjustment of the internal zero reference machine zero For this the load cell gets driven into the highest position After the reference path has been effected succesfully the test stand is ready for use Now you can choose the wanted function within the main menu In depend...

Page 5: ...agram Break testing 2 Diagram Setting Results Bend testing Path depending Settings Results Diagram Endurance testing Force regulation Settings Results Diagram Tow testing 1 Path depending Settings Results Diagram Tow testing 2 Peak Settings Results Stretch testing 1 Path depending Settings Results Diagram Stretch testing 2 Force regulation Settings Results Diagram Service adjust date time report m...

Page 6: ...el of menu Scroll To jump line by line within the list of parameters or results ATTENTION within the manual mode the arrows indicate only the movement of the slide per direction List of parameter After pressing the button appearce a list of parameteriseable settings Enter keyboard By pressing the button the input box to change the parameterizeable settings appearse Jump first last line The arrow k...

Page 7: ...of operation 5 1 Explanation of instrumentation 5 1 1 Force measurement For the force measurement high precision measuring beam get used their deflection during force transmission gets recorded by a extension measuring tape The conversion of the analog signals into digital form takes places within the load cell The digital signals of the D A converter constitutes 1000 Hz the transfer rate to the c...

Page 8: ...nspection process gets aborted and an infotext display takes place in the lower line of the display The load cells have an additional electronic overload protection which takes effect independently of the setted limits as soon as a damage of the load cell is imminent The control unit tries automatically to take it off into the diametrical direction with a propulsion command Similarly the drive doe...

Page 9: ...hieved 5 2 4 Ride in the Tipp mode Tipp In the tip mode which gets setted by the mode button the drive gets moved with a preselected speed into the required direction till the button gets released or a limit gets achieved 5 2 5 Indication and reset of the peak values maximum values The absolut maximum values for traction force and compression force get saved within the load cell The two maximum va...

Page 10: ...ell all parameter sets in all test programms get reset onto the default values to avoid possible damage on the construction If you change the tools in use or the material to check it might be necessary to adjust the parameter to avoid damages on the construction The submenu to regular the parameter gets called by pressing the parameter button 5 3 2 Definition of the valve position Reference positi...

Page 11: ...ation a predefined force gets kept for kept for a predefined amount of time The drive re enacts automatically the position of the load cell provided that the material property demands this The basic and the driving speed depends of the regulated hardnessgrade of the material Is the hardnessgrade understated it can lead to a consequently overshooting of the regulation Is the hardnessgrade overstate...

Page 12: ... readings of measurment of force Minimise y axle with readings of measurment of force Enlarge x axle with readings of measurment of length Minimise x axle with readings of measurment of length The recorded force values are placed on the y axle the corrisponding position values on the x axle The scaling of the diagram takes automatically place on the base of the size of the values and the nuber of ...

Page 13: ...ut on 0 Reference Spee vHome 0 1 mm min 900 0 mm min Hardnessgrade measurment object 0 99 START position HOME position 405 00 Speed bread detection 0 1 mm min 900 0 mm min Force Breakdetection 0 00 100 Speed till break 0 1 mm min 900 0 mm min Force break 0 00 100 5 3 4 2 Break testing 2 Peak values The inspection process serves to appraise the breaking force at various successive tests by pressing...

Page 14: ...orce and path 9 Automatically the slide gets moved upwards with the speed vHome to the HOME position Adjustable parameter for the test procedure Bend testing path dependend Parameter Permissible range of values Reference Min Max Setpoint position DOWN SP top 405 00mm Absolut on 0 Reference Setpoint position TOP 0 00mm 405 00mm Absolut on 0 Reference Setpoint force PRESSURE 0 N Nominal range of loa...

Page 15: ...er 6 Engaging of the force regulation and movement of the load cell until achieving the holding force Remaining for the predetermined pause time after the first arrival at the holding force 7 End of the reading record and ride to the Home positionsition Adjustable parameter for the test procedure Load force regulated Parameter Permissible range of values Reference Min Max Setpoint position DOWN SP...

Page 16: ...d VStart 0 1 mm min 900 0 mm min Force Break detection 0 00 100 Speed break 0 1 mm min 900 0 mm min Force break 0 00 100 5 3 4 6 Tow testing 2 Peak values Like the former one the inspection process serves to appraise the tear out force at a continuous tension at a uniform speed until the break of the measurment Instead of a test serie the peak values and position of the measurment object at the mo...

Page 17: ...or the pause time T 6 Return for the path_2 absolut relating to 0 position test ATTEND prefix of the way value 7 End of the reading record and return to the HOME position Adjustable parameter for the test procedure Strech testing path depending Parameter Permissible range of values Reference Min Max Setpoint position DOWN SP top 405 00mm Absolut on 0 Reference Setpoint position TOP 0 00mm 405 00mm...

Page 18: ... deposit too The description of the operation may be described within the enclosure 1 Parameter Zulässiger Wertebereich Reference Min Max Setpoint position DOWN SP top 405 00mm Absolut on 0 Reference Setpoint position TOP 0 00mm 405 00mm Absolut on 0 Reference Setpoint force Pressure 0 N Nominal range of load cell Setpoint force TENSION 0 N Nominal range of load cell HOME position SP top SP down A...

Page 19: ... becomes activated after the next initiation of the instrument 6 1 2 Password Categorical the servicefunctions are protected by a password You can change these passwords and afterwards not even the Alluris Service is able to access the servicefunctions without a direct interference into the firm ware It s possible to protect the parameters for the corrisponding inspection processes with a user pas...

Page 20: ...rence has been setted the measurment range of the nominal value gets newly setted by adherencing an adapted reference standard Only when the new values have been exactly averaged out and checked on their plausibility within a width which is predetermined within the force gauge the new settings become assumed Otherwise the old values remain stored After every force calibration it is necessary to sw...

Page 21: ...memory can be necessary especially if the memory capacity is exhausted Within most of the menues the remaining memory capacity gets indicated within the info line Before cancelling the data you can import them into Exel by the help of the Fmt_Connect_Software in this way you can save them everlasting 7 0 Connection to the PC The Force Tester FMT 310 can be conected to the serial interface of a PC ...

Page 22: ... x H 400 mm x 300 mm x 900 mm Additional technical data for the test stand with optional equipment may be mentioned within the enclosure 2 9 0 Maintenance 9 1 Linear bearing The linear bearing has to lubricated periodical depending on the frequency of use and the environmental conditions but at least after 6 month Therefore please open the upper bellows on the load cell In front of the drive screw...

Page 23: ...a comunication mistake between the load cell and the control unit Pleas check if the two cable for the load cell 9 p D Sub switch and M8 sensor connector are correctly connected Switch off the test stand to reset all the functions Try again to initiate the test stand If the load cell is defekt it can be necessary to change the whole force measurment unit see in addition chap 7 4 Our service can re...

Page 24: ... return it to Alluris for recycling For more information please contact our website www alluris de The compliance to the requirements of all relevant EEC directives is confirmed by the CE marking of the product Calibration Confirmation We hereby confirm in accordance to DIN EN 10204 2 1 that this instrument has been tested in accordance with DIN EN 9000 2000 approved procedures The instrument meet...

Page 25: ...25 Service Adressen Alluris GmbH Co KG Technischer Service Basler Strasse 63 DE 79100 Freiburg Deutschland Fon 49 0 761 47979 3 Fax 49 0 761 47979 44 service alluris de www alluris de ...

Reviews: