74
801805
Section 5 Service Procedures
© Copyright, Alliance Laundry Systems LLC – DO NOT COPY or TRANSMIT
To reduce the risk of electric shock, fire, explosion, serious injury or death:
• Disconnect all electric power to the machine and accessories before servicing.
• Close gas shut-off valve to gas dryer before servicing.
• Never start machine with any guards/panels removed.
• Whenever ground wires are removed during servicing, these ground wires must be
reconnected to ensure that the machine is properly grounded.
• Washer motor not grounded! Disconnect electric power before servicing motor.
W502
WARNING
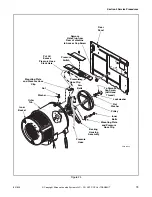
i. Check for concentricity/roundness of assembly.
Use a dial indicator to check that concentricity
at the inside edge of inner basket lip is a
maximum of .05 inch TIR (Total Indicator
Runout). Refer to Figure 23. If concentricity is
not within .05 inch, remove assembly from
washer and adjust location of trunnion. Repeat
until concentricity is within .05 inch.
j. Remove inner basket/trunnion assembly from
washer and evenly torque three nuts to 200 ± 10
inch-pounds.
k. Recheck that concentricity is still within .05
inch.
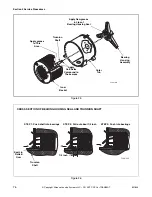
Inner Basket Installation –
a. Apply No. 27604P Anti-Seize Compound to
the area of the trunnion shaft that will be
contacting the front and rear bearings. Refer to
Figure 25.
b. Apply a film of grease to area of shaft that will
be contacting the bearing housing seal. Refer to
Figure 25. Make sure seal lips also are packed
with grease. Refer to Figure 25.
IMPORTANT: When installing inner basket, the
following steps must be taken to ensure that the seal
is properly orientated:
c. Install inner basket assembly by pushing all the
way into outer tub. Refer to Figure 26, Step 1.
d. Slightly pull out inner basket about 1/4 inch to
ensure that the bearing housing seal lips are not
rolled over. Refer to Figure 26, Step 2.
NOTE: If inner basket is pulled out more than 3/8
inch (past step on trunnion shaft), repeat Steps “c”
and “d”.
e. Fully reseat inner basket. Refer to Figure 26,
Step 3.
f. Install pulley and cap screw. Be careful not to
push the shaft forward while tightening the
screw.
IMPORTANT: When installing pulley, always use a
new cap screw to prevent screw from loosening
during operation. Use a thread tap to clean old
Loctite out of pulley screw receiving hole before
installing new screw. This ensures that inner basket
and pulley properly seat.
NOTE: When installing new cap screw, apply a
thread locking compound to screw threads and
torque new cap screw to 240 minimum to 260
maximum inch pounds (27.5 to 29.7 Nm).
Figure 23
FLW12K
Dial Indicator
Inner
Basket
Outer
Tub
Inner
Basket Lip


