background image

112

Rockwell Automation Publication 23PFC-TG001A-EN-P - March 2018

Chapter 4

Frame B Field Controller Part Replacement Procedures

9. Slide the U and V phase bus bars that pass through the AC current 

transducers up and out of the device.

10. Remove the screw and washer that secures each of the AC current 

transducers to the device frame and remove the AC current transducers. 

Install the AC Current Transducers 

Install the AC current transducers in reverse order of removal.

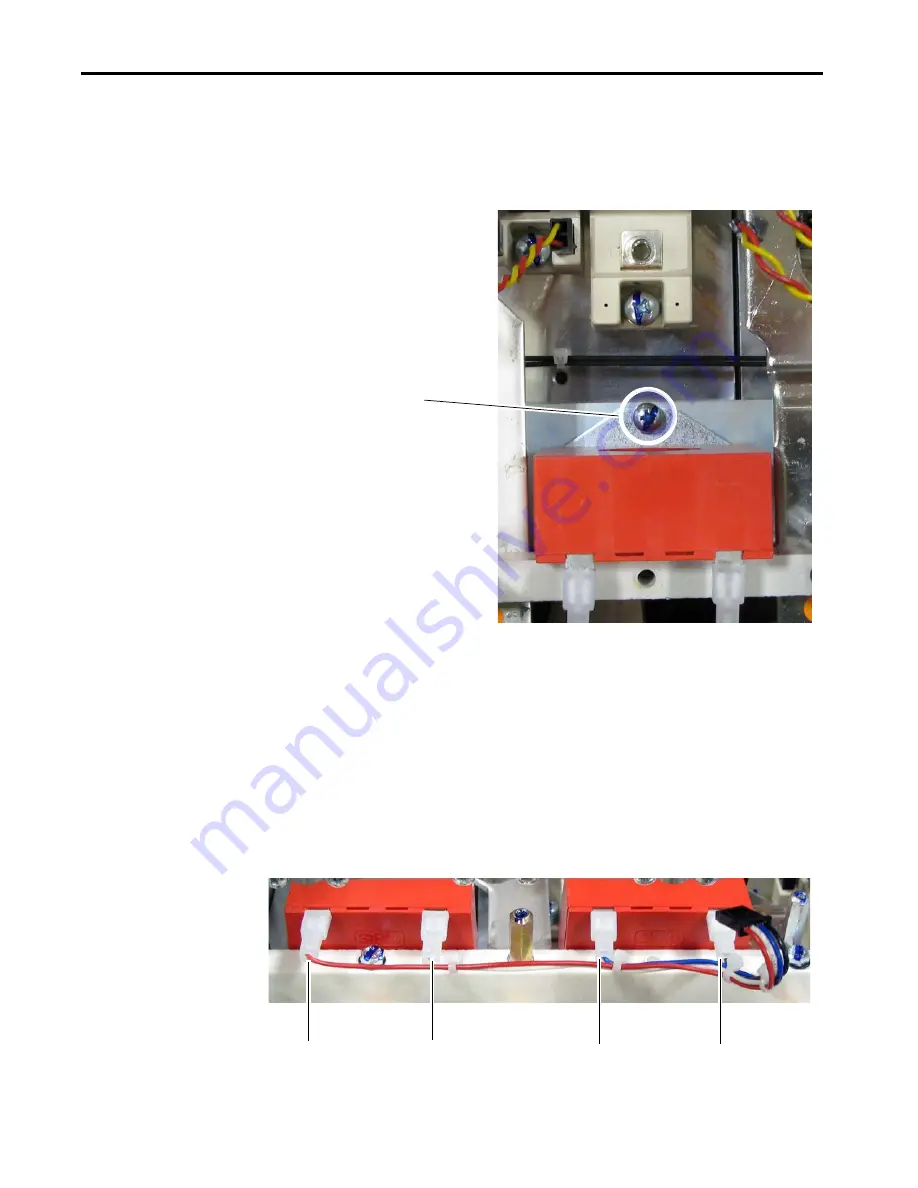
• Note the color and location of each of the four wires that are connected 

to the AC current transducers to ensure that each wire is properly 
connected during installation. Use cable ties to bundle wires as shown 
here. 

10

Red wire

White wire

Blue wire

Black wire

Summary of Contents for 23PFC

Page 1: ...PowerFlex DC Field Controller Frame A and B Catalog Number 23PFC Hardware Service Manual OriginalInstructions ...

Page 2: ...information circuits equipment or software described in this manual Reproduction of the contents of this manual in whole or in part without written permission of Rockwell Automation Inc is prohibited Throughout this manual when necessary we use notes to make you aware of safety considerations Labels may also be on or inside the equipment to provide specific precautions WARNING Identifies informati...

Page 3: ...20 Power Component Test Procedures 22 Check the SCR Modules 22 Check the Pulse Transformer Board 25 Thermistors and Thermal Switches 28 Relay Outputs 29 Create a Fault Report 29 What You Need When You Call Tech Support 29 Chapter3 Frame A Field Controller Part Replacement Procedures Replacement Part Kits 32 Remove Power from the Device 33 Switching Power Supply Fuse Replacement 34 Remove the Fuse ...

Page 4: ... Circuit Board 47 Control EMI Shield and Control Circuit Board Replacement 48 Remove the Control EMI Shield and Control Circuit Board 48 Install the Control EMI Shield and Control Circuit Board 49 Pulse Transformer and Switching Power Supply Circuit Board Replacement 50 Remove the Pulse Transformer and Switching Power Supply Circuit Board 50 Install the Pulse Transformer and Switching Power Supply...

Page 5: ...5V AC to 24V DC I O Converter Circuit Board 88 Control Circuit Board Replacement 88 Remove the Control Circuit Board 88 Install the Control Circuit Board 90 Control Electromagnetic Interference Shield Removal and Closure 90 Move the Control Electromagnetic Interference Shield 90 Close the Control EMI Shield in the Service Position 91 Switching Power Supply Board Fuse Replacement 92 Remove the Fuse...

Page 6: ...Cooling Fans 117 Install the Cooling Fans 118 Chapter5 Start up after Repair Verify Field Controller Operation Connected to a Load 119 AppendixA Schematics List of Schematic Diagrams 121 Frame A Field Controllers 122 Frame B Field Controllers 126 Frame A and B Field Controllers 129 AppendixB Circuit Board Layouts and Connections List of Circuit Board Layouts 131 Frame A Pulse Transformer Board 132...

Page 7: ... can view or download publications at http www rockwellautomation com global literature library overview page To order paper copies of technical documentation contact your local Allen Bradley distributor or Rockwell Automation sales representative Resource Description PowerFlex DC Field Controller Programming Manual publication 23PFC PM001 Provides information on how to start up program and troubl...

Page 8: ...8 Rockwell Automation Publication 23PFC TG001A EN P March 2018 Preface Notes ...

Page 9: ...018 9 Chapter 1 Before You Begin Testing Maintenance or Repairs This chapter provides information to help you prepare for tests maintenance or repairs on device components Topic Page General Safety Precautions 10 Hardware Description 11 Commonly Used Tools 12 ...

Page 10: ...out control equipment from powersources Ifitisnecessarytoworkinthevicinityofenergizedequipment the safety related work practices of NFPA 70E Electrical Safety Requirements for Employee Workplaces must be followed DO NOT work alone on energized equipment ATTENTION Potentially fatal voltages can result from improper usage of an oscilloscope and other test equipment The oscilloscope chassis can be at...

Page 11: ...two or four quadrant output An AC input contactor can be used to protect the field controller when it is used in standalone mode Verify the frame size of the field controller you are working on by checking the data nameplate that is on the side of the device The frame size is printed just above the serial number in the lower right corner of the label gen 50 60 Hz 1 0 0 5 A 1 Phase 制造于2017年 第20周 uk...

Page 12: ...continuity resistance and forward diode bias tests Fluke model 87 III or equivalent recommended Oscilloscope Portable digitizing dual channel scope with isolation Current clamp 3 times the device rated current output Solder station Soldering de soldering Torque wrench 1 12 N m Torque wrench 6 50 N m Box wrench 7 mm 8 mm 10 mm 13 mm 17 mm 19 mm 22 mm Socket extension 230 mm Wrench 7 mm 8 mm 10 mm 1...

Page 13: ...l Component Inspection 15 Troubleshoot a Control Power Supply Failure 15 Troubleshoot an AC Undervoltage Fault 20 Power Component Test Procedures 22 Thermistors and Thermal Switches 28 Relay Outputs 29 Create a Fault Report 29 What You Need When You Call Tech Support 29 IMPORTANT Only perform the diagnostic tests in this chapter if you are qualified and only when other corrective actions have fail...

Page 14: ...base files Export a configuration file by using Connected Components Workbench software See the on line help that is provided with Connected Components Workbench for information on how to export a device configuration file Save to a HIM Set Follow these steps to save the device and adapter parameters to a HIM set 1 On the HIM access the Memory Storage menu 2 Select the HIM CopyCat menu and press 3...

Page 15: ... has occurred The field controller is inoperable by using the HIM or other means of control 1 Read the General Safety Precautions on page 10 2 Remove the protective covers from the device For frame A devices see page 36 For frame B devices see page 80 3 If installed remove the fiber optic interface option module See the PowerFlex DC Fiber optic Interface Option Module Installation Instructions pub...

Page 16: ...pen continue with step 7 If a fuse is not open replace the switching power supply board 7 Replace the fuse fuses on the switching power supply board 8 Disconnect the cable at connector XA on the control board See Control Board Layout on page 141 for location of connector XA 9 Apply AC control power to the device If a fuse is open continue with Test the Switching Power Supply and Pulse Transformer ...

Page 17: ...ching power supply board from the pulse transformer board For frame A devices see page 50 For frame B devices see page 93 3 Reapply power to the switching power supply board only If a fuse does not open continue with step 5 If a fuse opens replace the switching power supply board 4 Remove all incoming AC voltage from the device 5 Check all external wiring that is connected to the pulse transformer...

Page 18: ...5 26 27 28 29 30 1 2 3 4 5 6 7 8 9 10 31 32 33 34 35 36 37 38 39 40 11 12 13 14 15 16 17 18 19 20 21 22 23 24 25 26 27 28 29 30 1 2 3 4 5 6 7 8 9 10 11 12 13 14 15 16 17 18 19 20 31 32 33 34 35 36 37 38 39 40 DEBUG S15 S3 S2 S1 S0 RST ACT RUN PWR 1 2 3 4 5 6 7 8 S18 S12 S10 S21 ENC_5 ENC_12 S4 1 2 3 4 5 6 7 8 S14 1 2 3 4 5 6 7 8 S20 S11 S9 ON ON XY18 XY17 XY19 XY9 XY8 XY12 XY10 XY11 XY6 XY5 XY21 X...

Page 19: ...A B C 21 22 23 24 25 26 27 28 29 30 1 2 3 4 5 6 7 8 9 10 31 32 33 34 35 36 37 38 39 40 11 12 13 14 15 16 17 18 19 20 21 22 23 24 25 26 27 28 29 30 1 2 3 4 5 6 7 8 9 10 11 12 13 14 15 16 17 18 19 20 31 32 33 34 35 36 37 38 39 40 DEBUG S15 S3 S2 S1 S0 RST ACT RUN PWR 1 2 3 4 5 6 7 8 S18 S12 S10 S21 ENC_5 ENC_12 S4 1 2 3 4 5 6 7 8 S14 1 2 3 4 5 6 7 8 S20 S11 S9 ON ON XY7 12VEXP 0VEXP 5VEXP ...

Page 20: ...rements is incorrect or missing remove incoming AC power and verify the wiring to the device and the power supply source and correct any problems 5 Using a voltmeter measure the combined voltages of the AC lines on the following testpoints on the control board all waveforms have a 2 5V offset See Figure 1 on page 18 and Figure 2 on page 19 for location of the testpoints See Figure 19 on page 129 f...

Page 21: ... value of parameter 466 AC Line Voltage is incorrect replace the control board 6 Remove the ribbon cable that is connected to XR on the control board and pulse transformer board and test the continuity of the cable For frame A devices use the measurements in Table 15 on page 134 For frame B devices use the measurements in Table 21 on page 139 7 If the measurements on the XR cable are correct repla...

Page 22: ... A devices see page 36 For frame B devices see page 80 3 Verify that contactor power if used is removed 4 Check the anode to cathode junction of each SCR With a digital multimeter set to Ohms measure the resistance across the SCRs lead orientation is not critical For frame A devices see Table 3 on page 22 and Figure 3 on page 23 For frame B devices see Table 3 on page 22 and Figure 4 on page 23 5 ...

Page 23: ...G001A EN P March 2018 23 Component Test Procedures Chapter 2 Figure 3 Frame A SCR Module Layout Figure 4 Frame B SCR Module Layout 1 U C V D W 2 3 01 02 03 SCR Modules U V C D W 1 2 3 2 1 3 1 2 3 2 1 3 1 2 3 2 1 3 1 01 2 02 3 03 SCR Modules ...

Page 24: ...see SCR Module Replacement on page 67 For frame B devices see SCR Modules Replacement on page 103 Figure 5 Frame A SCR Module Gate Lead Connection Pinouts Table 4 SCR Gate to Cathode Junction Measurements On SCR Module SCR Measure from To Nominal meter reading 1 1 Pin 5 Pin 4 5 20 Ω 1 1 The actual reading variesdepending upon the SCRmanufacturer Verify that the actualmeasured value isconsistentfor...

Page 25: ... if a malfunction in this circuitry is suspected 1 Read the General Safety Precautions on page 10 2 Remove power from the device For frame A devices see page 33 For frame B devices see page 79 3 Remove the protective covers from the device For frame A devices see page 36 For frame B devices see page 80 4 Remove the control electromagnetic interference EMI shield and control board For frame A devic...

Page 26: ...s that secure the slotted air flow plate to the top of the device b Remove the fan cable from connector XV on the switching power supply board and remove the plate 6 For 120 A frame A devices only complete this step Remove the two screws that secure the slotted air flow plate to the top of the device and remove the plate Remove Screws Air flow Plate Remove Screw Remove Screw ...

Page 27: ...ital multimeter set for a continuity check measure each connection point on the pulse transformer board that is listed in Table 5 For frame A device see Figure 21 on page 132 for connector locations For frame B device see Figure 23 on page 137 for connector locations 9 If any of the actual measurements are out of tolerance replace the pulse transformer board IMPORTANT Mark all connections and wire...

Page 28: ...127 for a circuit diagram Verify that the PTC or thermal switch is correctly configured If a thermal switch is used a 1 kΩ resistor must be placed in series between the switch and either terminal 78 or 79 If a thermistor PTC or a thermal switch is installed a 1 kΩ resistor must be connected between terminals 78 and 79 A bimetal thermostat monitors the field controller heat sink temperature When th...

Page 29: ... non default parameters and the fault and alarm queues including time stamps The logged data can be saved as a text txt file Complete fault reports are critical for analysis and repair of devices that are returned to the factory At a minimum perform and record the following Record the contents of the fault queue faults and times of occurrence Make a record of any burn marks on the printed circuit ...

Page 30: ... Status2 at Fault Captures and displays Par 382 Device Status 2 bit pattern at the time of the last fault 1351 1360 Fault x Code A code that represents the fault that tripped the device The codes will appear in these parameters in the order they occur i e Fault 1 Code the most recent fault 1361 1370 Fault x Time The time between initial field controller power up and the occurrence of the associate...

Page 31: ...Part Kits 32 Remove Power from the Device 33 Switching Power Supply Fuse Replacement 34 DPI HIM Assembly Replacement 35 Protective Cover Replacement 36 Communication Adapter and Electromagnetic Interference Shield Replacement 38 I O Expansion Circuit Board Replacement 41 115V AC to 24V DC I O Converter Circuit Board Replacement 43 Control Circuit Board Replacement 44 Control EMI Shield and Control...

Page 32: ...V AC 17 A Field Controller SK 23P S5N461 50 Pulse Transformer Board FIR1 51 FC for 500V AC 17 A Field Controller SK 23P S5N43 PulseTransformerBoard FIR1 12 FC for 200V AC 60and 120A Field Controller SK 23P S5N462 PulseTransformerBoard FIR1 52 FC for 500V AC 60and 120A Field Controller SK 23P S5N46 Switching Power Supply Board SK 20P S5N03 50 Power Traces Board for 200V 500V AC 17 A and 60 A Field ...

Page 33: ...connections When you remove or insert a cable connector with power applied an electrical arc can occur An electrical arc can cause personal injury or equipment damage by sending an erroneous signal to your systems field devices causing unintended machine motion causing an explosion in a hazardous environment Electrical arcing causes excessive wear to contacts on both the device and its mating conn...

Page 34: ...ral Safety Precautions on page 10 2 Remove power from the device see page 33 3 On the top of the device insert a screwdriver in the slot on the top of the fuse holder Carefully push down and turn the fuse counterclockwise When the fuse holder releases remove the holder and fuse Install the Fuse on the Switching Power Supply Circuit Board Install the fuse on the switching power supply board in reve...

Page 35: ...b at the top of the HIM assembly and by pressing upward at the bottom slide the HIM out of the cradle 4 Disconnect the DPI cable from the HIM assembly 5 Remove the screw that secures the DPI HIM assembly to the device 6 Carefully remove the DPI HIM assembly from the cover and disconnect the cable from the connector on the back side of the assembly Install the DPI HIM Assembly on the Protective Cov...

Page 36: ...ective Covers You must remove both the lower protective cover and the power terminal cover to access the power terminals 1 Read the General Safety Precautions on page 10 2 Remove power from the device see page 33 3 Loosen the two screws that secure the power terminal cover to the device and slide the cover down and off the chassis 3 Torque Specification 1 0 N m 8 9 lb in ...

Page 37: ... press in on the sides and pull the cover away from the chassis to release the cover 8 At the top edge of the cover pull the cover away from the device until the pins on the chassis fit in the keyholes of the cover Then lift the cover off the chassis IMPORTANT The backside of the HIM assembly is connected to the control board with a cable Therefore the cover will not release from the chassis until...

Page 38: ...ers in reverse order of removal Communication Adapter and Electromagnetic Interference Shield Replacement Remove the Communication Adapter and Electromagnetic Interference Shield 1 Read the General Safety Precautions on page 10 2 Remove power from the device see page 33 3 Remove the protective covers see page 36 ATTENTION Risk of electric shock exists when power is applied to the power terminals o...

Page 39: ...3 4 Disconnect the interface cable from the communication adapter and set it aside 5 Disconnect any network cables from the adapter and set them aside 6 Remove the four screws that secure the communication adapter to the Electromagnetic Interference EMI shield and remove the adapter 4 5 6 Torque Specification 0 9 N m 8 lb in ...

Page 40: ... the EMI shield to the stand offs on the control board and remove the EMI shield 8 Remove the three stand offs from the control board Install the Communication Adapter and Electromagnetic Interference Shield Install the communication adapter and EMI shield in reverse order of removal 7 Torque Specification 1 0 N m 8 9 lb in 8 Torque Specification 1 0 N m 8 9 lb in ...

Page 41: ...he device see page 33 3 Remove the protective covers see page 36 4 Remove the plug in I O terminal blocks with the wiring kept in place 5 Remove the two M3 x 6 mm screws and washers that secure the I O expansion board to the stand offs on the control board 6 Carefully pull the I O expansion board off connector XBB on the control board IMPORTANT Mark all connections and wires before removal to avoi...

Page 42: ...Frame A Field Controller Part Replacement Procedures 7 Remove the two stand offs from the control board 8 Install one of the existing screws in the lower left corner of the control circuit board 7 Torque Specification 1 0 N m 8 9 lb in 8 Torque Specification 1 0 N m 8 9 lb in ...

Page 43: ...verter Circuit Board 1 Read the General Safety Precautions on page 10 2 Remove power from the device see page 33 3 Remove the protective covers see page 36 4 Remove the plug in I O terminal blocks with the wiring kept in place 5 Remove the two M3 x 6 mm screws and washers that secure the I O converter board to the stand offs on the control board and remove the I O converter board IMPORTANT Mark al...

Page 44: ...Save to a HIM Set on page 14 Download the field controller and adapter parameters to an offline database file by using DriveExecutive See the on line help that is provided with DriveExecutive for information on how to save database files Export a configuration file by using Connected Components Workbench software See the on line help that is provided with Connected Components Workbench for informa...

Page 45: ...g S9 Configures the input signal of analog input 1 terminals 1 and 2 Par71 AnlgIn1Config mustbeprogrammedtomatchtheinputsignaltypethatis selected with this switch S10 Configures the input signal of analog input 2 terminal 3 and 4 Par76 AnlgIn2Config mustbeprogrammedtomatchtheinputsignaltypethatis selected with this switch S11 Configures the input signal of analog input 3 terminals 5 and 6 Par81 An...

Page 46: ...ld Controller Part Replacement Procedures 9 Carefully disconnect the cables from connectors XA and XR on the control board 10 Remove the plug in I O and control terminal blocks with the wiring kept in place 9 10 Control board shown with communication adapter and optional boards removed ...

Page 47: ...x 6 mm screws and washers that secure the control board to the control EMI shield and remove the control board Install the Control Circuit Board Install the control board in reverse order of removal Verify that all DIP switches are set to the correct configuration based on your recorded settings see page 45 11 Torque Specification 1 0 N m 8 9 lb in ...

Page 48: ...ntrol EMI shield that holds the control board to access other components within the device 1 Read the General Safety Precautions on page 10 2 Remove power from the device see page 33 3 Remove the protective covers see page 36 4 Carefully disconnect the cables from connectors XA and XR on the control board 5 Remove the plug in I O terminal blocks with the wiring kept in place if used 4 5 Control bo...

Page 49: ...corner to the chassis Slide the control EMI shield and control board up and out of the device Install the Control EMI Shield and Control Circuit Board Install the control EMI shield and control board in reverse order of removal IMPORTANT Be careful when removing the EMI shield not to pull free any of the gate leads or other cables on the pulse transformer circuit board below the EMI shield 6 Torqu...

Page 50: ...circuit board You must remove both boards to replace either board 1 Read the General Safety Precautions on page 10 2 Remove power from the device see page 33 3 Remove the protective covers see page 36 4 Remove the control EMI shield and control board see page 48 5 For 60 A and 120 A field controllers complete these steps a Remove the four screws that secure the slotted air flow plate to the top of...

Page 51: ...e the slotted air flow plate to the top of the device and remove the plate 7 Remove the plug in control power terminal block from the lower right corner of the pulse transformer circuit board IMPORTANT Mark all connections and wires before removal to avoid incorrect wiring during reassembly Air flow plate 6 6 Torque Specification 1 0 N m 8 9 lb in Torque Specification 1 0 N m 8 9 lb in 7 ...

Page 52: ...Controller Part Replacement Procedures 8 Remove the cables from connectors X3 and X4 at the top of the pulse transformer board For devices without a fan do not remove the jumper in connector X4 9 Remove the plastic screw near the top of the pulse transformer board and retain for reuse 8 9 ...

Page 53: ...r of orange and yellow gate lead cables from connectors KG01 KG06 and KG1 KG6 and push each lead through the appropriate opening in the board 11 Remove the cable from connectors XTA on the lower right side of the board IMPORTANT Carefully remove the gate leads by grasping the connector DO NOT pull the gate leads off by pulling on the wires 11 10 ...

Page 54: ...ghtly on the board slide it toward the top of the device and out of the chassis There is an isolation sheet below the board do not remove this sheet unless it is damaged IMPORTANT The cables from connectors X4 and XTA must slide through the openings in the board as it is lifted out of the device chassis Take care not to damage these cables and connectors 12 Carefully route cables through openings ...

Page 55: ...hing power supply board 14 Remove the four M3 x 6 mm screws and washers that secure the switching power supply board to the stand offs on the back of the pulse transformer board Remove the switching power supply board 15 Remove the plastic stand off and nut that secures the switching power supply board to the back of the pulse transformer board 14 13 Torque Specification 1 0 N m 8 9 lb in 15 15 ...

Page 56: ...ust configure the DIP switches on the circuit board to match the field controller size output current rating 1 Set DIP switches S3 and S4 on the pulse transformer board to the correct settings based on the field controller output current rating See DIP Switch S3 and S4 Settings FIR1 xx FC on page 57 S9 TR01 TR04 TR02 TR05 TR03 TR06 TR1 TR4 TR2 TR5 TR3 TR6 S4 S3 XR XSW1 X4 1 2 3 4 5 6 7 8 1 2 3 4 5...

Page 57: ...k cell below a switch in Table 9 indicates that the setting is OFF Device Output Current Amps DIP Switch S3 DIP Switch S4 S3 1 S3 2 S3 3 S3 4 S3 5 S3 6 S3 7 S3 8 S4 1 S4 2 S4 3 S4 4 S4 5 S4 6 S4 7 S4 8 17 ON ON 60 ON ON ON ON ON ON 120 ON ON ON ON ON ON ATTENTION FailuretoinstalltheIsolationsheetbelowthepulsetransformer and switching power supply boards can result in damage to the field controller...

Page 58: ...have AC current transducers that are installed on the power traces board See AC Current Transducers on Devices with a Power Traces Board 120 A frame A field controllers have AC current transducers that are installed on the bus bars inside the field controller See Remove the AC Current Transducers from 120 A Field Controllers on page 60 ACCurrentTransducersonDeviceswithaPowerTracesBoard The field c...

Page 59: ... transducers to the power traces circuit board and remove the AC current transducers from the device 8 Continue with Install the AC Current Transducers on page 62 RemovetheCurrentTransducerswithNoConnectionBars 6 Remove the four M3 x 6 mm screws and washers that secure the top of the AC current transducers to the power traces board 7 Remove the two screws and washers that secure the top of the wir...

Page 60: ...Remove the power connections from terminals U and V at the bottom of the device 11 Remove the M4 x12 5 mm screws and washers that secure each of the AC current transducers to the U and V phase terminal bus bars IMPORTANT You do not need to remove the windings from the AC current transducers However note the number of times the wire lead is wound around the AC current transducers for proper install...

Page 61: ...l isolation strip at the bottom of the device 13 Remove the top and bottom screws and washers that secure the connecting bus bars and U and V phase terminal bus bars to the SCR modules Remove the connecting bus bars 14 While lifting the terminal bus bars out of the device slide the AC current transducers off the bus bars U phase bus bar V phase bus bar 12 Torque Specification 2 5 N m 22 0 lb in 13...

Page 62: ...r AC current transducers that must be wound with wire leads Wind the wire leads around the new AC current transducers the exact number of times and in the same position as the wires on the AC current transducers that were removed from the power traces board Crimp the connection lugs onto the wire leads before they are secured to the power traces board Wrap wire around AC Current Transducer Crimp c...

Page 63: ...s 1 Read the General Safety Precautions on page 10 2 Remove power from the device see page 33 3 Remove the protective covers see page 36 4 Remove the M5 x 10 mm screws and washers that secure the terminal lugs if present and power and ground wiring to terminals U V W C D and PE at the bottom of the device 5 Remove the control EMI shield and control board see page 48 6 Remove the pulse transformer ...

Page 64: ...rd 8 Remove all M5 x 10 mm screws and washers that secure the board to the SCR modules and power terminal isolation strip Remove the power traces board from the device 9 Remove the screw and washer that secures the top of each of the AC current transducers to the power traces board and remove the current transducers 7 8 8 Torque Specification 2 5 N m 22 0 lb in 9 AC current transducers with connec...

Page 65: ...board Remove the AC current transducers and windings if present from the device Install the Power Traces Circuit Board Install the power traces circuit board in reverse order of removal Verify that the connecting wire on the board is placed in the exact location as previously installed Verify that the wire leads wound around the current transducers if present are in the same location as when previ...

Page 66: ... board see page 48 5 Remove the pulse transformer and switching power supply circuit boards see page 50 6 Remove the two M3 x 6 mm screws that secure the thermostat to the heat sink and remove the thermostat and connected wires from the device Install the Bimetal Thermostat Install the thermostat in reverse order of removal IMPORTANT Mark all connections and wires before removal to avoid incorrect...

Page 67: ... power bridge is configured and the steps that are required to remove the SCR modules See SCR Modules on 17 A and 60 A Field Controllers on page 67 See SCR Modules on 120 A Field Controllers on page 68 SCRModuleson17Aand60AFieldControllers 6 Remove the power traces circuit board See Power Traces Circuit Board Replacement on page 63 The AC current transducers can remain on the power traces board 7 ...

Page 68: ...oller Part Replacement Procedures SCRModuleson120AFieldControllers 6 Remove the isolation sheet 7 Remove the M5 x 10 mm screws that secure the U V W C and D terminal bus bars to the power terminal isolation strip at the bottom of the device 6 7 U Torque Specification 2 5 N m 22 0 lb in C V W D ...

Page 69: ...ecure the connecting bus bars to the anodes of the corresponding SCR modules and remove the bus bars In addition remove the U V and W phase terminal bus bars from the device IMPORTANT The screws that secure these bus bars to the SCR modules are M5 x 16 Retain for reuse with these bus bars only 8 8 Connecting bus bars U Phase bus bar V Phase bus bar W Phase bus bar ...

Page 70: ...er Part Replacement Procedures 9 Remove the four M5 x 16 screws and washers that secure the C and D terminal bus bars to the horizontal bus bars Remove the C and D terminal bus bars 10 Remove the screws and washers that secure the connecting bus bars to the SCR modules and remove the bus bars 9 10 ...

Page 71: ...ning torque for the SCR modules that are installed on the heat sink 11 IMPORTANT Thermal grease must be applied to the bottom of each SCR module before securing it to the heat sink Device Output Current Amps Rockwell Automation Cat No Vendor Vendor Part Number Final Torque 17 SK 20P S7F73 Semikron SKKT27 16E 5 15 N m 44 25 15 lb in IXYS MCC26 16io1B 2 5 4 N m 22 35 4 lb in 60 SK 20P S7F74 Semikron...

Page 72: ...n on 60 Amp Field Controllers on page 73 See Cooling Fan on 120 Amp Field Controllers on page 74 Device Output Current Amps Rockwell Automation Cat No Vendor Vendor Part Number Final Torque 17 SK 20P S7F73 Semikron SKKT27 16E 3 15 N m 26 5 15 lb in IXYS MCC26 16io1B 2 5 4 N m 22 35 4 lb in 60 SK 20P S7F74 Semikron SKKT42 16E 3 15 N m 26 5 15 lb in ABB IXYS MCC44 16io1B 2 5 4 N m 22 35 4 lb in ABB ...

Page 73: ...the top of the chassis The fan is connected via a cable to the switching power supply board and therefore will not pull free from the device until the cable is disconnected 4 Disconnect the fan cable from connector XV on the switching power supply board and remove the fan and air flow plate 5 Remove the twoM4 x 12 5 mm screws that secure the fan and spacers to the air flow plate and remove the fan...

Page 74: ...mpFieldControllers 120 Amp Frame A field controllers have a cooling fan that is installed on the bottom of the device 3 Loosen the two screws that secure the power terminal cover to the device and slide the cover down and off the chassis 4 If necessary remove the power wiring from the device terminals 3 Torque Specification 1 0 N m 8 9 lb in 4 ...

Page 75: ...e to the bottom of the device chassis Carefully pull the air flow plate and fan assembly down and off the device 6 Disconnect the black and red wires from the fan terminal block that is on the air flow plate IMPORTANT Mark all connections and wires before removal to avoid incorrect wiring during reassembly 5 6 TorqueSpecification 3 0 N m 26 5 lb in 5 5 Torque Specification 3 0 N m 26 5 lb in ...

Page 76: ...flow housing Install the Cooling Fan Install the cooling fan in reverse order of removal 7 IMPORTANT For both fan configurations verify that the air flow arrow on the fan is pointed toward the top of the device IMPORTANT For devices with a fan that is connected to the top air flow plate verify that the two spacers are properly placed during installation Air flow arrow must point toward top of devi...

Page 77: ...y Replacement 79 Protective Cover Replacement 80 Communication Adapter and Electromagnetic Interference Shield Replacement 83 I O Expansion Circuit Board Replacement 85 115V AC to 24V DC I O Converter Circuit Board Replacement 87 Control Circuit Board Replacement 88 Control Electromagnetic Interference Shield Removal and Closure 90 Switching Power Supply Board Fuse Replacement 92 Pulse Transformer...

Page 78: ... Board TBO 32 20P S5V62 85 115V AC to 24V DC I O Converter Board 20P S520L 87 Control Circuit Board R PFX32 FC SK 20P S5RP1 88 Power Circuit Boards Pulse Transformer Board for 200V AC Field Controller 245 570 A FIR2 11 FC SK 23P S5N465 93 Pulse Transformer Board for 500V AC Field Controller 245 570 A FIR2 51 FC SK 23P S5N19 Switching Power Supply Board SW2 32 SK 20P S5N10 93 AC Line Snubber Board ...

Page 79: ... 3 Disconnect the DPI cable from the HIM assembly ATTENTION Remove power before you make or break cable connections When you remove or insert a cable connector with power applied an electrical arc can occur An electrical arc can cause personal injury or property damage by sendinganerroneoussignaltoyoursystemfielddevices causingunintended machine motion causing an explosion in a hazardous environme...

Page 80: ...lly remove the DPI HIM assembly from the cover and disconnect the cable from the DPI connector on the back side of the assembly Install the DPI HIM Assembly Install the DPI HIM assembly in reverse order of removal Protective Cover Replacement Remove the Protective Covers 1 Read the General Safety Precautions on page 10 2 Remove power from the device see page 79 4 5 Torque Specification 0 8 N m 7 l...

Page 81: ...r down and off the device chassis 5 Loosen but do not remove the screws that secure the top cover to the device then slide the cover up and off the device chassis IMPORTANT The backside of the HIM assembly is connected to the control board with a cable Therefore the cover will not release from the chassis until the cable is disconnected 3 Torque Specification 1 5 N m 13 3 lb in 4 U V C D W Torque ...

Page 82: ...e connector on the upper right corner of the control board and set the cover aside Install the Protective Covers Install the protective covers in the reverse order of removal ATTENTION Risk of electric shock exists when power is applied to the power terminals of the device The power terminal cover and protective covers must be replaced before you apply power to the device 6 ...

Page 83: ... Read the General Safety Precautions on page 10 2 Remove power from the device see page 79 3 Remove the protective covers from the device see page 80 4 Disconnect the interface cable from the communication adapter and set it aside 5 Disconnect any network cables from the adapter and set them aside 6 Remove the four screws that secure the communication adapter to the electromagnetic interference EM...

Page 84: ...e the EMI shield to the standoffs on the control board and remove the EMI shield 8 Remove the three standoffs from the control board Install the Communication Adapter and Electromagnetic Interference Shield Install the communication adapter and EMI shield in reverse order of removal 7 Torque Specification 1 0 N m 8 9 lb in 8 Torque Specification 1 0 N m 8 9 lb in ...

Page 85: ...e see page 79 3 Remove the protective covers from the device see page 80 4 Remove the plug in I O terminal blocks with the wiring kept in place 5 Remove the two M3 x 6 mm screws and washers that secure the I O expansion board to the stand offs on the control board 6 Carefully pull the I O expansion board off connector XBB on the control board IMPORTANT Mark all connections and wires before removal...

Page 86: ...ent Procedures 7 Remove the two stand offs from the control board 8 Install one screw in the lower left corner of the control board Install the I O Expansion Circuit Board Install the I O expansion board in reverse order of removal 7 Torque Specification 1 0 N m 8 9 lb in 8 Torque Specification 1 0 N m 8 9 lb in ...

Page 87: ...page 79 3 Remove the protective covers from the device see page 80 4 Remove the plug in I O terminal blocks with the wiring kept in place 5 Remove the two M3 x 6 mm screws and washers that secure the I O converter board to the stand offs on the control board and remove the I O converter board 6 Remove the two stand offs from the control board IMPORTANT Mark all connections and wires before removal...

Page 88: ...ler and adapter parameters to an offline database file by using DriveExecutive See the on line help that is provided with DriveExecutive for information on how to save database files Export a configuration file by using Connected Components Workbench software See the on line help that is provided with Connected Components Workbench for information on how to export a device configuration file 3 Rem...

Page 89: ...nal of analog input 1 terminals 1 and 2 Par 71 Anlg In1 Config must be programmed to match the input signal type that is selected with this switch S10 Configures the input signal of analog input 2 terminal 3 and 4 Par 76 Anlg In2 Config must be programmed to match the input signal type that is selected with this switch S11 Configures the input signal of analog input 3 terminals 5 and 6 Par 81 Anlg...

Page 90: ...ased on your recorded settings Control Electromagnetic Interference Shield Removal and Closure Move the Control Electromagnetic Interference Shield You must move lower the control electromagnetic interference EMI shield that holds the control board to access other components within the device 1 Read the General Safety Precautions on page 10 2 Remove power from the device see page 79 3 Remove the p...

Page 91: ...from connectors XA and XR on the control board 5 Loosen the two captive screws at the top of the control EMI shield and lower shield Close the Control EMI Shield in the Service Position Close the control EMI shield in reverse order IMPORTANT If the device is not in a vertical position the control EMI shield will not remain open without a means of restraint 4 5 ...

Page 92: ...of the fuse holder Carefully push down and turn the fuse counterclockwise When the fuse holder releases remove the holder and fuse Install the Fuses on the Switching Power Supply Circuit Board Install the fuses on the switching power supply board in reverse order of removal Pulse Transformer Circuit Board Fuse Replacement Remove the Fuses on the Pulse Transformer Circuit Board 1 Read the General S...

Page 93: ... on the pulse transformer circuit board in reverse order of removal Pulse Transformer and Switching Power Supply Circuit Boards Replacement Remove the Pulse Transformer and Switching Power Supply Circuit Boards The switching power supply circuit board is on the back of the pulse transformer circuit board You must remove both boards to replace either board 1 Read the General Safety Precautions on p...

Page 94: ... cable from connector XTA at the bottom of the pulse transformer board 6 Remove the plug in terminals from the control power block at the bottom of the pulse transformer board 7 Move the control EMI shield see page 90 IMPORTANT The air flow plate is also secured to the pulse transformer circuit board and therefore cannot yet be removed Instructions for doing so are included later in this procedure...

Page 95: ... Procedures Chapter 4 8 Remove the two screws that secure the air flow plate to the top of the pulse transformer board and lift the plate off the device chassis 9 Remove the cable from connector XV on the switching power supply board 8 9 Front of device Switching power supply board Pulsetransformer board ...

Page 96: ... TG001A EN P March 2018 Chapter 4 Frame B Field Controller Part Replacement Procedures 10 Remove the cables from connector X4 on the pulse transformer board 11 Remove the ground connection at the left side of the pulse transformer board 10 11 ...

Page 97: ...e lead cables from connectors KG01 KG06 and KG1 KG6 and push each lead through the appropriate opening in the board 13 Remove the seven screws that secure the board to the stand offs on the device chassis and remove the boards from the device IMPORTANT Carefully remove the gate leads by grasping the connector DO NOT pull the gate leads off by pulling on the wires 12 13 ...

Page 98: ...ller Part Replacement Procedures 14 Remove the cable from connector XUV on the switching power supply board 15 Remove the six screws and washers that secure the switching power supply board to the stand offs on the back of the pulse transformer board Remove the switching power supply board 15 14 ...

Page 99: ...ircuit board you must configure the DIP switches on the circuit board to match the field controller size output current rating 1 Set DIP switches S3 and S4 on the pulse transformer board to the correct settings based on the field controller output current rating See DIP Switch S3 and S4 Settings FIR2 xx FC on page 100 PE XR XTA T01 T4 T1 T2 T02 T5 T3 T6 T03 T06 T04 T05 TR3 78 79 35 36 75 76 U2 V2 ...

Page 100: ...elow a switch in Table 11 indicates that the setting is OFF Output Current Amps DIP Switch S3 DIP Switch S4 S3 1 S3 2 S3 3 S3 4 S3 5 S3 6 S3 7 S3 8 S4 1 S4 2 S4 3 S4 4 S4 5 S4 6 S4 7 S4 8 245 ON ON ON ON ON ON ON ON 365 ON ON ON ON ON ON ON 570 ON ON ON ON ON ON ON ON ATTENTION Each gate lead cable must be connected to the exact connector from which it was removed on the pulse transformer circuit ...

Page 101: ... 4 Remove the pulse transformer and switching power supply boards from the device see page 93 You do not need to remove the switching power supply board from the back of the pulse transformer board for this procedure 5 Remove the two screws and washers that secure the red and blue wires from the AC line snubber board to the bus bars and remove the wires 6 Remove the three screws and washers that s...

Page 102: ...rs that secure the AC line snubber board to the device frame and lift the board Note The wires from the resistors are connected to the board Therefore the board cannot be removed until the resistors are removed 8 Remove the two screws that secure each resistor six total to the device heat sink and remove the resistors and AC line snubber board from the device 7 8 ...

Page 103: ...ds to the bottom of the device and remove the shields 4 Remove the bolts washers and wiring from the power terminals U V W C and D 5 Remove the protective covers from the device see page 80 6 Remove the pulse transformer and switching power supply boards from the device see page 93 You do not need to remove the switching power supply board from the back of the pulse transformer board for this proc...

Page 104: ...ts and washers that secure the red and blue wires from the AC line snubber board to the terminal bus bars C and D and remove the wires 8 Remove the three bolts and washers that secure the black wires from the resistors to the terminal bus bars U V and W and remove the wires 8 7 Bolt Lock Washer Flat Washer Note the proper order of washers for re installation ...

Page 105: ...1A EN P March 2018 105 FrameB Field Controller Part Replacement Procedures Chapter 4 9 Remove the three bolts that remain and washers that secure the AC input bus bars U V and W phases to the anode of the SCR modules and remove the bus bars 9 9 ...

Page 106: ...0 Remove the three pairs of upper gate leads from the SCR modules 11 Remove the bolts and washers that secure the DC bus bars to the SCRs and remove the bus bars 12 Remove the four bolts and washers and stand off that secure the power terminal bus bars to the isolation bar and slide the bus bars up and out of the device 11 10 12 ...

Page 107: ...t secure each SCR module to the heat sink and remove the SCR module Install the SCR Modules Install the SCR modules in reverse order of removal Use the following orientation for installing the SCR modules IMPORTANT Thermal grease must be applied to the bottom of each SCR module before securing it to the heat sink 13 1 2 3 2 1 3 Gate Leads at Top Gate Leads at Bottom ...

Page 108: ...ay VSKT230 16PbF 4 6 N m 10 35 4 53 lb in 10 IXYS MCC225 16io1 4 5 7 N m 39 8 62 lb in Infineon TT210N16KOF 5 N m 15 44 25 lb in 15 570 SK 20P S737F IXYS MCC312 16io1 4 5 7 N m 39 8 62 lb in Semikron SKKT330 16E 5 15 N m 44 25 15 lb in Infineon TT285N16KOF 5 N m 15 44 25 lb in 15 Device Output Current Amps Rockwell Automation Cat No Vendor Vendor Part Number Final Torque 245 SK 20P S7F79 Semikron ...

Page 109: ...4 The longer legs of the intermediate AC input bus bars connect to the top of the SCR modules Five of the bolts are 24 mm long and the rest are 20 mm long Install the 24 mm bolts in the following locations Intermediate Bus Bar Phase U V or W Bus Bar SCR Module on Heat Sink Top of Device Long Leg Short Leg 24 mm bolt locations ...

Page 110: ...elds to the bottom of the device and remove the shields 4 Remove the bolts washers and wiring from the U and V phase AC input power terminals 5 Remove the protective covers from the device see page 80 6 Remove the pulse transformer and switching power supply boards from the device see page 93 You do not need to remove the switching power supply board from the back of the pulse transformer board fo...

Page 111: ...ures Chapter 4 7 Remove the bolts and washers that secure the U and V phase AC input bus bars to the isolation bar 8 Remove the bolts and washers that secure the resistor wires and the connecting bus bars to the U and V Phase SCR modules and remove the wires and bus bars 7 8 Connecting bus bar Connecting bus bar ...

Page 112: ...r that secures each of the AC current transducers to the device frame and remove the AC current transducers Install the AC Current Transducers Install the AC current transducers in reverse order of removal Note the color and location of each of the four wires that are connected to the AC current transducers to ensure that each wire is properly connected during installation Use cable ties to bundle...

Page 113: ... terminal and the D power terminal 5 Remove the protective covers from the device see page 80 Device Output Current Amps Rockwell Automation Cat No Vendor Vendor Part Number Final Torque 245 SK 20P S7F79 Semikron SKKT162 16E 5 N m 15 44 25 lb in 15 IXYS MCC162 16io1 4 5 5 5 N m 39 8 48 7 lb in 365 SK 20P S7F41 Semikron SKKT273 16E 9 N m 15 79 6 lb in 15 Vishay VSKT230 16PbF 4 6 N m 10 35 4 53 lb i...

Page 114: ...ly boards from the device see page 93 You do not need to remove the switching power supply board from the back of the pulse transformer board for this procedure 7 Remove the bolt and washer that secures the U phase terminal bus bar to the terminal isolation bar 8 Remove the bolts and washers that secure the connecting bus bar to the U phase SCR modules and remove the bus bars 7 8 8 ...

Page 115: ...lacement Procedures Chapter 4 9 Remove the bolt and washers that secure the D terminal bus bar to the terminal isolation bar 10 Remove the screw and washer that secures the wire to the bus bar and the bolt and washer that secures the U phase bus bar to the SCR module and remove the bus bar 9 10 10 ...

Page 116: ...onnections on the two leads of the bimetal thermostats 12 Remove the bimetal thermostats from the heat sinks by unscrewing them at the base Install the Bimetal Thermostats Install the bimetal thermostats in reverse order of removal 11 and 12 IMPORTANT Thermal grease must be applied to the bottom of the bimetal thermostats before securing them to the heat sink ...

Page 117: ...emove the two screws that secure the rear plastic shield to the bottom of the device and remove the shield 4 Locate the cooling fan terminal block on the bottom of the device and loosen the screws that secure the fan power supply wires red and black to the terminal block and remove the wires IMPORTANT Note the color and location of each of the wires that are connected to the cooling fan to ensure ...

Page 118: ...ws that secure the fan to the device frame You must insert a Phillips head screwdriver through the hole in the front of the fan housing to reach and remove the screws Remove the fan from the device Install the Cooling Fans Install the cooling fans in reverse order of removal Verify that the air flow direction arrow on the fans is pointing toward the heat sink on the device 5 6 Insert a screwdriver...

Page 119: ...e protective covers are installed on the field controller 6 Apply power to the control circuits terminals U2 and V2 of the device 7 Restore the field controller and communication adapter parameter configuration using one of these methods Restore a saved HIM Set to the field controller Upload the field controller and adapter configuration from an offline database file to the field controller by usi...

Page 120: ... is set to the load nominal rated voltage for the field controller 179 Load Rated Curr is set to the load nominal rated current 481 UnderVolt Thresh is set to an appropriate value typically 85 of the nominal AC line voltage 9 Complete the Verify Field Controller Operation section of Chapter 1 Startup in the PowerFlex DC Field Controller Programming Manual publication 23PFC PM001 ...

Page 121: ...rmal Protection Control Circuit Diagram 125 Frame A Heat Sink Monitoring Control Circuit Diagram 125 Frame B Field Controllers Frame B Field Controller Interconnection Diagram 126 Frame B Power Feedback Connections Diagram 126 Frame B Control Circuit Input Power Diagram 127 Frame B Motor Thermal Protection Control Circuit Diagram 127 Frame B Heat Sink Monitoring Control Circuit Diagram 128 Frame B...

Page 122: ... T2 T3 T4 T5 T6 1D2 1C2 1D2 1C2 KG4 KG2 KG5 KG6 KG3 KG01 KG04 KG02 KG05 KG03 KG06 KG1 D V C U PE W XR PE XY XI2CA XTA XCD_10 X4 1C2 1D2 Cooling Fan Note Not all frame A devices contain a fan Bimetal Thermostat Switching Power Supply Board Device Cover Human Interface Module 20 HIM Ax CT U CT V Control Board Pulse Transformer Board Field controllers contain either a power traces board or bus bars ...

Page 123: ... Schematics Appendix A Figure 8 Frame A Power Feedback Connections Diagram Hardware connections to power structure bus bars U V W XR15 XR16 XR17 C D XR19 XR18 1M0 1M0 1M0 1M0 1M0 1M0 1M0 1M0 1M0 1M0 1M0 1M0 U V W Note 6 x 665 kohm resistors Note Note Note Note Note ...

Page 124: ...A Control Circuit Input Power Diagram 5 5 4 4 7 7 6 6 5 5 4 4 7 7 6 6 6 6 7 7 4 4 5 5 5 5 4 4 7 7 6 6 6 6 7 7 4 4 5 5 6 6 7 7 4 4 5 5 G01 K01 K04 G04 G02 K02 K05 G05 G03 K03 K06 G06 G1 K1 K4 G4 G2 K2 K5 G5 G3 K3 K6 G6 SCR Module 1 SCR Module 01 SCR Module 2 SCR Module 02 SCR Module 3 SCR Module 03 L1 1C2 1D2 V2 U2 V91 230 VAC or 115 VAC input To Switch Mode Power Supply SMPS ...

Page 125: ...matics Appendix A Figure 11 Frame A Motor Thermal Protection Control Circuit Diagram Figure 12 Frame A Heat Sink Monitoring Control Circuit Diagram 24V XR 32 0VI 78 79 1K Overtemp Fault Signal XR 10 XR 12 XR 10 XR 12 X4 1 X4 2 XSW 2 XSW 1 24V 0V24 U3 5V OTS Control Board ...

Page 126: ...ield Controller Interconnection Diagram T XP3 X3 XP XR PE XY XI2CA XTA XCD_I0 X4 1C2 1D2 K G K G K G K G K G K G XA XR XFCD XP3 XA XV XUV T CT U Bimetal Thermostats T2 T3 T1 1D2 1C2 1C2 1D2 Device Cover Pulse Transformer Board Control Board Switching Power Supply Board T4 T5 T6 Fans W D V C U PE CT V Human Interface Module 20 HIM Ax ...

Page 127: ...B Control Circuit Input Power Diagram Figure 16 Frame B Motor Thermal Protection Control Circuit Diagram W V U D C XR15 XR16 XR17 XR19 XR18 F1 F2 F3 S9 PE PE 1W 1W 1W 1W 1W 1W 1W 1W 1W 1W 1W 1W 1W 1W 1W 1W 1W 1W 1W 1W 1W 1W 1W 1W 1W 1W 1W 1W 1W 1W 1W 1W 1W 1W 1W 230 VAC or 115 VAC Input To Switch Mode Power Supply SMPS U2 V2 1C2 1D2 78 79 1K XR 32 0VI 15V ...

Page 128: ... Frame B Heat Sink Monitoring Control Circuit Diagram Figure 18 Frame B AC Line Snubber Circuit Diagram XR 12 XR 12 XR 10 XR 10 5V 0V24 XSW 1 24V XSW 2 X4 1 X4 2 U7 OTS Control Board PulseTransformer Board R 2U2 3U2 2V2 3V2 2W2 3W2 C D R R R R R AC Line Snubber Board R1 R2 R3 R 4 R 5 R6 C D U V W ...

Page 129: ... A and B Field Controllers Figure 19 Frame A and B AC Line Measurement Points Diagram Figure 20 Frame A and B Contactor Control Relays Control Circuit Diagram 100 K 100 K 100 K V W U XR 15 XR 16 XR 17 15 V 15 V XY22 XY21 15 15 15 15 XY18 0V24 U6 K7 K8 24V 35 36 75 76 U2 S1 XR XR XR XR 7 6 5 4 ...

Page 130: ...130 Rockwell Automation Publication 23PFC TG001A EN P March 2018 Appendix A Schematics Notes ...

Page 131: ... Connections Frame A 133 Pulse Transformer Board to Control Board Connections Frame A 134 Frame A Switching Power Supply Board Layout 135 Switching Power Supply to Fan Connections Frame A 135 Switching Power Supply Board to Control Board Connections Frame A 136 Frame B Pulse Transformer Board Layout 137 Pulse Transformer Board to Switching Power Supply Connections Frame B 138 Pulse Transformer Boa...

Page 132: ...rd Layouts and Connections Frame A Pulse Transformer Board Figure 21 Frame A Pulse Transformer Board Layout S9 TR01 TR04 TR02 TR05 TR03 TR06 TR1 TR4 TR2 TR5 TR3 TR6 S4 S3 XR XSW1 X4 1 2 3 4 5 6 7 8 1 2 3 4 5 6 7 8 78 79 35 36 75 76 U2 V2 XSW XI2CA XTA 1C2 1D2 Control Power Terminal Block ...

Page 133: ...rd Point 1 1 Connection on back side of circuit board to Pin Number Switching Power Supply Board Connector Description 1C2 4 XUV Rectified U2 V2 voltage approx 150 300V DC 3 not used 1D2 2 not used 1 Common Pulse Transformer Board Connector Pin Number to Pin Number Bimetal Thermostat Connector Description X4 1 1 X4 24V supply through resistor 2 2 24V common Pulse Transformer Board Connector Pin Nu...

Page 134: ... GNDP 8 8 I armature 0 signal 9 9 0V GNDP 10 10 Heat sink over temperature 11 11 Digital U1 V1 sync signal 12 12 0V GNDP 13 13 CT burden signal 14 14 0V GND 15 15 Reduced U sync signal 16 16 Reduced V sync signal 17 17 Reduced W sync signal 18 18 Reduced C armature signal 19 19 Reduced D armature signal 20 20 0V GNDP 21 21 Gate signal SCR 4 01 22 22 0V GNDP 23 23 Gate signal SCR 5 02 24 24 0V GNDP...

Page 135: ...ching Power Supply Board Figure 22 Frame A Switching Power Supply Board Layout Table 16 Switching Power Supply to Fan Connections Frame A XA 1 2 15 16 6 1 XSW XY1 1 4 XSW1 1 4 XV F1 1C2 1D2 XUV Fuse location Control Board Connector Pin Number to Pin Number Fan Connector Description XV 1 1 XV 24V 2 2 3 3 24V supply common 4 4 ...

Page 136: ...Frame A See Pulse Transformer Board to Switching Power Supply Connections Frame A on page 133 Switching Power Supply Board Connector Pin Number to Pin Number Control Board Connector Description XA 1 1 XA 5V 2 2 5V common 3 3 5V 4 4 5V common 5 5 5V 6 6 5V common 7 7 SMPS supply input under voltage 8 8 9 9 15V 10 10 11 11 15V common 12 12 13 13 15V 14 14 15 15 24V common 16 16 24V ...

Page 137: ...Circuit Board Layoutsand Connections Appendix B Frame B Pulse Transformer Board Figure 23 Frame B Pulse Transformer Board Layout PE XTA T01 T4 T1 T2 T02 T5 T3 T6 T03 T06 T04 T05 TR3 78 79 35 36 75 76 U2 V2 S9 X4 XSW XI2CA S4 S3 XR 1U2 1V2 Control Power Terminal Block ...

Page 138: ...B PulseTransformer Board Point to Pin Number Switching Power Supply Board Connector Description 1U2 4 XUV Rectified U2 V2 voltage approx 150 300V DC 3 not used 1V2 2 not used 1 Common Pulse Transformer Board Connector Pin Number to Pin Number Bimetal Thermostat Connector Description X4 1 1 X4 24V supply through resistor 2 2 24V common Pulse Transforme r Board Connector Pin Number to Pin Number Cur...

Page 139: ...mature 0 signal 9 9 0V GNDP 10 10 Heat Sink over temperature 11 11 Digital U1 V1 sync signal 12 12 0V GNDP 13 13 CT burden signal 14 14 0V GND 15 15 Reduced U sync signal 16 16 Reduced V sync signal 17 17 Reduced W sync signal 18 18 Reduced C armature signal 19 19 Reduced D armature signal 20 20 0V GNDP 21 21 Gate signal SCR 4 01 22 22 0V GNDP 23 23 Gate signal SCR 5 02 24 24 0V GNDP 25 25 Gate si...

Page 140: ...d to Control Board Connections Frame B See Pulse Transformer Board to Switching Power Supply Connections Frame B on page 138 1 16 XSW XUV F1 F2 XV XA SB SA Switching Power Supply Board Connector Pin Number to Pin Number Control Board Connector Description XA 1 1 XA 5V 2 2 5V common 3 3 5V 4 4 5V common 5 5 5V 6 6 5V common 7 7 SMPS supply input undervoltage 8 8 9 9 15V 10 10 11 11 15V common 12 12...

Page 141: ...n page 134 and Switching Power Supply Board to Control Board Connections Frame A on page 136 A B C A A B B Z Z COM V A A B B Z Z COM V A B C 21 22 23 24 25 26 27 28 29 30 1 2 3 4 5 6 7 8 9 10 31 32 33 34 35 36 37 38 39 40 11 12 13 14 15 16 17 18 19 20 21 22 23 24 25 26 27 28 29 30 1 2 3 4 5 6 7 8 9 10 11 12 13 14 15 16 17 18 19 20 31 32 33 34 35 36 37 38 39 40 DEBUG S15 S3 S2 S1 S0 RST ACT RUN PWR...

Page 142: ...142 Rockwell Automation Publication 23PFC TG001A EN P March 2018 Appendix B Circuit Board Layouts and Connections Notes ...

Page 143: ...PFC TG001A EN P March 2018 143 Appendix C Troubleshooting Flow Chart This chart presents the steps for troubleshooting a Power Failure fault F3 See Troubleshoot a Control Power Supply Failure on page 15 for the step by step instructions ...

Page 144: ...the control board I O terminal blocks are not short circuited Are terminals short circuited No Yes Remove cable from connector XR on control board and ohmmeter all voltage testpoints and commons to verify no short circuits values should be 200 kohm Repair short circuits Any values lower than 200 kohm Replace the control board Yes No Remove power from the drive and replace the fuse on the switching...

Page 145: ...rkbench software 12 contactor fault 29 control board frame A install 47 remove 44 control board frame B install 90 remove 88 control EMI shield frame B close 91 move 90 control power supply failure 15 cooling fan frame A install 76 remove 72 cooling fan frame B install 118 remove 117 D DPI HIM assembly frame A install 35 remove 35 DPI HIM assembly frame B install 80 remove 79 DriveExecutive softwa...

Page 146: ...n save 14 power removing 33 power failure fault 15 power traces board frame A install 65 remove 63 protective cover frame A install 38 remove 36 protective cover frame B install 82 remove 80 PTC 28 pulse transformer board test 25 pulse transformer board frame A install 56 remove 50 pulse transformer board frame B install 99 remove 93 pulse transformer board fuse frame B install 93 remove 92 R rela...

Page 147: ...7 remove 103 service tool list 12 spare part list frame A 32 frame B 78 switching power supply board frame A fuse 34 install 56 remove 50 switching power supply board frame B install 99 remove 93 switchingpowersupplyboardfuse frameB install 92 remove 92 T test pulse transformer board 25 SCR module 22 testpoint location 18 19 thermal switch 28 thermistor 28 tool list service 12 troubleshoot power f...

Page 148: ...148 Rockwell Automation Publication 23PFC TG001A EN P March 2018 Index Notes ...

Page 149: ......

Page 150: ... code to route your call directly to a technical support engineer http www rockwellautomation com global support direct dial page Literature Library Installation Instructions Manuals Brochures and Technical Data http www rockwellautomation com global literature library overview page Product Compatibility and Download Center PCDC Gethelp determining how products interact check features and capabili...

Reviews: