17
Another way of setting the Rhythm's Program is to bring it over from Programs Mode. Press
[PROGRAMS]
to enter Programs Mode, and find the Program that you want. Then, hold down
[PROGRAMS]
and press
[RHYTHMS]
, and the Rhythm's Program will be set. This works in the other direction as well–hold down
[RHYTHMS]
and press
[PROGRAMS]
to bring the Rhythm's Program over to Programs Mode, perhaps for
some quick editing.
When you've found the Program you want to use for this drum, press the
DATA DIAL
.
b. Level:
Turn the
DATA DIAL
clockwise to edit the drum's overall volume.
c. Pan:
Turn the
DATA DIAL
to edit the drum's position in the stereo field.
d. Sequence:
Turn the
DATA DIAL
clockwise to edit the drum's Sequence. (Remember, this will edit the
Sequence for just this one drum, not for all the drums that make up the Rhythm setting.) Press the
DATA
DIAL
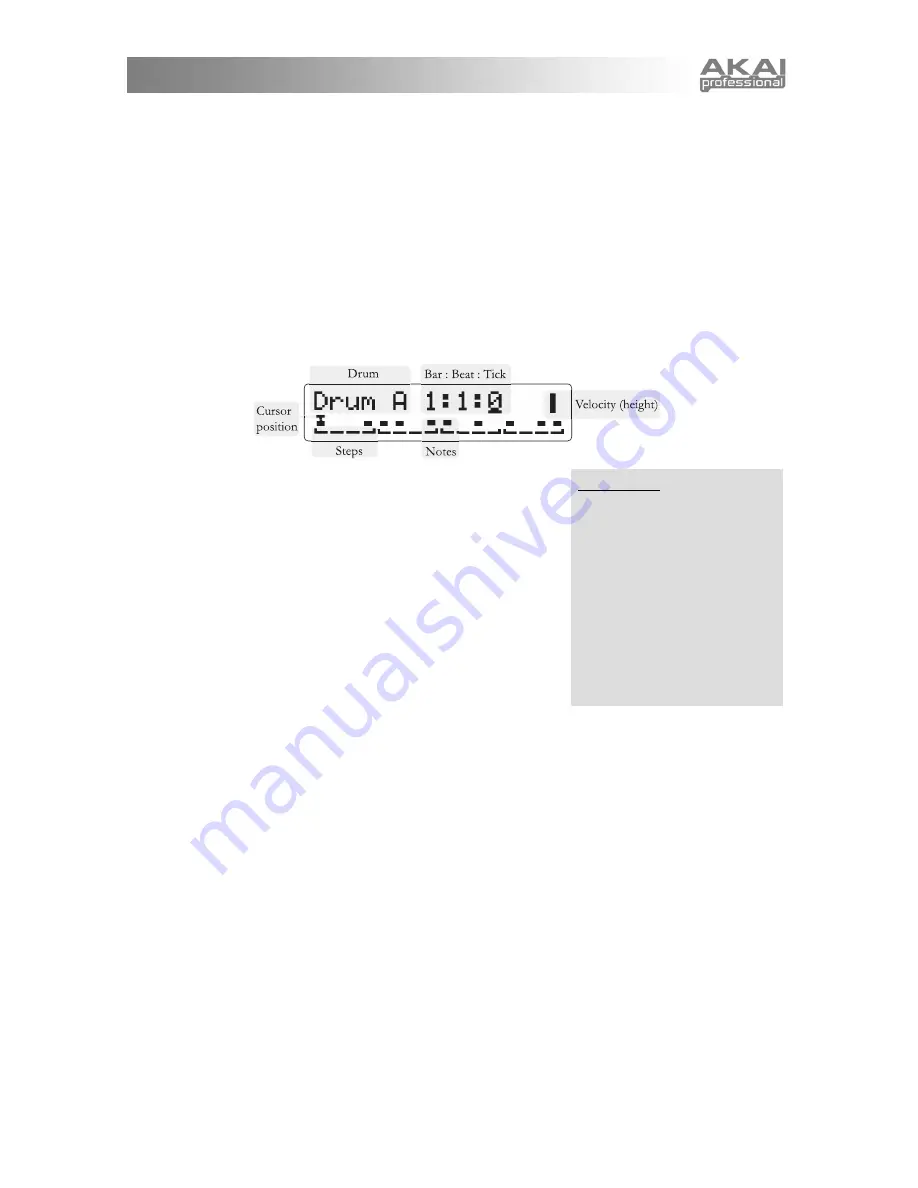
to edit the Sequence. The display will show a grid like this one:
In the top line, the screen indicates that Drum A is being edited in Step
mode. The cursor is at bar 1, beat 1, tick 0, shown as 1:1:0.
In the bottom line, each of sixteen steps is shown. Rectangles appear
where notes are present.
Turn the DATA DIAL to travel amongst the different notes in the
Sequence. For Sequences that require more than one screen, keep
turning the knob – the display will track your position in its upper right
position.
Adding notes:
To add a note, press the white key that
corresponds to that particular drum. For instance, drum A is
controlled using the A above middle C, labeled voice. Your
velocity information will be recorded, as well as the position of
the
(PITCH)
,
(MOD1)
,
and
(MOD2)
wheels.
Note that you can press multiple keys at once in order to place multiple drums at a step. In fact, you
can enter an entire Rhythm at once simply by playing it on the keys, as long as each step has at least
one drum note.
If you play a key that does not correspond to any drum, the cursor will advance, but the Rhythm will not
be changed. When entering a Rhythm, sometimes it's helpful to continuously tap on the highest note of
the keyboard, to control the rate at which the cursor advances.
After pressing the key, the cursor will automatically advance one step.
Removing notes:
To remove a note, press any black key on the right side of the keyboard. The step
will be erased, and the cursor will advance one step. The note is only removed from the drum that is
displayed on the screen; all other drums are not affected.
This makes it easy to replace the Sequence for a particular drum without explicitly erasing it
beforehand. Simply play the Sequence into the step editor, using a black key as a "rest."
Changing note velocities:
Again, you must be in the Sequence editing screen for that particular note's
Program. Place the cursor over the note you want to edit and press the
DATA DIAL
normally. You will
be able to change the velocity by turning the
DATA DIAL
. You can remove the note by turning the
velocity down to zero.
While you're editing velocity, you can play any key to hear what the note sounds like at that velocity.
You will hear all drums which have notes at the step.
Time display
The MINIAK displays time as
"bar:beat:tick". There are four
beats in a bar, and 120 ticks in a
beat.
Three-step beats land on 0, 40,
and 80.
Four-step beats land on 0, 30,
60, and 90.
Five-step beats land on 0, 24,
48, 72, and 96.
Summary of Contents for MINIAK
Page 1: ...WWW AKAIPRO COM REFERENCE MANUAL ENGLISH 1 55 ...
Page 2: ......
Page 58: ......
Page 59: ......
Page 60: ...WWW AKAIPRO COM ...


