CIRCUIT ADJUSTMENTS
Preparation:
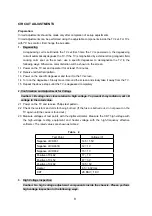
Circuit adjustments should be made only after completion of set-up adjustments.
Circuit adjustments can be performed using the adjustable components inside the TV set. For TVs
with I
2
C bus control, first change the bus data.
1. Degaussing
A degaussing coil is built inside the TV set. Each time the TV is powered on, the degaussing
coil will automatically degauss the TV. If the TV is magnetized by external strong magnetic field,
causing color spot on the screen, use a specific degausser to demagnetize the TV in the
following ways. Otherwise, color distortion will be shown on the screen.
1.1 Power on the TV set and operate it for at least 15 minutes.
1.2 Receive red full-field pattern.
1.3 Power on the specific degausser and face it to the TV screen.
1.4 Turn on the degausser. Slowly move it around the screen and slowly take it away from the TV.
1.5 Repeat the above steps until the TV is degaussed completely.
2. Confirmation and Adjustment for Voltage
Caution: +B voltage has close relation to high voltage. To prevent X-ray radiation, set +B
voltage to the rated value.
2.1 Power on the TV and receive Philips test pattern.
2.2 Check the resistors and coils for being burned. (If the fuse is burned out, do not power on the
TV again until the cause is found out.)
2.3 Measure voltages of test points with the digital voltmeter. Measure the CRT high voltage with
the high-voltage testing equipment and heater voltage with the high-frequency effective
voltmeter. The rated values are shown as table 2.
Table 2
Test Point
Voltage (V)
Negative of VD831
145 1.5V
Negative of VD461B
12 1V
Negative of VD832
15 1V
Positive of C462
17 1V
Positive of C452
47 3V
Positive of C492
195 5V
Heater
6.3 0.3Vrms
CRT
28.8KV 1KV
3. High Voltage Inspection
Caution: No high voltage adjustment components inside the chassis. Please perform
high voltage inspection in the following ways.
8
Summary of Contents for 25CT23FSR
Page 1: ...SERVICE MANUAL Models 25CT23FSR 29CT23FSR www akai ru COLOUR TV SET ...
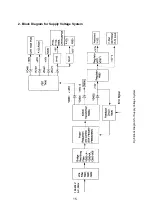
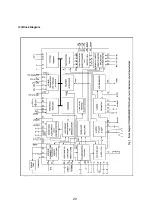
Page 21: ... 3 Block Diagram 7 20 ...
Page 22: ...8 21 ...
Page 23: ... 4 Pining 5 Refer to Table 12 about Functions and Data of the IC s Pins 9 22 ...
Page 31: ... 2 Circuit Block Diagram Dwg MK 003 50mm Fig 18 Fig 17 3 Pin Configuration and Functions 30 ...
Page 46: ...CIRCUIT DIAGRAM JUC 820 975 JUC 820 591 JUC 820 725 JUC 820 644 APPENDIX ...


