background image

1 DA (double azimuth) 4 heads 

The unit employs DA 4 heads to enable recording and playback at 
2 different speeds (SP/EP) for up to 8 hours. 

2 HQ - High Picture Quality 

The unit incorporates the latest designs in VHS circuits to enhance 
the picture quality. 

3 Super Quick Start Mechanism 

Playback starts in 0.7 seconds as soon as the PLAY button is 
pressed in the stop mode. 

4 Digital Auto Tracking Control 

The optimum playback picture is automatically obtained. 

5 1-month 6-event Programmable Timer 

Up to 6 programs for single-event, daily or weekly recording can be 
preset. 

6 Capable of Receiving up to 155 TV and CATV Channels 

The built-in frequency synthesized tuner enables reception of up to 

155 TV and CATV channels. 

7 Fully Automatic Tape Operations 

Auto power on, auto play start, auto eject/power off and auto cancel 
operations are provided. 

8 Line Input Jacks on the Front Panel for Handy Connection 

The input jacks on the front panel are convenient when recording 
from a video camera or other portable video equipment. 

9 Timer Recording via the Line Input Jacks 

10 Quick Timer Recording 

Recording and setting the recording duration (up to 4 hours in units 

of 30 minutes) can be activated simply by pressing the quick timer 

recording button. 

11 Worldwide Power Supply System (Auto Voltage) 

The unit can operate on 100 - 240 V AC, 50/60 Hz. 

12 On-screen Display 
13 Two Search Systems 

The index search and intro search systems allow you to locate the 
desired program easily. 

14 Function Memory 

When the PLAY, EJECT, TIMER REC or POWER button is pressed 
within 2 seconds after the or button has been pressed, the 
VCR fast-forwards or rewinds to the end or beginning of the tape and 
enters one of the respective operation modes. 

15 Capable of Playing Back NTSC Tapes 

The unit can play back NTSC tapes with the TV for the M-PAL color 
system by converting the NTSC signal to the M-PAL signal. 

16 Memory Back-up for 60 Minutes 

1 With this video cassette recorder, use only cassettes marked 

2 This video cassette recorder is designed to receive TV pro-

grams and to record and play back the signal in the M-PAL color 
system. Playback of the tapes using the NTSC color system is 
possible. 

3 Audio-visual material may consist of copyrighted works which 

must not be recorded without the authority of the owner of 
copyright. Please refer to the relevant laws of your country. 

To reduce the risk of fire or electric shock, do not expose this appliance 
to rain or moisture. 

1) Do not attempt to open the cabinet. There are no parts inside you 

can service yourself. Refer all servicing to qualified service person-

nel. 

2) To ensure reliable operation and to protect the unit from overheat-

ing, the ventilation slots and openings must not be blocked or 
covered. Avoid placing in enclosed spaces such as a book case 
unless there is adequate proper ventilation. 

3) Keep the unit away from radiators and heat sources. 
4) Avoid using near strong magnetic fields. 
5) Do not push objects of any kind into this unit through the cabinet 

slots as they could touch current-carrying parts or short-circuit 
parts resulting in fire, electric shock or damage to the unit. 

6) Be careful not to spill liquid of any kind on this unit. If liquid is spilled 

into the unit, consult a qualified service engineer. 

7) Use this unit in a horizontal (flat) position only. 
8) If the picture or sound is affected, keep the unit away from the TV. 
9) Install the unit more than 1 m away from a radio or receiver. 

Otherwise, noise may occur during radio reception. 

10) Do not place heavy objects on the unit. This may damage the 

cabinet or cause trouble in the unit. 

11) Unplug the unit from the AC outlet when it will not be used for a long 

period of time. 

12) When there is lightning, unplug the unit from the AC outlet imme-

diately. Never touch the antenna wire during lightning. 

Note on Condensation 
Moisture condensation may occur inside the unit when it is moved 

from a cold place to a warm place, or after heating a cold room or 
under conditions of high humidity. If the tape is played back in this 
condition, the unit and the tape may be damaged. Do not use the unit 
until it has warmed to room temperature and moisture has been 
evaporated completely. 

If moisture condensation occurs, remove the cassette, set the 
POWER button to ON. and leave the unit for about two hours to 

eliminate condensation. Afterwards, normal operation should be 
possible. 

Summary of Contents for HV-BR3000

Page 1: ......

Page 2: ...in the M PAL color system Playback of the tapes using the NTSC color system is possible 3 Audio visual material may consist of copyrighted works which must not be recorded without the authority of the...

Page 3: ...sinal no sistema de cor PAL M poss vel a reprodu o de fitas gravadas no sistema de cor NTSC 3 Certos programas de udio e de v deo podem estar protegidos pelos direitos autorais A grava o de tais mater...

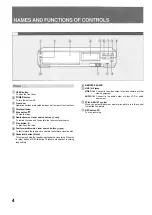
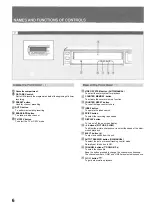
Page 4: ...ch button To fast forward the tape and to operate the forward visual search Pause still button To temporarily stop the tape during playback or recording Press the play button or REC button to resume p...

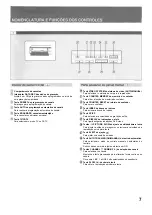
Page 5: ...menta o Para desligar ligar a unidade Painel frontal As teclas de opera o encontram se no interior e na parte posterior do painel frontal Mostrador 5 Tecla de parada Tecla de rebobinagem busca visual...

Page 6: ...eset the tape counter to zero INDEX button To operate the index search SP EP button To select the recording tape speed DISPLAY button To turn on off the on screen display buttons PICTURE SLOW To adjus...

Page 7: ...do contador Para zerar o contador Tecla INDEX de busca de ndices Para acionar a busca de ndices Tecla SP EP Para selecionar a velocidade de grava o da fita Tecla DISPLAY de indica es na tela Para liga...

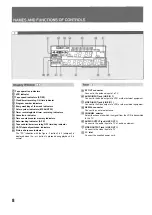
Page 8: ...ith the figure 3 softest to 3 sharpest is displayed when the or button is pressed during playback 0 is normal RF OUT connector Connect to the antenna input of a TV AUDIO INPUT jack LINE IN 1 Connect t...

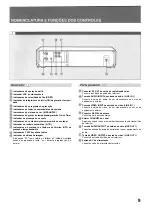
Page 9: ...ifusa a 3 n tida mostrada quando se pressiona a tecla ou durante a reprodu o 0 normal Conector RF OUT de sa da de r dio freq ncias Conecte entrada de antena do televisor Tomada AUDIO INPUT de entrada...

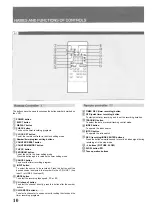
Page 10: ...button To select the recording tape speed SP or EP CH channel button To select the channel directly press this button after the number buttons CH CURSOR buttons To select a channel or to use as cursor...

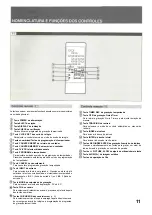
Page 11: ...rel gio Para ajustar o controle remoto ao modo de acerto do rel gio Teclas num ricas Teclas de programa o do temporizador Tecla COUNTER RESET de reinicio do contador Tecla COUNTER MEMORY de mem ria do...

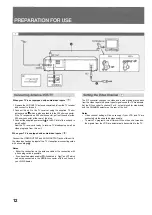
Page 12: ...jacks of this unit to the video input and audio input of the TV Use optional connecting cords with phono plugs Notes Either the connection via the antenna cable or the connection with phono plug cord...

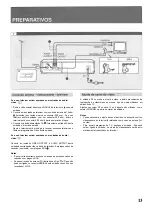
Page 13: ...unidade s entradas de v deo e udio do televisor Empregue cabos de conex o opcionais com plugues RCA Notas poss vel realizar tanto a conex o via cabo da antena ou cabos de conex o com plugues RCA Se po...

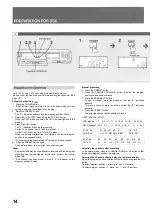
Page 14: ...esetting due to weak signals In this case perform the manual presetting If no channel has been preset in step 2 2 will appear on the program position display Manual presetting 1 Press the PRESET butto...

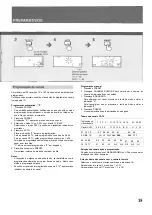
Page 15: ...ais poder n o ser satisfat ria com a programa o autom tica por serem fracos os sinais Neste caso efetue a programa o manual Se nenhum canal n o foi programado no passo 2 2 aparecer no indicador do n m...

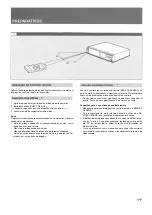
Page 16: ...troller toward the infrared REMOTE SENSOR on the front of the VCR and press the button on the remote controller A beep sounds on the VCR to indicate that the control signal is accepted If no beep soun...

Page 17: ...olongado Aponte o controle remoto ao sensor remoto REMOTE SENSOR na parte frontal do videocassete e pressione uma tecla O videocassete soar um sinal indicando a recep o do sinal de controle Se n o soa...

Page 18: ...CURSOR A button to skip the year setting The year can be set from 1990 to 2009 Example to select 2001 press buttons 0 and 1 6 Press buttons 1 and 0 to set the hour 7 Press button 0 twice to set the mi...

Page 19: ...ano pode ser acertado entre 1990 a 2009 Exemplo para selecionar 2001 pressione as teclas 0 e 1 6 Pressione teclas 1 e 0 para acertar a hora 7 Pressione tecla 0 duas vezes para para acertar os minutos...

Page 20: ...rature and the moisture has evaporated Avoid direct sunlight extreme heat high humidity magnetic fields and dusty places Do not drop the cassette or subject it to vibrations Do not touch the tape with...

Page 21: ...o temperatura ambiente e de que tenha se evaporada a umidade Evite exposi o direta aos raios solares muito calor alta umidade campos magn ticos e locais empoeirados N o deixe cair o cassete ou sujeit...

Page 22: ...Automatic Functions Automatic power on When a cassette is inserted the unit will automatically turn on Automatic play When a cassette without its erasure prevention tab is inserted playback will start...

Page 23: ...fun es autom ticas Ativa o autom tica A unidade liga se automaticamente quando da inser o do cassete Reprodu o autom tica A reprodu o ser iniciada na inser o de um cassete sem ling eta de seguran a E...

Page 24: ...motion playback is released after about 5 minutes to protect the unit from damage The unit automatically adjusts tracking during slow motion play back However some noise may be present when viewing t...

Page 25: ...rca de 5 minutos para proteger a unidade contra avarias A unidade ajusta automaticamente o rastreio durante a reprodu o em c mera lenta Por m aparecer um pouco de chuviscos na reprodu o de fitas grava...

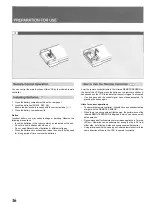
Page 26: ...he AUTO TRACKING button after 5 seconds or more Picture Sharpness Adjustment During playback press the or button to adjust the sharpness in 7 steps The picture sharpness indication is displayed on the...

Page 27: ...AUTO TRACK ING passados 5 segundos ou mais Ajuste da nitidez da imagem Durante a reprodu o pressione a tecla ou de modo a ajustar a nitidez em 7 graus A indica o da nitidez da imagem mostrada na tela...

Page 28: ...forward direction can be searched Searching for an index signal 1 Insert a cassette with index signals 2 In the stop playback fast forward or rewind mode press the INDEX button repeatedly until the d...

Page 29: ...inais de ndice tanto busca progressiva como regressiva Busca de sinais de 1 Insira um cassete com sinais de ndices 2 No modo de parada reprodu o avan o r pido ou rebobinagem pressione INDEX v rias vez...

Page 30: ...ss the button If you want to edit out some material during recording 1 Press the button 2 To resume recording press the REC or button Notes To prevent the tape damage avoid leaving the VCR in the paus...

Page 31: ...a grava o pressione Se deseja cortar certos trechos durante a grava o 1 Pressione 2 Para retomar a grava o pressione REC ou Notas Para evitar estragos na fita evite deixar o videocassete no modo de pa...

Page 32: ...ters one of the respective operation modes 1 Press the button to stop the tape 2 Press the or button 3 Press the following button within 2 seconds When the PLAY button is pressed the play indicator li...

Page 33: ...essione para parar a fita 2 Pressione ou 3 Pressione uma das seguintes teclas dentro de 2 segundos Se pressionar PLAY aparece o indicador de reprodu o na tela do televisor Se pressionar EJECT aparece...

Page 34: ...r buttons 0 9 0 0 and 5 to set the ON time 8 Press number buttons 1 1 1 and 5 to set the OFF time 9 Press number button 1 or 3 to select the tape speed SP or EP 10 Press the PROGRAM button To preset a...

Page 35: ...rtar o dia 7 Pressione as teclas num ricas 0 9 0 0 e 5 para acertar a hora de in cio ON 8 Pressione as teclas num ricas 1 1 1 e 5 para acertar a hora de t rmino OFF 9 Pressione a tecla num rica 1 ou 3...

Page 36: ...contents overlapped blink on the TV screen When the quick timer recording see page 40 and an automatic timer recording program overlap the quick timer recording has pri ority 36 1 Press the TIMER REC...

Page 37: ...rava o Quick Timer veja p gina 41 e um programa de grava o temporizada sobreporem se a primeira ter prioridade 1 Pressione TIMER REC de modo a desligar o indicador 2 Pressione POWER 3 Pressione CHECK...

Page 38: ...e the preset timer ON time To activate the data recording function set the DATA REC switch inside the front door to ON before setting the timer recording program Notes Data recording cannot be activat...

Page 39: ...undos antes da hora de in cio da grava o temporizada Para ativar a fun o de grava o de dados ajuste DATA REC no interior do painel em ON antes de programar a grava o temporizada Notas A grava o de dad...

Page 40: ...30 minutes up to 4 hours or the end of the tape See Setting the recording duration below The recording duration indication decreases as the recording pro gresses When 0 00 is reached recording stops...

Page 41: ...do aparecer 0 00 Notas Se inserir um cassete sem a ling eta de seguran a o mesmo ser automaticamente ejetado quando se pressionar duas vezes a tecla QTR Se o rel gio n o estiver ajustado a grava o Qui...

Page 42: ...OR button on the remote controller so that the L2 or L1 indication appears in the display window 3 Set the connected equipment to the playback mode and this unit to the recording mode 1 Connect anothe...

Page 43: ...UTou CH CURSOR no controle remoto de modo que L2 ou L1 apare a no mostrador 3 Coloque o equipamento fonte em modo de reprodu o e esta unidade em modo de grava o 1 Conecte um outro videocassete em LINE...

Page 44: ...s not connected The POWER button has been pressed to turn the power off The TIMER REC button has been pressed to activate the timer The CHANNEL sclcctor is not set to the proper channel The connecting...

Page 45: ...o canal reservado ao videocassete Verifique as conex es Limpe o cabe ote de v deo Ajuste AUTO TRACKING em ON ou em MANUAL e mantenha a pressionada at obter a melhor imagem poss vel Ajuste o canal res...

Page 46: ...unbalanced Horizontal resolution 230 lines nominal SP mode Video S N luminance 43 dB nominal SP mode Audio input 8 dBs 47 kohms Audio output 6 dBs 2 2 kohms Audio frequency response 200 Hz 8 kHz Audio...

Page 47: ...do v deo 1 0 Vp p 75 ohm desequilibrada Resolu o horizontal 230 linhas nominal modo SP Rela o sinal ru do v deo lumin ncia 43 dB nominal modo SP Entrada do udio 8 dBs 47 kohm Sa da do udio 6 dBs 2 2 k...

Page 48: ...80 JU2 911 01 900510 ATM Y Printed in Japan AIWA Co Ltd...

Reviews: