

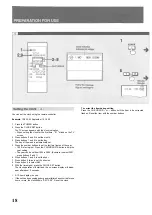

Up to 155 TV and CATV channels are automatically preset.
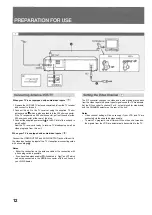
Be sure to set the video channel before presetting the channels. (See
page 12.)
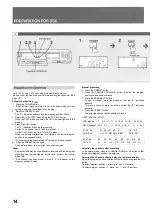
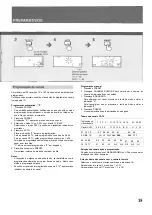
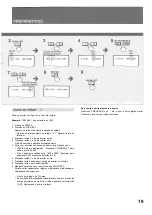
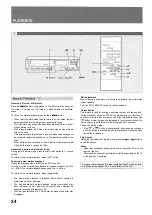
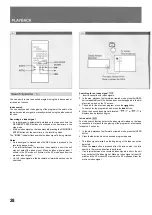
Automatic presetting
1 Press the POWER button.
• If the unit is on, make sure that it is not in the timer setting nor clock
setting mode, and that a tape is not running.
2 Press the PRESET button.
The "P:" indication appears and the program position blinks.
3 Select the TV or CATV mode using the TV/CATV button.
When the CATV mode is selected, the CATV indicator lights up in the
display.
4 Press the AUTO button.
The "P" indication blinks while presetting.
For the TV channels, from 2 to 69 are preset.
For the CATV channels, from 1 to 99 are preset.
When the automatic presetting is completed, the lowest program
position to be received blinks.
"A" shows a stored channel and "E" shows an erased channel.
5 Press the PRESET button again.
The display window returns to the tape counter mode.
Notes
• Some channels may be unsatisfactorily received with the automatic
presetting due to weak signals. In this case, perform the manual
presetting.
• If no channel has been preset in step 2, "2" will appear on the
program position display.
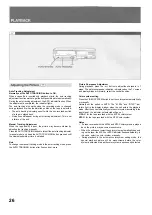
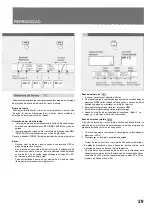
Manual presetting
1 Press the PRESET button.
2 Press the CHANNEL DOWN/UP button to select the program
position to be added or erased.
3 Press the ERASE/ADD button.
To add a channel, press the button so that the "A" indication
appears.
To erase a channel, press the button so that the "E" indication
appears.
4 Press the PRESET button.
The selected channel will be added or erased.
CATV channel chart
Selecting the channels after presetting
In the normal mode, press the CHANNEL DOWN or UP button so that
the desired program position is displayed.
Selecting the channels directly using the remote controller
Select the program position with the number buttons and press the CH
button.
To select program position 1, press the 1 and CH buttons.
To select program position 11, press the 1, 1 and CH buttons.
VCR display
CATV channel
37 38 39
AA BB CC
66 67 68
15 16 17
1 2 3 4.... 11 12 13 14 15 16.... 34 35 36
5A 2 3 4.... 11 12 13 A B C.... U V W
....57 58 59 60 61 64 65
.... UU VV WW AAA BBB EEE FFF
92 93 94 95 96 97 98 99
41 42 43 A-5 A-4 A-3 A-2 A-1
14
Summary of Contents for HV-BR3000
Page 1: ......
Page 48: ...80 JU2 911 01 900510 ATM Y Printed in Japan AIWA Co Ltd...


